Saturday, June 30, 2012

Nature Shots

Alright, sadly, still no progress on the house. I've either been too busy on weekends, or the heat has been insufferable.

To pass the time, I thought I would share some recent photos I took while at work. As most of you know, I work at a high-end custom kitchen/cabinetry shop. The shop is on the same property as my boss' home, and the property is several acres. He keeps the vast majority of it in very good shape, and I decided to walk down to the woods the other day on my lunch break (since the heat was not too bad that afternoon).

I purposefully avoided photos that included the shop or house.


The main "lawn" closer to the back of the property:


The first little section of trees are all trimmed low, then there's a stream with a metal bridge to cross it.


Past the bridge, the small shrubbery is all trimmed (quite far in), but the ground has full coverage in low plants, mostly ferns, and a ton of spotted jewelweed (see lower).


Jewelweed (not yet in flower). The juice from these can be used to counteract poison ivy/poison oak.


My favourite shot. It looks like light is shining up onto the branches (like with a mirror or something reflective), but it's coming from the top, and through the leaves.


I have Monday off (for Canada Day), so hopefully I'll do something productive.

Tuesday, June 19, 2012

Banquet Lamp

My father, over the weekend, gifted me his antique banquet lamp. He's had it for as long as I can remember, and it used to be in the bedroom. It's a rather large and ornate lamp, and the base is made of "Brittania" metal (aka pot metal, white metal, etc) painted to look like brass or gold. It has the original shade and chimney, but it has unfortunately been electrified in a destructive way (meaning it can't really be switched back to oil burning since they drilled a hole in the oil reservoir).

The only other flaw is a chip on the shade at the top.

I'm not sure where I'm going to put it yet, but it will probably end up on an antique dresser in the guest bedroom, or possibly in the living room.


The floral design is hand painted. The main design is large, but there's a small single flower centered on the back as well.

Sunday, June 17, 2012

Update + Flooring News

I think I hear crickets. Sorry it's been a while, but not much has been going on with the house lately.

I bought wood and other parts to fix up the porch, but I haven't started working on it.

This weekend I was busy with Father's Day, next weekend I'm going out of town for the St. Jean Baptiste celebrations in Quebec, and the weekend after that will be my friends' annual summer BBQ and anniversary party AND Canada Day.

It seems like in no time flat the summer will be over.

There's a whole bunch of things I really want to do this summer, like redo the garage roof, and the fascia around the house, but I don't know if I'll have the cash. I just finished paying off a whole slew of dentist bills (I found out I had a handful of cavities).

So yeah... I can at least do the porch, and possibly block-off squirrel access to the house (I know where they're coming in).

One of the main reasons I wanted to write this post, however is because my dad gave me renewed hope for my floors. I told him about all the urine stains, and apparently when they first got the house, the floors there were the same. Apparently it all came out when they sanded and refinished the floors. He said he used a drum sander.

Monday, June 11, 2012

The Vanity Thus Far

As I mentioned the other day, I'm well on the way to getting the vanity done. I did a bit more sanding (though a surface sander) this afternoon, and I took a few extra photos.

This is the wood I started with. It's hard maple (sugar maple), and it's figured with ripples, as well as some bird's eye. All 3 boards are a bit different.


Some of the figuring in the wood is very prominent, while other sections are very soft and subtle.


I did not use any kind of plan for this vanity. It's all designed "on the fly" based off years of experience, and going by the measurements I needed. The front is 32 1/4" wide (to end at 33 when you count my door casing), and it's 33 high (to end roughly at 34" once the top is on it). It's 20" deep.

I made a very quick life-size drawing on the CNC table, and then I started cutting.

Front:


Side:
The side dimensions (very large bottom board) are made to line-up perfectly with the bottom door stile, and the top door stile, so that it looks like a continuous line around the cabinet (you can see this farther down).


This is the front face frame. It's just assembled with 3/8" dowels and glue. You'll note that the right hand side is cut funny. I made it this way to keep the proportions. The overall effect should be nice once the base (toekick) is attached.


Doors ready to be glued-up.


You can see the effect I was talking about earlier, where the side panel lines up with the top and bottom door panels. The side panel is just plain (not fancy, and no raised panel). Many old dressers and furniture were done this way, and I didn't want to go crazy since the cabinet will already be pretty "busy" looking. Also note that the right hand side is narrower because the face frame will be glued against it, and so the thickness of the front will make both sides identical widths.


Basically, the wide side on the right will be up against the door casing for the bathroom, and the panel side will be next to the toilet. The interior boards will just be plain maple veneer particle board sheets, and it will have a decorative base around the bottom (open at the front), and it will have a small detail moulding (ogee) around the top just under where the counter top will rest.

Stained Glass Panel

Alright, I've been dying to photograph this and show you guys. Like I said, it's in terrible shape, but I am confident that I can fix this.

As usual with any new medium, I've been doing a whole lot of research about stained glass, methods, restoration techniques, and online videos, tutorials, tools, etc.

I should be able to fix this panel with a tool investment of under 100$, plus the stained glass, assuming I can find near perfect matches for each type that's missing.

At first glance, the panel looks rather simple, having only 3 colours, but each section and each colour has a different texture. The purple is bumpy, the yellow is kind of sandy, and in the clear, there are at least 4 textures. The circles are deep pitted squiggles, the exterior border is chip glass (which looks like frost), and then the interior leaves have a wavy pattern.

I LOVE the beveled glass in the centre.

Photos! All of these are photographed in "as found" condition, including all the dirt, grime, and bits falling out.


The entire panel looks like someone sat on it. It's caved-in so much that I'm pretty sure I won't be able to straighten it to take a rubbing/pattern from it.


I should note right now that to fix this panel, it has to be completely torn apart (tear out all the lead came), and each piece of glass needs to be cleaned or repaired, new pieces cut, and then the entire panel needs to be re-leaded from scratch, then soldered. After that's done, it also needs to be cemented, cleaned, and polished. I'm also going to need to make a completely new wooden frame since this one is badly rotted.


This photo shows all the pieces that are broken or missing. Some of these can be reglued, others are too badly damaged and need to be replaced. I count at least 28 broken/missing pieces. It looks like I missed one at the top, but I have that piece (it fell out).


The next post (in a few minutes) will show the vanity so far.

Saturday, June 09, 2012

Stained Glass Find

I went to a few yard sales on foot this morning. Two of them were total junk, but on the way to the third, I spotted a gorgeous old stained glass panel being thrown out. It's in really rough shape, though. It has many broken pieces, and several missing ones too. The lead came is also very distorted, bent, torn, and all the cement in the joints is falling out. This means that the entire window would need to be completely disassembled, and all new lead installed. I've always wanted to try doing some stained glass, so it looks like I just might get my wish.

It's mostly clear glass in different frosted and textured patterns, but it has a light purpleish-pink border, and another band (and highlights) in a very pale lemon yellow. The centre piece is a very thick beveled glass in sort of a shield shape.

Again, if I had my camera, I'd share the pictures, so that will have to wait.

I'm really hoping that I can closely match some of the missing and broken pieces, but this won't be easy since there are no stained glass shops in town.

Friday, June 08, 2012

Vanity (Fail)

So I just got back from work a bit early (but I got a ride into town, saving me over an hour long walk otherwise). I got quite a lot done on the vanity. I have the left side done (a "shaker" panel side), I have the face frame done, and I also just finished gluing-up the two triple panel doors. Basically, all the complicated and time consuming jobs on it are done.

What's left to do:

- Cut a back, bottom, and right side.
- Route and cut the toekick (the skirt or baseboard that wraps around the base).
- Fit the doors.
- Mount hardware/doors.
- Assemble everything.
- Finishing.

Now you're probably wondering why this post is a "fail" post. Well, I took all kinds of nice photos of the vanity in progress, but I went and forgot my camera at work (which will bother the hell out of me for the entire weekend since I feel naked without it).

So yeah, you guys will have to wait until Monday night before I can post photos.

Thursday, June 07, 2012

Office Birch Floor Update

Just a quick update about the Office room floor. The scraping is going decently well. Many have suggested water, and it didn't really do much, other than make a mess. I also discovered a rather unpleasant mess under the glue. Piss stains. And LOTS of them. I have to assume they're from a dog? There's no smell, but the floor boards are pretty badly stained on the entire centre of the floor. I've done a bit of quick reading and the only good suggestion that I found was to soak the floor boards with Hydrogen Peroxide overnight. Has anyone tried this with success? The floor is pretty much bare wood, so it should absorb the peroxide. I just don't know if it's going to improve things.

If all the floors are like this, I'll have to come up with a fix. I'd really hate to rip it all out and start over, but I'll keep that as a last option. Other ideas would be a dark stain (even though I'd REALLY prefer the nice honey gold/amber colour of the birch), paint (ugh), etc.

Starting The Vanity

We started working on a kitchen the other day at work. While my coworker was taking some maple boards down, I spotted one that was just simply amazing. The co-op student also pointed it out, and I decided that I'd set it aside and buy it for my own projects. There were also another 2 similar boards and I set those aside as well.

I decided that I'd use these for the vanity (and keep the rest for some other project). The wood is special because it's a few highly figured boards with a mix of burl, waves, curls and maybe even a bit of bird's eye. Basically, the wood is insanely busy and curly looking.

I was thinking of posting a link to similar photos, but I'm going into work tomorrow (on a day off) to build most of it, and I'll just take some photos then, so stay tuned!

Basically, I want fancy triple-panel doors on the front, and a single flat panel on the side (only one side will be showing the other will be against the wall).

Saturday, June 02, 2012

Lucky Break?

I started scraping the glue (mainly out of boredom), and it's coming off pretty easily. It's a bit hard on the hands, but in a few hours I did 1/4 of the room. The floor actually looks really good. I might not even have to sand it (other than lightly by hand).


Side by side comparison of scraped/unscraped:


What got done so far:

Office Floor Demo

Alright, I'm sure I'm not the only one, but I LOVE demolishing things. I've really been itching to tear out all the crappy laminate and sub-floor (plywood) on the main floor (Office, Living Room, Dining Room).

I started tearing out a few of the laminate "boards" last night (even though I still had the bed and the computer desk in the room). So this morning (just a few hours ago), I removed the bed, and other items from the room, but I left the computer desk (which is currently just a folding card table), and a rolling "under-bed" box full of art and paper (it weighs a ton and I can't lift it alone).

Lucky for me, they had a lot of pieced-together sections for the sub-floor, and I was able to just move things over to pull out the floor. I was also lucky that the plywood pieces were just barely tacked down with a few nails (6-7 on a 4x8 sheet).

The only down sides are that the floor is coated in adhesive (looks almost like dried yellow glue, but I'm sure that's not what it is, and that the floor gaps are fairly large in places (most are 1/8 with some as large as the full tongue ~3/8).

Otherwise the floor isn't too butchered (I know for a fact that the dining room floor will need a bunch of repairs). There's one place with a saw cut about 12" long, but it's with the wood grain and I can putty it and hide it.

I also pulled the rest of the baseboards.

Here's where I decided to grab the camera. 90% of the laminate is off (some left at the bottom), some foam sheets still there, and 1/4" plywood showing.


First peek at the original birch hardwood floor. Note that there was also a sheet of 1/4" fiberboard (similar to a light MDF) under the 1/4" Fir plywood. Neither was hard to remove, with just a few ribbed drywall nails holding it down.


Two detail shots where you can see the adhesive, and the original orangey birch peeking through. You can clearly see that this stuff was spread thinly with a notched trowel. I have no idea if this was for some kind of carpet, linoleum, or laminate.


Here you can see where I just dragged the desk over. You can also see the new phone and cable outlet that I had installed months ago for the PC hookups and/or TV if this later becomes a media room (or if I switch back to cable internet).

Eventually I'd like to get one of those big old oak desks for the computer. The kind that's made of nice wood and built to last.


All the plywood removed, but one piece of baseboard left. Also note that the original paint colour in this room was a very deep reddish brown. Almost a crimson. It was also painted before the baseboards were put in, since you can see the brush marks. Yep, that's right! The entire room/house would have originally been painted with a 4" bristle brush. Pretty wild that paint rollers weren't around at that time yet. I also can't quite imagine how dark this room would have looked. Dark red with dark orange woodwork, and a deep reddish brown ceiling to match (the beadboard ceiling were dark reddish-orange brown).


Some areas are bare wood, others have some kind of papery residue, and there's traces of adhesive everywhere.


Overall the floor isn't too bad. It's not nearly bad enough that I'd cover over it again, but I definitely want to try to fill the gaps with something before refinishing them. I know the filler will likely crack or crumble, but I really want fewer gaps in the main floor. Upstairs bothers me less because it's painted and will get less traffic.

Friday, June 01, 2012

Bedroom Furniture

It's been over 2 years and I finally have a bedroom with furniture in it! My good friend Devin came by this morning to help me bring up/move a few pieces into the room.

I have a 5 piece set of bedroom furniture in solid walnut that I've had since I was a kid. My father (also an antiques lover) bought the set from an old lady down the street probably in the late 70s or in the 80s. My brother and I used (and lightly abused) these pieces since we were kids.

I spent a good hour last night and this morning, going over the pieces with a dark brown gel stain to help camouflage some of the scratches and dings. The chair and stool are pretty bad. I've thought about refinishing the set a few times, but I always end up thinking it would be a terrible idea and ruin 90% of their value.

The set has a tall (man's) dresser, a large (woman's) dresser with a mirror (the kind that weighs a ton), as well as a vanity (also with mirror, but I've never used it, and I've never seen the piece with the mirror attached - but I have it), and there's a bench, and a chair that probably goes with the vanity.

For quite a while I remember that the dresser with the mirror was in my parents' bedroom, and we used the tall dresser in our room (my brother and I). The left hand side was mine, and the right side was his. Socks were on top, then undies, and regular clothes in the next 3. I don't really remember where the vanity was, but I ended up using it in my bedroom when we finished the upstairs at my old house.

I also have an antique single bed, but it's older, and it doesn't match the set. You've seen bits of it in the Office photos. That bed will go into the guest bedroom (eventually) with other mismatched (antique) pieces.

So far, I've brought-in the tall dresser, and the long one with the mirror. I could also easily fit the vanity, but I think I want to put that one in a different room (more on that below).

Here is the large dresser with the mirror. It's been years since I've used the mirror (I last used it with a mirror prior to 2003), since it looked better without it at the apartment. I'm glad to see that it looks rather nice like this in this setting.

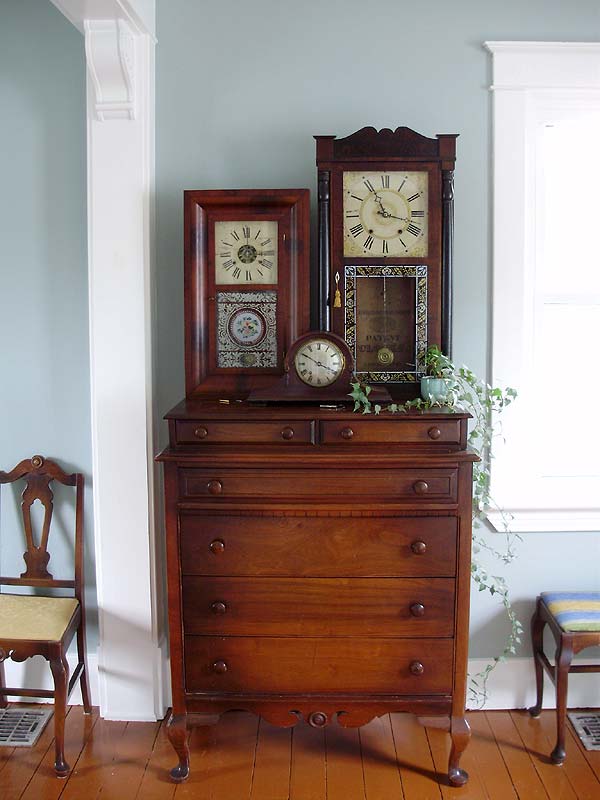
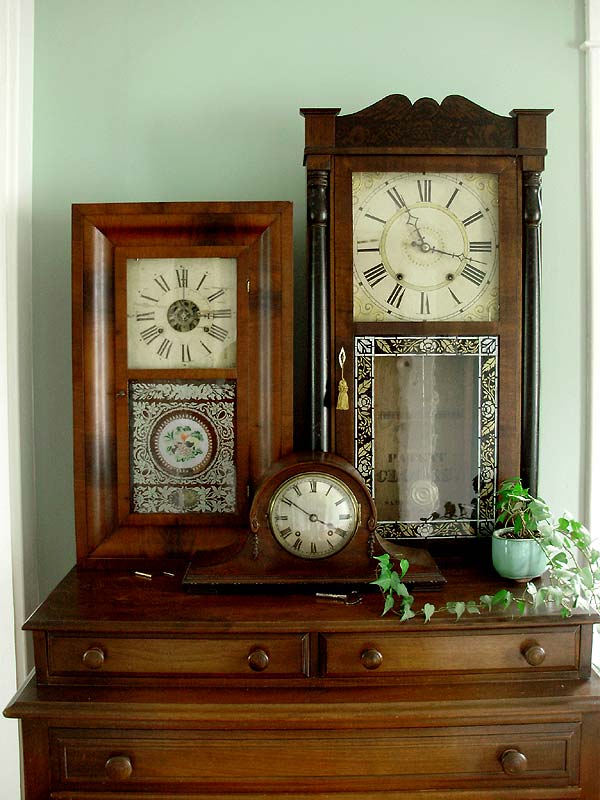
Side note: Now that I have some furniture in place, I can display a few of my clocks. I cleaned the dust off of them and fished the missing parts out of storage (pendulums, keys, weights, etc). These may get changed around later, but I just grabbed a bunch that would look nice for now.


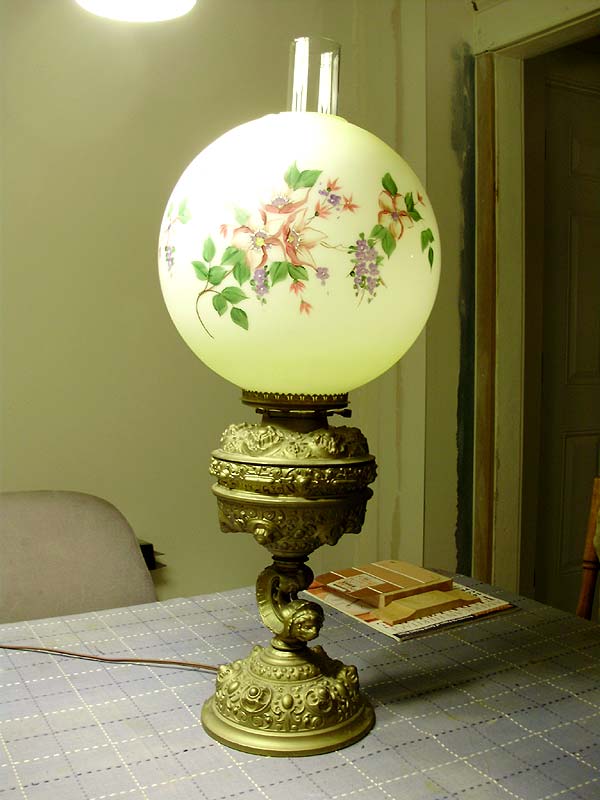
Tall dresser (my favourite piece), with one of my nicer clocks on it (the big one). Note that it's not finished, since the centre of the glass should show a painting rather than be clear. The top is also just sitting in place since it broke off during the move in 2010. The large clock dates from the 1830s.


I rather like this upholstered chair (a 20$ yard sale find), but it may or may not stay in this spot. I am currently thinking about having some kind of tall bookcase or armoire against this wall (rather than having the vanity, since it will line up with the edge of the window and it might look awkward).


Another view:


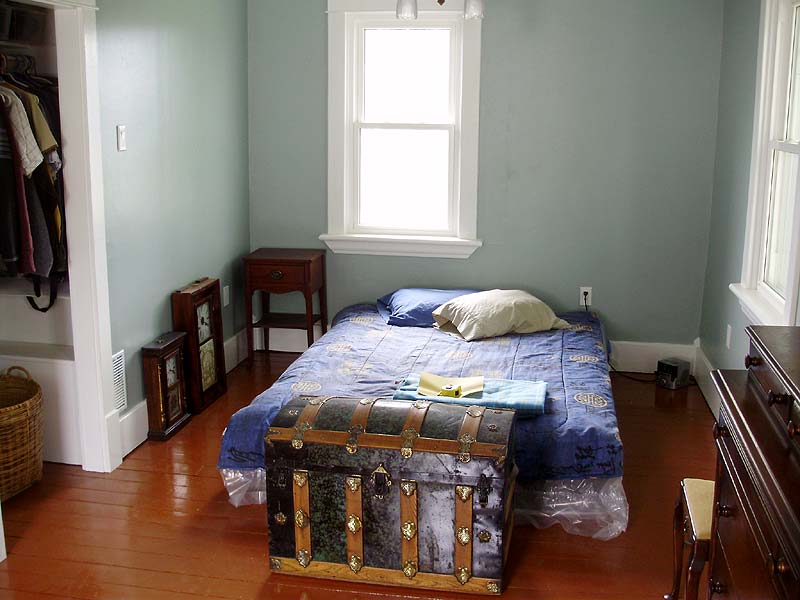
The other half of the bedroom has changed around already. I originally (and still) wanted the bed centered under the window on the right, but I also really want my old trunk (treasure chest) at the foot of the bed. There's not nearly enough clearance with the bed under the window, so I had to put it like this. It works fine like this, but I'm not really digging the asymmetrical look.

The two clocks on the floor will probably find a home on a shelf on the wall (just above where they're sitting.


Thoughts? Comments? Ideas?

I'm looking for curtain ideas so far. I'm 95% sure I know what I want, but I'm not at all sure about the colour(s) or pattern.

A big part of the reason I bought this house was because of the beautiful casings. That said, I don't want to use curtain rods with long curtains (tab curtains, for example). I love the look of tab curtains, and I own quite a few from my apartment days, but I want something more along the lines of this:


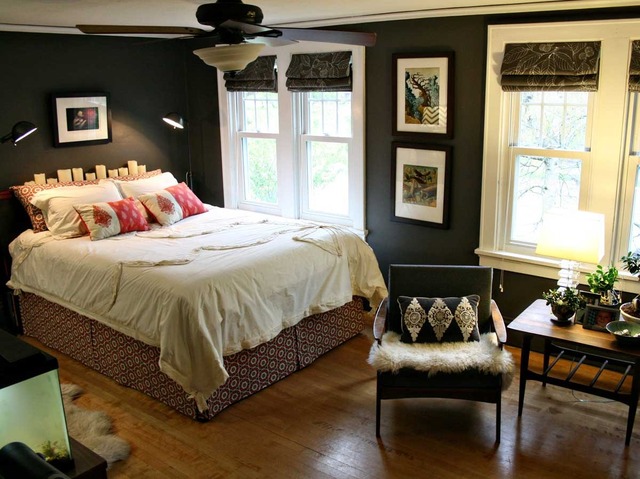
My favourite ones are the ones in the third photo. I like the idea of bamboo, but I'll need something to really block-out the light.

I was thinking of going with something neutral like a beige or a light brown with a subtle pattern, but I also really like the look of the ones with the border. Thoughts?

Please note that I'm not really interested in buying pre-made curtains for these windows. I'm planning to hand-sew my own Roman shades from scratch. HOWEVER, if you have an online source for nice (preferably cheap) fabric, I'm all ears!