Showing posts with label Porch Door. Show all posts

Sunday, October 14, 2012

The Great Big Porch Reveal! Finally!

Well, several months' worth of work has come to an end for the year. I won't even pretend like there isn't still a TON of work left to do on the porch, but the part that shows the most is done, and it looks pretty again.

Here's a photo from back in May 2012, as a starting point.


And this is how it looks NOW!
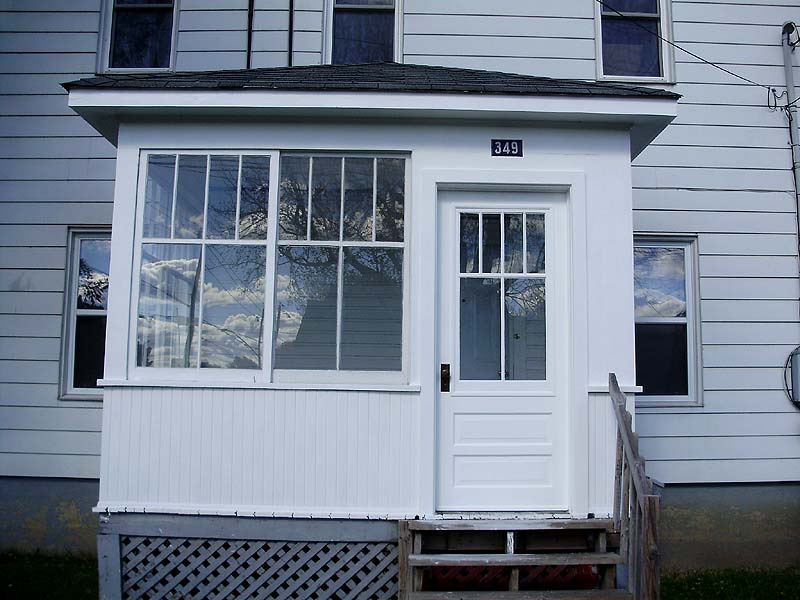


Getting up to this point was no easy task. It involved many steps, including some demo, rebuilding the door jamb, replacing the exterior wood t-g, lots of puttying/silicone/gap-filling, and tons of painting.

The last few updates that I made on the porch were several months back, and included the removal of the old aluminum siding, and the beginning of replacing the t-g. You can visit those posts here:

New Mattress & Last Week's Work on the Porch - May 26th
Ongoing Porch Repairs - August 7th
Porch Restoration Progress - Aug 11th
Porch Door Rehab - August 18th
Porch Progress Thus Far - August 19th
Porch Painted (First Coat) - August 26th
Porch Door - September 3rd
Porch Door Update & Misc. - September 8th
Painting - October 8th

Alright, assuming you're all caught-up, here's where I last left you guys hanging.

I had been itching to scrap this atrocious (and damaged) aluminum screen door ever since I bought the house. Taking it off, and tearing out all the ugly 2x4s and other scrap wood blocks from the original opening was a great moment for me in this reno.


The door only stayed there for a few hours. I know someone took it for the metal, but I really didn't want to deal with it (having to take it across town to the scrappers). I was happy to see it go.

In the process (removing the door and added wood), I discovered that the original porch door was hinged on the interior, and opened on the opposite side (which makes a HELL of a lot more sense. I had noticed the hinge notches (holes) before, but I wasn't sure if they were added later, or from a second door. But there was only ever one door.

The problem with the door jamb, however, was that it was damaged, as well as coated in thick flaking oil paint (bright yellow). So I decided to start fresh and build a new door jamb the same as the original.


I also decided to replace the door casings, since I did not want them notched around the window sills (as they were originally - even though it looked kind of stupid this way).


I thought about changing the style of the casing, or dressing it up a little bit, but in the end, I decided to keep it very close to the original, which is very very plain.

Once I had my jamb in place, I hung and fitted the door frame, which had been completely reglued and reassembled (and partially sanded).


At this point, I painted the first coat, since I was getting tired of dealing with the plastic tarps/weather.


It was at this point where I had dropped the can of shellac sealer all over the steps/floor and all over myself (see "Porch Painted (First Coat)" above).


Before I did the second coat, I bought and installed the bottom trim moulding. This was not the moulding I originally planned to use, but the one I wanted was too wide, and the boards along the front edge of the porch are uneven. This would have looked really bad with the wider moulding.

It was a tedious pain in the rear end to hand-fill each and every little triangular opening in the t-g without making a mess/blobs.


Once the silicone (acrylic paintable DAP) was dry, I gave the mouldings a quick seal and first coat before painting a second coat over the entire porch.


You might notice that I did not yet add the top mouldings yet. This is because I'm planning to completely replace all the sills next year.

A lot of prep (not shown) was done on the porch before painting, including some gap-filling along the crown moulding, under the fascia edge, and in a ton of nail holes and the occasional small knot.


Fitting the mortise lock took quite a while, since I used a traditional brace (old crank-style drill) and chisels. Probably a few hours' worth of work by itself. The lock/handle/knobs are a salvaged set (ie: FREE!)


Although fitting a strike plate might seem like a difficult job, this was actually REALLY easy (for me), and I got amazingly nice results (nice crisp outline). All I did was face-screw the plate to the wood, score the wood around the perimeter with a blade. Then I removed it, and used a router with a flat bottom 1/4" cutter and nibbled away just close to the score line. A few quick passes with a chisel, and BAM! Done! Two more less fancily cut holes were made with the same router bit for the latch and bolt. The line you see in the photo is a pencil line. And NO the Robertson screws were NOT reused. Slot head screws all the way!


Getting there...


The house numbers were re-installed after the second coat was fully dry.

Quick side note: The entire porch (2 coats) were done entirely by 3" paintbrush. I did not use a roller anywhere. Same with the door.

I covered some of the window-making process in a previous post. See: "Porch Door Update & Misc.".


I added a moulded frame for the window, as well as a drip-edge at the bottom made from the same moulding. I used clear pine for this. DO NOT USE FINGER-JOINT WOOD OUTSIDE. I have seen this done before, and even if it's well painted, it will NOT last. All the joints will come apart from the moisture/temperature. Use good stuff for exterior work.

The reason for the frame is that I was imitating the look of a door with a removable window insert. The interior side of the door is made to look like a panel (see detail photos farther down).


Making sure the insert fit nicely.


After routing the frame (one side with a detail, the other with a groove for the glass), installing the glass, puttying, and drying, came the painting phase. 4 coats per side. I had tried to cheat and skip the primer, and the cedar bled through the first coat, so basically I did white topcoat (fail), BIN shellac sealer (one heavy coat + touch-ups), then 2 coats topcoat porch paint.

It was getting cool in the unheated garage, so the door got painted on my dining room table.


Put the hardware back on (my favourite part), and install!


Here you can see how the inside of the door looks. The window is sunk-in slightly, and it has a bead around the edge that matches the one around the lower panels. I still have the entire porch interior to do, including the door casings.


Note: I used the same mouldings everywhere. The door's stop moulding on the jamb is the same as the one used around the window, and for the drip edge.


TOTAL APPROXIMATE COST:

I thought I would give a rough estimate of what I spent on this reno.

Bin Sealer: 2 small cans at ~18$each
24' pine moulding: 24.50$
5 lengths pine moulding: 26.30$
1x5x6 pine (2): 19.30
5/4x6x8 cedar (2): 19.20$
Paint (2): 40$each (still have 3/4 of a can)
Shims: 3.50$
Nails: 4.00$
Pine 1/4 round (3): 21$ (did not use but I'll need it for the interior next year)
Pine t-g 6' lengths (27): 83.43$
Pine t-g + additional 3: 9.27$
Pine 2x4x8 (2): 5.30$
Cedar 2x6x8: 11.98$
Pine 1x4x8 (4): 22.96$
Pine 1x4x6: 4.30$
Hinges (2): 2.58$
Putty: 6.98$
Dap Acrylic silicone (let's guess 3 tubes): 6.50$
Glass: 14$

Free items:
- Old cedar door
- Lock, knobs, backplates, and screws
- 4 upper panes of old glass

I think that's about all of it, which gives a rough total of: 401.10 plus taxes gives around 450$.

NEXT YEAR:

- Replace bottom frames/lattice
- Replace stairs/railing
- Replace sills
- Rehab windows
- Interior door casings
- Paint interior floor
- Paint interior porch
- Front door (probably)
- Fix ceiling hole

To give you an idea of how bad the bottom looks, here are a few detail shots:


Alright that's it for now. I'm too tired to re-read and edit this so if there are any glaring mistakes of things that seem confusing, please tell me and I'll fix them.

Thursday, October 11, 2012

Quickie

Alright, it's late, and I'm headed to bed, but I wanted to post just quickly to announce that the porch door was installed the other night (Tuesday), and I'll be posting the entire porch renovation (what got done this year, at least), with lots of photos and the final reveal.

I'm still thinking about working on some new steps, but the weather is really starting to get cold, and I might not have the time before winter comes around. We'll see.

Monday, October 08, 2012

Painting

5 coats down, one to go.*


* Porch door: 3 coats per side: 1 BIN sealer, 2 coats white. This is ON TOP of a base coat of white I had already put down - but the wood bled through the paint.

Friday, September 28, 2012

September Update (Part 1 - Misc Stuff)

Alright, I have quite a few photos that I want to post, so I'm doing it in two parts.

In house news, last weekend, I finished glazing the porch door (which turned out wonderfully), and after a week, it seems fairly dry enough to paint (not like last time when it was still very squishy after nearly a month of drying). I need another can of the exterior porch paint, so I can't finish painting the door until then (I'll go this weekend for the paint). I also need to re-order some slot head brass screws. I'm quite pissed about this. Earlier this summer, I had bought some "size 8" brass screws, and I had assumed that the heads would be the standard size, which is the size of all common deck screws. However, when I tried them in my hinges, they are closer to a size 7, which won't fit.

Last week, my friend from Ottawa visited. She had a favour to ask of me (which I already knew about ahead of time), which was to repair her aquarium. Basically, she just moved earlier this month, and after the move, the aquarium developed a small leak.

I had never done any kind of aquarium repair, but apparently they're only held together with "more or less" regular (but good quality) silicone. The thick, sticky, goopy kind. She bought/provided the special "aquarium sealant" which is basically just clear silicone. I've done a sh*t-ton of caulking after becoming a homeowner, so this was a piece of cake to do.

The only hard/annoying part was to painstakingly scrape off the old silicone. This was done with a glass scraper with a new blade in it. It took several passes with a lot of force/pressure on each joint.

I didn't redo all the seams, and instead focused on all the vertical (thin) seams, which seemed to be the problem ones.

After waiting 2 days, and filling it up, I'm happy to report that it's now leak free (and looking quite wonderful if I say so myself).


I'm actually amazed at the amount of water/weight that this aquarium holds. It's a 33 gallon, which (according to Google) holds 245Lbs worth of water! It took 7-8 mop-pails full (the blue one in the picture) to fill the tank. I'm just amazed that the glass doesn't bow-out and shatter under the weight. Everything seems perfectly fine (and sturdy), so I guess it's fine.

When she came down with her aquarium, she also brought with her the fabric I had picked out for my curtains!

I've already mentioned that it's the Ikea "Stockholm" in Beige (which is actually more of a grey-brown. The only problem with the fabric is that the pattern doesn't go up to the edge. It's 60" wide (and I need 28" for the width of the windows, plus seam allowance), but the pattern leaves a rather wide blank area on each side. I had thought of cutting it perpendicular, but that would make the pattern sideways, and then I'd have a dark area at the top/bottom of each panel, which is worst.

So... I'll just have to "make it work". I don't really mind the asymmetrical look that it'll have, but at least I have 4 windows and I can pair them.


These were some other fabrics that I had looked at in town.

I really liked this one (especially the colours), but I found that the pattern was too busy.


This one was kinda cool, but way too thick and heavy for Roman Blinds.


Nice, but too "matchy-matchy" with my wall colour.


Fun, but a bit too retro for me.


I *REALLY* liked this one, which reminds me a little bit of "toile" fabric, but it was too thick...


...and it was 20$/m! :(


Onto another topic. Remember the Rankin Apartments (I keep mentioning them, since I walk by the building weekly). Well a few weeks ago, I spotted more doors by the dumpster.


That's a rather beautiful door, but I didn't take it for several reasons. Reason 1 was that the entire other side was blackened by fire damage (badly). Reason 2, Condition: The door had been refitted with a more modern knob, and it looked like it had been kicked-in at some point, with damage to the main edge, and big slivers broken off. The glass panels were also all smashed.

What I *DID* save, though, were the wonderful ball-tip hinges! These are very thick QUALITY hinges. They also had half the original screws on the door side (obviously). These are "flashed copper" or "Japanned" copper hinges. I have no freakin' clue why they would call these Japanned, but I've seen the term used several times. Basically they are copper with darker blotchy areas, kinda like an animal print look.

The door behind it was a crappy (modern) busted-up screen door.

There was also (against the building) a damaged old door, so I took the lockset/handles from it.

Weeks earlier, I had also "stolen" a primitive light fixture out of one of the back porches. Nothing fancy, just a porcelain ceiling "disc" a spiral wire, and a socket (from the 20s/30s). I wasn't sure if I should take it, but I was pretty sure that the back porches were going to be torn down. This past week, I was happy to see that I was right. The one fixture was the only one available (or left), otherwise I would have klepto-ed more of them.

These are the back porches I'm talking about (which are no longer there):


More in Part 2.

Wednesday, September 19, 2012

Quickie Update

Not much going on lately. I'm still working on the porch door (I need to go pick up some glass for it), and I'll hopefully be getting fabric for the Master Bedroom curtains thanks to a friend of mine who lives in Ottawa (she knows who she is, and she rocks!) The fabric is from Ikea and it's called "Stockholm" in the beige tint. Basically it's a leaf and berry pattern (line work) in white on a beige background.

Also, I've tested out my aniline dyes (samples) that I was thinking of using for the vanity and I wasn't that thrilled about how they turned out (considering all the extra work involved), so instead, I'll be using a regular oil based stain in a dark mahogany (reddish brown). The colour is a special mix called "Cherry on Maple" (I note this here mainly for my own references).

The only other bit of news that I don't think I mentioned yet is that last Friday I picked up some keys. I had the Yale "night" lock re-keyed on the antique door (the salvaged one that was complete and in good shape), and had 3 keys cut for it, and I also got an antique style (but generic) skeleton key fitted to the lock for the porch door. This was super fun, and since it's a universal key, it also happens to fit 3 more similar Corbin locks in my inventory. It almost works on several others, but not quite. They did have other styles/shapes of these universal keys available, so depending which locks I end up using, I can get keys for them.

Saturday, September 08, 2012

Porch Door Update & Misc.

I finished the joinery on the window insert for the porch door. It's got quite an interesting range and combination of joinery, and I'm very pleased with how it turned out. It's not perfect, but it's more than adequate, considering it's supposed to look old, and it will get puttied and painted.

I wanted to finish it, and mount it into the door frame, but I ran into an unforeseen problem. I was sure that I had a suitable router bit to do the groove for the glass, but I don't. I have a bit that would work, but the bearing that's currently on it is too narrow, which would make the groove too wide. I want no more than 1/4" and I think it would give me 3/8" (which if a lot if you consider that it's going on two sides of a wooden strip that is only 3/4" wide. It would actually eat up all of the 3/4 and leave nothing left in the centre. I'll either need to buy a different bit (which I'm sure I could use several more times on other stuff), or get a set of bearings, which I can swap on my bits.

While the frame was glued and drying, I also put one coat of paint on one side of the door. It looks pretty damn awesome (if I say so myself), and I can't wait to see the finished product.

So I actually uploaded some photos just now, so this won't be a boring post.

Here's a TEASER for the porch!


Note that the tongue and groove floor boards will later be painted grey like the bottom of the porch. I painted them white for now, since they needed protection, and since the new side pieces needed to be painted before winter/rain, etc. I will paint the porch floor (grey) and the bottom of the porch when I have all the lattice/bottom trim redone, as well as the new steps. It will all go in gloss oil paint (floor paint). That won't be until next year.

***

Here's some of the joinery on the window frame. All of this was done with just a table saw, a HAND SAW AND MITRE BOX, and a chisel. Very basic stuff. I was still able to get nice tight joints, with a good amount of accuracy. A lot of stuff was measured by eye (going off the frames, etc).

The centre bar, as well as the two dividing bars that make up the 4 top panes were done with dowel ends. These are ONE PIECE. They are basically a mortice and tenon, but I just used a 1/2" round hole, and I cut the tenon on the ends into a rough circle.


The top horizontal rail is done with a bridle joint on each end. The side stiles (vertical bars) are done with matching bridle joints in each corner, and a mortice for the centre rail.


The bottom rail is twice as wide, and I wanted to use the same setup in each corner, so I made a combination bridle joint and mortice joint. Note that the tenon is cut shorter, since it doesn't protrude all the way through the side stile (like the bridle joint).


The centre bar is one continuous piece that crosses the centre bar, so here, I used a lap joint.


Here's a detail of the mortice and tenon from the centre bar.


Now, I'll just mention that making a window frame like this is NOT a beginner project. You need a lot of time, patience, and accuracy to end up with a decent end product. HOWEVER, if you have some experience with woodworking, there's no reason why you can't build something like this. The joints used are all pretty simple, and you can easily make test samples (as I did) to check all your cut depths, and heights before cutting your good pieces.

Additional Note: Some of you may notice that the frame is built-up from THREE different wood species. The reason for this is because I used what I had on hand. I wanted to make it entirely out of cedar (like the rest of the door), but I did not have enough usable (straight) cedar. The board I used cupped HORRIBLY when I cut it, and there were too many badly spaced knots for the lengths I needed. Bonus points if you can name the three wood species shown!

And no you don't get to see the full shot of the assembled window yet! :P

***

Here's a photo of that mini access door for the office. It's not attached yet (just sitting there for the photo). I'm not sure if I want to mount it flush like this with minimal hardware (and paint it the wall colour), or if I want to deck it out in mini door trim and paint it white like the rest of the trim, along with antique hardware. Thoughts?


***

Remember this old apartment building that had a fire (over a year ago)?


Well, as suspected, it's being gutted to the studs. I can't say that I blame them, and I don't feel nearly as sad for this building as I do for some of the others. It had nice, but fairly plain trim (inside), and it has some nice old doors (which are getting scrapped soon). The windows where what really made it look its age (1920-1930). These too, are all being changed.

I've been checking the dumpster weekly, and I was able to grab the hardware (hinges and lockset) from an old door (which was badly damaged). I also went with my mom to salvage some of the windows. There were at least 3 pairs of the nice 6 panel minis, but I was only able to find one pair. A lot of the other windows were smashed when they were chucked in the dumpster, but I saved two of the upper 3-panel sashes (in near mint shape).

Here's the transition when they were changing the windows. The only thing I'm sad about is that they didn't make any effort to get matching ones with a fake grille for the upper sashes.


Here's the set of 6 panel doors (which I will make into a wall hanging cabinet or some sort of cabinet). You can also see these in the background in the joinery photos above. Note the original (and VERY LARGE) drip edges. The other surprising part of these is that they were still in use up until last year, but they have absolutely no signs of any weatherstripping. They are literally just hinged, with 2 latches to keep them closed. They must have been VERY drafty.


Here are two of the upper 3 panel ones. The paint on them is a nice pinkish oil paint, and it's still in perfect shape. It looks like they were never repainted in the past 60 years or so.


The next two photos are a bit random, but I thought I'd just post them now.

This is a nice, plain Victorian house in town. I pass by it weekly on my way to do groceries. They have remuddled it, and I have mixed feelings about what they did with the house. Some stuff they did an amazing job (like repainting the porch), other stuff is just awful, like blocking off the second porch door, and adding pot-lights (in the porch t-g), removing interior walls, etc. Overall they're keeping the house well maintained, but they're modernizing it a bit too much.

Ok, that was a bit of a tangent, but yeah, they added these two old enameled street signs. These are very recently added, and they look freakin' awesome. But I'm left wondering where the heck they came from. They look like they're in absolutely mint condition, but they also look EXACTLY PERIOD ACCURATE. They are an identical match to other old ones in town. I think it's possible that they found them (unused) in the house. I'm pretty sure they don't make these anymore (not in this exact style/font anyway). And yes, you can totally go on Google Maps and see the whole house.


I noticed this recently, too. A nearby church - St. Columban's, which is just a few blocks away, is being repainted. It looks like it needed it pretty badly, even though the building/roof looks to be in pretty good shape. I took this at 6am on my way to work, which is why the lighting is dark.


Alright, that's it for now! :D