Sunday, October 14, 2012

The Great Big Porch Reveal! Finally!

Well, several months' worth of work has come to an end for the year. I won't even pretend like there isn't still a TON of work left to do on the porch, but the part that shows the most is done, and it looks pretty again.

Here's a photo from back in May 2012, as a starting point.


And this is how it looks NOW!
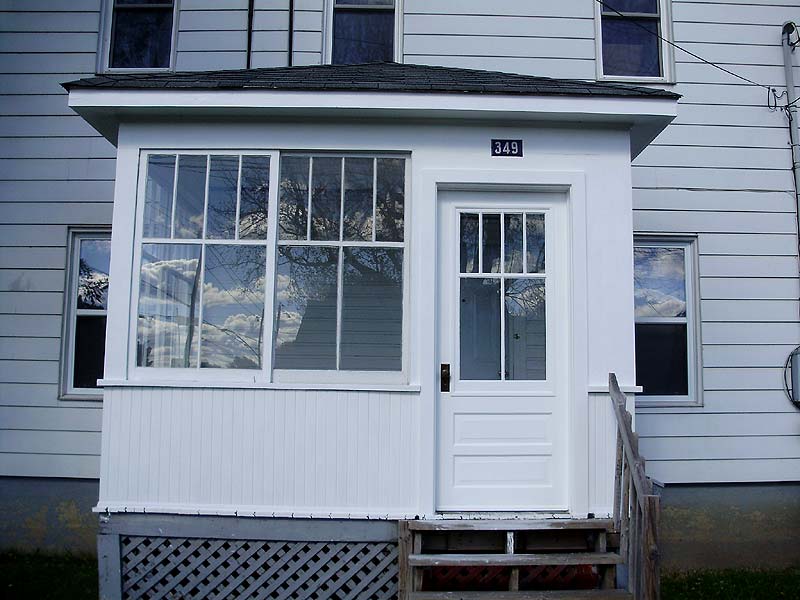


Getting up to this point was no easy task. It involved many steps, including some demo, rebuilding the door jamb, replacing the exterior wood t-g, lots of puttying/silicone/gap-filling, and tons of painting.

The last few updates that I made on the porch were several months back, and included the removal of the old aluminum siding, and the beginning of replacing the t-g. You can visit those posts here:

New Mattress & Last Week's Work on the Porch - May 26th
Ongoing Porch Repairs - August 7th
Porch Restoration Progress - Aug 11th
Porch Door Rehab - August 18th
Porch Progress Thus Far - August 19th
Porch Painted (First Coat) - August 26th
Porch Door - September 3rd
Porch Door Update & Misc. - September 8th
Painting - October 8th

Alright, assuming you're all caught-up, here's where I last left you guys hanging.

I had been itching to scrap this atrocious (and damaged) aluminum screen door ever since I bought the house. Taking it off, and tearing out all the ugly 2x4s and other scrap wood blocks from the original opening was a great moment for me in this reno.


The door only stayed there for a few hours. I know someone took it for the metal, but I really didn't want to deal with it (having to take it across town to the scrappers). I was happy to see it go.

In the process (removing the door and added wood), I discovered that the original porch door was hinged on the interior, and opened on the opposite side (which makes a HELL of a lot more sense. I had noticed the hinge notches (holes) before, but I wasn't sure if they were added later, or from a second door. But there was only ever one door.

The problem with the door jamb, however, was that it was damaged, as well as coated in thick flaking oil paint (bright yellow). So I decided to start fresh and build a new door jamb the same as the original.


I also decided to replace the door casings, since I did not want them notched around the window sills (as they were originally - even though it looked kind of stupid this way).


I thought about changing the style of the casing, or dressing it up a little bit, but in the end, I decided to keep it very close to the original, which is very very plain.

Once I had my jamb in place, I hung and fitted the door frame, which had been completely reglued and reassembled (and partially sanded).


At this point, I painted the first coat, since I was getting tired of dealing with the plastic tarps/weather.


It was at this point where I had dropped the can of shellac sealer all over the steps/floor and all over myself (see "Porch Painted (First Coat)" above).


Before I did the second coat, I bought and installed the bottom trim moulding. This was not the moulding I originally planned to use, but the one I wanted was too wide, and the boards along the front edge of the porch are uneven. This would have looked really bad with the wider moulding.

It was a tedious pain in the rear end to hand-fill each and every little triangular opening in the t-g without making a mess/blobs.


Once the silicone (acrylic paintable DAP) was dry, I gave the mouldings a quick seal and first coat before painting a second coat over the entire porch.


You might notice that I did not yet add the top mouldings yet. This is because I'm planning to completely replace all the sills next year.

A lot of prep (not shown) was done on the porch before painting, including some gap-filling along the crown moulding, under the fascia edge, and in a ton of nail holes and the occasional small knot.


Fitting the mortise lock took quite a while, since I used a traditional brace (old crank-style drill) and chisels. Probably a few hours' worth of work by itself. The lock/handle/knobs are a salvaged set (ie: FREE!)


Although fitting a strike plate might seem like a difficult job, this was actually REALLY easy (for me), and I got amazingly nice results (nice crisp outline). All I did was face-screw the plate to the wood, score the wood around the perimeter with a blade. Then I removed it, and used a router with a flat bottom 1/4" cutter and nibbled away just close to the score line. A few quick passes with a chisel, and BAM! Done! Two more less fancily cut holes were made with the same router bit for the latch and bolt. The line you see in the photo is a pencil line. And NO the Robertson screws were NOT reused. Slot head screws all the way!


Getting there...


The house numbers were re-installed after the second coat was fully dry.

Quick side note: The entire porch (2 coats) were done entirely by 3" paintbrush. I did not use a roller anywhere. Same with the door.

I covered some of the window-making process in a previous post. See: "Porch Door Update & Misc.".


I added a moulded frame for the window, as well as a drip-edge at the bottom made from the same moulding. I used clear pine for this. DO NOT USE FINGER-JOINT WOOD OUTSIDE. I have seen this done before, and even if it's well painted, it will NOT last. All the joints will come apart from the moisture/temperature. Use good stuff for exterior work.

The reason for the frame is that I was imitating the look of a door with a removable window insert. The interior side of the door is made to look like a panel (see detail photos farther down).


Making sure the insert fit nicely.


After routing the frame (one side with a detail, the other with a groove for the glass), installing the glass, puttying, and drying, came the painting phase. 4 coats per side. I had tried to cheat and skip the primer, and the cedar bled through the first coat, so basically I did white topcoat (fail), BIN shellac sealer (one heavy coat + touch-ups), then 2 coats topcoat porch paint.

It was getting cool in the unheated garage, so the door got painted on my dining room table.


Put the hardware back on (my favourite part), and install!


Here you can see how the inside of the door looks. The window is sunk-in slightly, and it has a bead around the edge that matches the one around the lower panels. I still have the entire porch interior to do, including the door casings.


Note: I used the same mouldings everywhere. The door's stop moulding on the jamb is the same as the one used around the window, and for the drip edge.


TOTAL APPROXIMATE COST:

I thought I would give a rough estimate of what I spent on this reno.

Bin Sealer: 2 small cans at ~18$each
24' pine moulding: 24.50$
5 lengths pine moulding: 26.30$
1x5x6 pine (2): 19.30
5/4x6x8 cedar (2): 19.20$
Paint (2): 40$each (still have 3/4 of a can)
Shims: 3.50$
Nails: 4.00$
Pine 1/4 round (3): 21$ (did not use but I'll need it for the interior next year)
Pine t-g 6' lengths (27): 83.43$
Pine t-g + additional 3: 9.27$
Pine 2x4x8 (2): 5.30$
Cedar 2x6x8: 11.98$
Pine 1x4x8 (4): 22.96$
Pine 1x4x6: 4.30$
Hinges (2): 2.58$
Putty: 6.98$
Dap Acrylic silicone (let's guess 3 tubes): 6.50$
Glass: 14$

Free items:
- Old cedar door
- Lock, knobs, backplates, and screws
- 4 upper panes of old glass

I think that's about all of it, which gives a rough total of: 401.10 plus taxes gives around 450$.

NEXT YEAR:

- Replace bottom frames/lattice
- Replace stairs/railing
- Replace sills
- Rehab windows
- Interior door casings
- Paint interior floor
- Paint interior porch
- Front door (probably)
- Fix ceiling hole

To give you an idea of how bad the bottom looks, here are a few detail shots:


Alright that's it for now. I'm too tired to re-read and edit this so if there are any glaring mistakes of things that seem confusing, please tell me and I'll fix them.

Thursday, October 11, 2012

Quickie

Alright, it's late, and I'm headed to bed, but I wanted to post just quickly to announce that the porch door was installed the other night (Tuesday), and I'll be posting the entire porch renovation (what got done this year, at least), with lots of photos and the final reveal.

I'm still thinking about working on some new steps, but the weather is really starting to get cold, and I might not have the time before winter comes around. We'll see.

Monday, October 08, 2012

Cornwall Houses, Woodworking Projects, & Misc.

Cornwall Houses

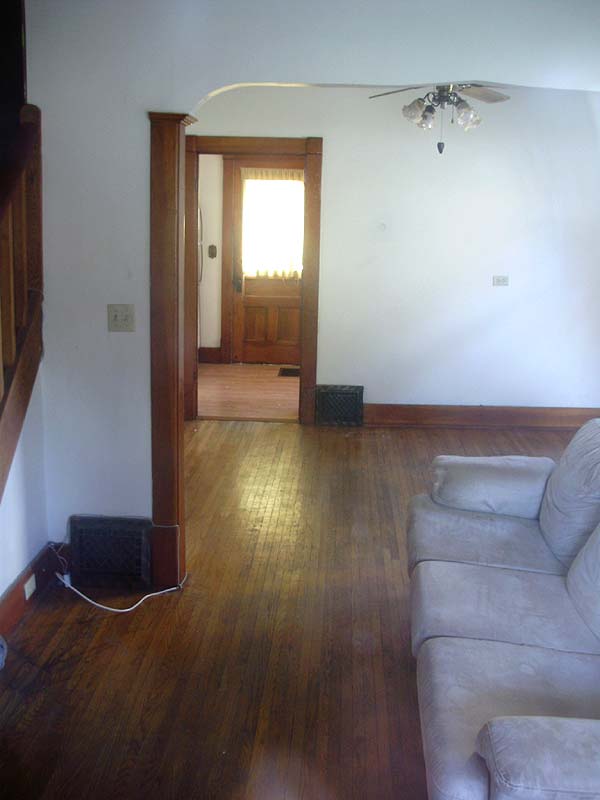
I walk past this duplex often, because it's on my street and I love the front doors. It's a rental, and it just recently got vacated on one half, and is now 'FOR RENT'.

I took this opportunity to snoop in the front window, and the interior did not disappoint! Checkout the perfectly preserved details of this little gem!

Basically it's a mirrored duplex. This is the right-hand side, and the left side is a mirror copy (currently occupied).

I have seen my fair share of beautiful old wood doors, but I especially like these. They're fairly unusual since they're an "offset" 3 over 3 style, with one large raised panel below (I think). Unfortunately the glare in the screen door hides the view a little bit. It has old crackly varnish (which I've come to like).


The only views available are through the front window, unless I pretend I'm interested in renting it and book a showing/tour. I love the mouldings (which are pretty plain), the floors, and the old heat registers.

EDIT: I just noticed something I had completely missed. Look at the top of the "arch". It's not just a plain curve, it's actually like an "upside down open book" shape (double S curve). AWESOME.


I'd love to see the kitchen, but the back door has a curtain over it, and all the other windows are over 8 feet off the ground. I'd assume that the bedrooms are pretty plain, with 2 panel doors (many homes in this neighbourhood all have fairly plain doors/trim with some exceptions).

Rankin Apartments


I said I'd update you guys with a photo of the demo'd back porches, so here you go. They emptied the previous dumpster with all the old windows, door jambs, drywall, etc., and have filled a new one with the porch debris. The interior rooms are actually fairly decent looking, with hardwood floors, but the entire building is gutted to the studs, and it looks like an awful mess.

Note the new single glass panel doors (which will be quite nice for a good amount of light into the apartments). They aren't even close to historically accurate, though. Also, a vandal (or careless worker) smashed the bottom right window, which is why it's boarded-up with plywood.


***

Ugly Duckling Cabinet

Here's the nearly completed* old cabinet that got a facelift recently. You can't see it too well, but I remade the wooden block on the upper left for the hinge. I glued it and face-nailed it (to make it look older). I also found an old hinge in my spare parts that was a near perfect match to the other 3 (instead of reusing the larger non-matching brass one that was there before).


The exterior is "sand" and the interior is "grey" (which looks navy blue in person and in the photos) which are both high gloss oil paint.


This photo shows that I even went through the trouble to strip the catches for the doors (as well as the hinges, door handles, and all the screws). The colours are off in this photo and I was having too much trouble fixing them.


This photo doesn't show it too well (the lighting in the garage blows) but I was surprised to see that these handles are in "flashed copper" or "Japanned copper" (where it's a copper plating with stripes of black). Most of it is worn off from use, but it's still visible on the ends.


*The last thing to do with this cabinet before I can hang it, will be to attach some kind of back to it. Originally it had none (it would have been the drywall), so I'll need to use something thin.

Side note (related to flashed copper hardware): I was amazed to see that some places on the web sell antique copper hinges (like the ones I salvaged) for as much as 30$ PER HINGE. I have 9 of those in flashed copper.

http://www.historichouseparts.com/Images2/VDH022212-9.JPG

***

Lastly, the "Misc" is that I finished framing and hanging the two frames (yes I went and got a second one) that I started to do the other day. I do, however, want to swap-out the cheap corrugated cardboard backs with 1/8" hardboard pieces, but I will do that later.

It looks a bit stark, since it's a huge quantity of black in an otherwise stark white (eww) hallway, but I'm hoping it will look fine once the hallway is painted. I haven't picked a colour yet, and it's not ready to paint anytime soon, but I'm open to colour suggestions. The upstairs hallway is dark, but I wanted the main (downstairs) one light (or lighter).

As reference, this is the view from the kitchen door. The open door is the door to the Office, and next to it is the front door, which will eventually be swapped for a wood door with a window, letting-in some light.

Painting

5 coats down, one to go.*


* Porch door: 3 coats per side: 1 BIN sealer, 2 coats white. This is ON TOP of a base coat of white I had already put down - but the wood bled through the paint.

Sunday, October 07, 2012

Brief News (Photos & Bedding)

I decided a while back that I wanted to have some sort of large photo collage (or at least many framed photos of friends and family), so I went to Wal-Mart and got 48 photos printed out. I also bought a fairly inexpensive 24 photo frame.

I'm thinking of getting a second one, actually. The problem is that 90% of my photos are landscape, and this frame takes 12 portrait, and 12 landscape, so I'm missing 2 photos to finish this frame. I have a ton of extra photos, but none that are portrait style.


So I just went through 100's more of my photos and picked out over a dozen portrait ones, and I'll go back tomorrow (if it's open), and get those printed, along with a few others.

In other news, this is the bedding set I bought the other day, next to my curtain fabric. It's nearly the same brown, but I wasn't intentionally trying to match anything. The comforter set comes with 3 pillows, and the other two (not pictured) are hideous.

Saturday, October 06, 2012

The Most Amazing Dollhouse You'll Ever See

I came across a link the other day while I was catching up on recent posts on Old House Dreams. For those unfamiliar with this wonderful site, it's a lady who loves old houses as much as I do, and she shares links to historic homes that are for sale. Some of them are in shambles, and some of them are absolutely amazing, but they are always interesting to look through, and I've picked up a lot of extremely useful information and ideas for my own restoration efforts through browsing the listings and photos. Patterns for leaded glass, design layouts for original kitchens, built-ins, and beautiful old doors, windows, and mouldings.

The site is pretty specifically for old houses, so when I came across a listing for a dollhouse, I was immediately curious. It had to be worth looking at if it was posted on this site.

When I arrived at the site: http://www.historicdollhouses.com/index.html I headed immediately to the photo gallery, and started viewing the slideshow. After a few photos, I had to pause it, simply to be able to absorb the level of detail in this phenomenal house.

The dollhouse is the work of Dustin White, and is based on early American Greek Revival homes built around the 1850s.


The house is entirely hand made, and 100% custom. It has over 4700 pieces, and took about a year and a half to build.

For anyone who is even the least bit interested in old houses, this is an absolute treat to look at.


It has all the details you can possibly imagine in this style house. The cedar roof, side porch, chimney details, attic... It is complete with fireplaces, cast iron wood stoves, hardwood floors, grain-painted doors, and even functional 6-over-6 sash windows and shutters! The icing on the cake is that the house is also electrified with low wattage lighting to simulate old candle light in the fixtures. There are also glowing logs/embers in the fireplaces and old stoves.


I would strongly recommend going through the photo gallery. There are over 150 photos, showing all the rooms. It was hard for me to select just a handful of photos for this post.

As you can probably guess, the house comes at a rather steep price. It is, however, a one of a kind piece of art. It would be wonderful to see it finished with period furniture as well.


***

Having made this post also reminds me that I've been meaning to do a shout-out post for some of my favourite old house blogs. Expect that in the next few weeks.

Friday, October 05, 2012

Progress!

Sh*t got done today! And I'm quite happy to report with photos, too!

Work has been slow lately (not in a good way, either), so we got a 4 day weekend (Monday is Thanksgiving here in Canada). Since I had the day off today, but I knew my boss and his son were going to be in (for phone calls or in case any clients might drop in), I decided it would be a perfect time to do the finishing on my vanity.

I got in to work at my usual time (7:15), and I only left near 2:00pm. I had everything set to be able to do the wet/sand/stain/seal/sand/glaze/lacquer on the vanity (yes those are all the steps involved to get the look I want), but unfortunately, a wrench got thrown into my plans, and Léo (boss) told me that I wouldn't be able to use the spray booth today since the fan belt was busted.

I was still able to do the wet/stain/seal portion of the project, but I was pretty bummed that I wouldn't be able to fully finish the vanity this week.

The stain I decided to use (for the first time) is a water based Aniline Dye. This is a powdered dye that you mix with hot water to make a stain. The amount of powder you use determines the intensity of the colour, and you can mix and match different powders to create just about any colour you want.

Water based dyes have drawbacks (as do traditional oil based stains). One of these is that you need to pre-wet the entire project, and leave it to dry (which took less than an hour - surprisingly), then re-sand the whole thing. This is to pre-raise the grain, before the stain goes on, to eliminate a rough finish, since water swells the wood and gives it a rough texture.

The actual staining was also a bit more of a challenge than a traditional stain. I have about 10+ years experience with stains and finishes, so I didn't have too much trouble, but a novice would have had a nightmare of a time getting a beautiful, even colour.

The instructions suggest staining a light "first coat", followed by a second, stronger coat, but I skipped this, going straight to the full-strength colour with no issues.

It's a lot more work than with a regular stain, but I think the results are more than worth the trouble, especially when dealing with figured woods (curled grain, bird's eye, etc). The dye REALLY makes the variances in the grain POP, unlike a regular stain, which more often than not, will mask the grain, and make things come out more even and "blah".

Here's a teaser photo of the finishing up to this point. The colour is not 100% accurate, since this was in bright light, and with fresh (wet) sealer applied. There will also be a dark glaze added in the cracks/crevices, which will be the next step.

The actual colour is less orange, and appears darker (see other photos below, where the vanity is in the background).

Look at that magnificent grain! I showed it to Léo, and he wasn't that fussy about it, which kind of surprised me. What do you think? Gorgeous, or is it just "too much"?


So while I was working on that, and in between stuff drying, I decided to finally build the doors I need for the rest of the built-ins. These would be the two glass doors for the office display case built-in, and the door for the linen closet upstairs.

Here's the set of 2 doors for the office. They will have some sort of fancy glass insert that I'll make at some point. (Note vanity):


Here's the linen closet door. I'm actually not happy with how it turned out. In hind sight, the frames should have been thicker, and I should have done 5 panels, but it's too late, and I'm not making another one. Once it's painted and installed I'm sure it will look just fine. I STRUGGLED with the decision between raised panels (like the vanity door above), or flat panels, like the original house doors. I decided to go with flat panels for all the built-ins. This will match the little mini door in the office, too. More than likely, I'll also go with flat panels on the new house doors (same as the originals), but when it comes to the kitchen cabinets, those I'll do with raised ones the same as the vanity. That seemed like the best plan.


Lastly, I did some shopping. I went and picked up some black-out fabric (4m/yards) for my roman blinds (which was only 1.50$/m). I also picked up 4 Velcro strips (on sale 50% off) to use along the top of each curtain panel, so that they can be yanked-off and cleaned. In total, that cost only 14$!

I also popped-in to Zellers and had a look around (they had a bunch of stuff on sale, too). They had some nice bedding sets on sale and I REALLY wanted to buy this particular set (with birds), but they only had it in a double.


But I did end up getting a different one. It's brown with a bluish grey pattern that looks a bit reminiscent of Gothic scrollwork. This one wasn't on sale, but the set was only 49.99$ (no photo yet).