Sunday, January 27, 2013

Art!

I bought these two very appropriately themed canvas pieces a while back at Winners. These were actually drastically reduced from around 20$ all the way down to 5$ for the pair!

I wanted some art, but I'm one of those artist types that worries about possible moisture damage, so I opted to use these "cheapies".

I hung the bottom one first, and I measured it so that it would be in line with the antique mirror.


I quite like them, and I can always easily swap them later if I find something nicer.

Thursday, January 24, 2013

More Floor Repairs and Electrical

After a bit of a lull, I've started more small jobs around the house. I've patched more of the floors, and I'm nearly done. I had pretty much just enough wood to do all the needed repairs. The only one I didn't do, and probably won't do, is that narrow gap along the bathroom duct in the Dining Room (see here: http://i1018.photobucket.com/albums/af308/clockmaker15/HOUSE/P1190028.jpg). Once the baseboard is in place, it may only show about 1/8" crack, and if I put a 1/4 round it won't show at all. I'd rather not have all the short bits of patched wood and nail holes.

At this point, I had done just the Dining Room, and this is ALL the hardwood I had on hand for repairs:


But keep in mind that I still had all these repairs left to do:


As well as a few other small areas.

I decided to start with what I could use out of the really scrappy pieces. One was perfect for this repair:


It had a broken back half, but was wide enough to cover the repair (the portion near the wall will be completely hidden by the baseboard).

Next, I tackled this guy:


Note how they passed the wire for the exterior plug.


Rather than reuse the already huge hole that they made for the other plug, they just drilled a series of holes (one which goes clear to the outside of the house for the plug box), and then just patched over it with drywall. For now, I left that one alone, since I'll need to rewire the exterior box, and it's around -25C (-13F) outside right now.

While fixing the floor, I also had to rewire and re-secure the electrical box. As with every other one in the house (with VERY FEW exceptions), it was crooked, and rattly. You can KIND of see that the plate and the outlet fitting aren't flush.


You can never really tell in photos how crooked something really is, so here's the same photo, but with the cover plate next to it. The plate is around 1/4 inch thick. The box is flush on the right side, but about 1/2 inch out on the left. FAIL. You really need the metal electrical box to be as flush as possible with the drywall. Even if it's sticking out a hair from the drywall, that's fine, but it can't be this crooked. It was also BARELY attached to the wood. This box was only secured to the exterior t-g wood, and not to a stud (which is fine if it's SOLID, which it wasn't).


I could not get a good grip on the wood from the existing holes in the box, so I had to drill 2 new ones, closer to the edge of the box. This is pretty easy, you just need a drill with a 3/16" bit. The finished box is now sturdy, flush, and unfortunately in need of a bog patch job because the huge hole that they had made and patched, cracked.


Here's another shot:


The next repair that really needed attention was the old duct work hole in the Office floor. If you remember, last year, I moved the duct work over into the corner by about a good 7-8 inches. This gave me a lot more space in the room (wall space), but left me with 2 large holes to patch. One was in the ceiling: https://lh4.googleusercontent.com/-4c1dIrVONNI/Tzhgxt8R8NI/AAAAAAAAAJY/Ghuik90hxo4/s800/P2020164.jpg, and the other was in the floor:


I started by cutting out a staggered pattern for the boards.


Because this is the exterior wall against the foundation, I had to cut a notch for my support piece to sit.


The support piece sits on the cement on one side, and on a support brace under the floor from when I reinforced the corner (after moving the duct). You can see this diagonal floor brace in the upper right of this photo: https://lh3.googleusercontent.com/-IKq2-n4COpM/Tzhgxvn8LLI/AAAAAAAAAJY/fRLLzDBj1pw/s800/P2020162.jpg.


The brace was secured into place, and then my floor pieces added. Pretty cool, right?


I just wanted to point out that I did not escape injury with this project. Nothing major, but it HURT.

When I was cutting the floor board of this repair:


My reproduction lantern clock fell from my DVD tower right onto the back of my hand. All the vibrations from the cutting tool made it slip off the top. I'm lucky the clock did not break or get badly dented (since my hand will heal, but the clock repair could be very hard to fix). Lesson learned.


Since I had a bunch of wood left, and more than enough to patch-over that floor register, I decided to re-repair the floor grate patch. I REALLY didn't like how those two boards in the middle had turned out, and the floor was also uneven at this spot.

Before:


During:


After (holy crap this makes ALL THE DIFFERENCE!):


Today, I continued fixing electrical boxes in the Living Room. I redid the one next to the cold air returns, the one next to the bookcase (which was FINE! The only one so far! It was solid, AND flush! A true miracle!), then the one next to the old floor grate, and finally, I also had to move the main light switch. The switch was fine with the old crappy casing they had thrown on, but with the correct repro casings, it's too close to the door frame, and there wouldn't be enough room for the cover plate (unless I would cut it, which you can do (and I've had to do it before). I wanted it moved over.

I removed the switch (a dimmer that I had installed a while back), and then remembered how amazingly bad this box was. Again, this is like the one above, where it's hard to see just how crooked it really was. Sticking out 1/4" on the left, and sunk-in about 1/4" on the right. AWFUL. The photo is taken pretty much "head-on".


I added a new wood block, and re-screwed the box. It looks a bit crooked, but it's only because the switch is not actually hooked on yet.


More soon!

I hope to get a bunch of mudding done.

Monday, January 21, 2013

Floor Repairs (Hardwood)

Alright, I've been feeling pretty non-productive lately, but I've been forcing myself to continue with small jobs around the house. The latest one was to start repairing the hardwood floors.

By "repair" I simply mean: Patch the PO's rewiring botch jobs.

I know that most of the new wiring was done around 1992, and that most of it was NOT done professionally. The kind of wiring job that was done in my house is really mixed, and I have to assume that it was done in batches at different intervals, and by a few different people.

I've talked about the wiring in my house a bit before, but I'll just take a few moments to go over a few points again, based on some new info, and new observations.

First, the "Office" front room. Whoever did this room did an awesome job. None of the hardwood floors were damaged in this room, and they had some REALLY difficult places to pass the wires (foundation wall). I have to assume that the hardwood floor in this room was still in use when this wiring was done. You can click HERE to go back and see the post where I first exposed the floor in this room (where you'll also notice no holes in the floor around the edges of the room).

The living room is a bit of a hit and miss. Parts of it were done not bad, and other parts were horrendous botch jobs. You can click HERE to go see the botch jobs to the floor in the living room (near the end of the post).

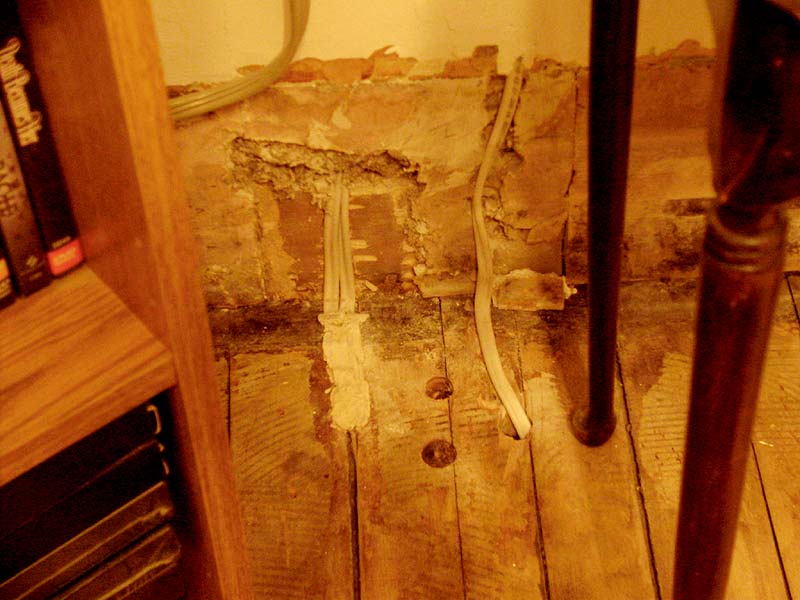
By the time they got to the dining room, it looks like they really didn't care anymore, and they just drilled right through the floor anywhere convenient. You can click HERE to go see the dining room floor post. I'll be re-referencing some of those photos below.

I decided to start repairing the floor in the dining room first. Most spots needed just small patch pieces, so I figured I would see how much I can repair with the short ends before I need to use the bigger boards.

I can't believe I don't have a photo of the worst of the patch jobs in the DR floor, but I have some "during" and "afters". It's just another one of those "it's so awful I'm sure I have a photo of it" and apparently I took photos of the other 3, and not that one.

So here are the before shots. Two are minimal patch repairs, and two were pretty bad.


My repairs for these is quite simple. It's definitely not the best way to do it, but it's the only good option I have, since I have an extremely small stock of antique flooring that I can use for my repairs. If I had more matching flooring, all my patches would be in at least a 2 foot length, since these old floors did not have a lot of seams, and all the boards tend to be over 8 feet long. The longer your board, the less noticeable it will be.

In my case, I had to patch the floor with short little pieces, and I have to just hope that when it's puttied, sanded, and top coated, that it's a fairly decent match. At the very least, it will still be in matching antique wood.

The following "step-by-step" photos show the worst patch (for which I have no "before" photo).

I've talked about my "multi-tool" many times before on this blog, and I finally went and got a photo of it, so I can add it into posts, but I can't quite stress enough how much this tool can really be a life saver for a DIYer.


Step 1 is to cut away the damaged floor, where you want to create your patch. As much as possible, you always want to stagger your joints. I think it's also obvious that you want to have the power turned OFF just in case you accidentally cut into your wire(s). I used a lamp, and an extension cord when I was working on this.

An interesting point about this following photo. If you look at the board on the lower left, you'll see a big square nail holding it down. I though this was odd, but I found out (later) why they nailed it this way. The nail is about at the farthest point near the wall before it would hit the cement of the foundation. Because of the cement, I'm fairly sure that the last board near the wall is just "floating" in place, and it's being held in place by the top-nailed board.

So yeah, step 1, cut the floor. Use a square to trace some nice straight lines to follow, and cut it with your multi-tool (I'm honestly not sure what other tool you could use to do this).


Step 2: Clean your mess before step 3. If I had a before photo, you could actually see that there were 2 holes drilled in the floor for this wire, but I don't really understand why. It looks like they didn't like the first hole location, and then they just made another one a few inches away.

What also seems weird, is that it looks like someone had started to do a GOOD repair, by making a track from above for the wire (like I did), but I have no idea why they gave up, and didn't finish it the right way. It also didn't look like these old floor board had been pulled up, so I'm just left scratching my head on this one.


Step 4: Cut a trench in the subfloor for your wires to clear the hardwood. I just used the multi-tool, and a hammer & chisel. It doesn't need to be perfect, but try to make it open/large enough that if you should ever need to run new wires, you could do it without needing to yank-out the patches.


The last step is to find, cut, and prep your wood floor pieces, and nail them in place. If you're able to, you can nail them down in between the boards at an angle (to avoid top-nailing them), but if you don't have the space, and the angles won't work out to avoid the wires, just top-nail the patches into place. Try to have your nails go down at a 45 degree angle to keep them from working their way out over time.

The lighting makes this repair look pretty crappy, but once the floor is sanded, the nail holes are filled, it will look passable.


Here are the other 3 patches:

The patch used on this one is a bit narrower than it should be, but the uneven edge near the wall will be covered by the baseboard.


So there you are. Simple repairs to hardwood floors. Next, I'll be working on the ones in the living room, and the big hole in the floor of the office (the old hole from the duct work going upstairs). I also want to patch-over the current modern floor grate in the living room, and instead, use the large old hole, but it will depend on my wood supply.

Saturday, January 19, 2013

Cornwall Homes - Trinity Anglican Church

In this Cornwall Homes post, I wanted to share with you guys one of the most spectacular examples of Gothic architecture we have in Cornwall, which is the Trinity Anglican Church. I am really not a religious person, so I'm mainly presenting these photos as a lover of Gothic architecture. These photos were taken a few years ago at an open house event.

The church is just a few blocks away from my home, and is on one of the busiest streets in Cornwall (Second Street).

People who are lucky enough to live near the church are treated to its magnificent bells, which are electronically programmed to ring melodies every hour, followed by the hour strike on the deepest bell. I believe the tower has 8 fixed bells and 1 swinging bell. If you're a fan of carillons, I have several video clips of the bells playing on my YouTube channel. This is one of my favourites from the bunch:


The history of the Anglican Church in Cornwall goes back to 1787, but the current church was built in 1869, and opened for service in 1875. It is also known as the "Bishop Strachan Memorial Church". You can read more about it on various websites, including the church's official site here: http://www.trinityanglicancornwall.ca/

For the longest time in the church's history, the tower did not have a steeple (roof). The roof is aluminum (it had to be a light material, since Cornwall has a lot of clay in the soil, and we have very few tall buildings because of this), and it was added in the 1980s, I believe.

I have always loved the exterior of the church, but when I finally got to see the interior, I was blown away. I don't have a photo of the church's exterior, but you can see it in the videos. I'm focusing on the interior.

One of the most amazing features in this church is the stained glass. These are some of the most beautiful I have seen in a typical church. Tons of deep, rich jewel tones, and lots of detail.

 photo P9135619.jpg

 photo P9135625.jpg

The second most striking feature is the hammerbeam roof (yes I had to look up that term).

 photo P9135621.jpg

 photo P9135622.jpg

The church boasts a beautiful set of columns, marble tiled floors, and a beautiful organ.

 photo P9135623.jpg

 photo P9135624.jpg

The woodwork panelling that houses the organ is solid 1/4 sawn white oak.

 photo P9135620.jpg

 photo P9135626.jpg

 photo P9135633.jpg

 photo P9135634.jpg

During my visit, I was lucky enough to be given a tour by the music director. He showed me the small bell clavier in the tower (for manual playing of the bells).

 photo P9135617.jpg

To play, each lever is marked with a musical note, and you just push down on them, or play with balled fists on the levers.

Each lever on the clavier is connected by a cable to each of the bells in the tower.

 photo P9135618.jpg

If that wasn't cool enough, the music director also let me climb up into the organ with him to see the pipes. There are wooden ones, and tin/lead ones, anywhere from a few inches long (tiny lead ones) to huge ones that are dozens of feet long, and maybe 5 inches wide. I even think that some of the huge square wooden pipes may have been about a foot wide. I can't honestly remember. Another interesting note is that a lot of the pipes you see on the exterior of the organ are fake. Only some of those are real, and the others are "for show". Each pipe needs to be carefully tuned, so we had to be very careful not to touch anything, or hook anything. The lead pipes are very soft and fragile.

Different types of pipes will give different types of sounds. There's one pipe for each key on the keyboard, and there are many sets of pipes, which can be used in many combinations. You can use just 1 set, 2, 3, or even all of them at the same time. It all depends what you're playing.

 photo P9135639.jpg

 photo P9135640.jpg

 photo P9135641.jpg

 photo P9135642.jpg

I was treated to a piece by Bach on the organ, which was wonderful. I've been meaning to go back again, but poor planning meant that I missed their last open house. I could go on any Sunday, but I'd feel awkward to be there only for the music.