Saturday, August 27, 2011

Crapity Crap Crap

Well I went ahead and randomly decided to tear-off the ugly and very poorly installed OSB in the back garage wall. In the process I made some very alarming, and awful discoveries. I kind of wish I hadn't looked, but in a way, I'm better off knowing about this now, before it gets worst.

The issue is that the OSB was hastily installed to cover up the wall. "Why?", I hear you asking? Well, because part of the wall has some extreme water damage. So much so, that a few of the vertical studs are completely rotted, and many of the exterior tongue and groove boards are rotted, cupped, and warped. In the centre of the "bad" section, I can actually grab the stud, and if I shake it, the whole wall moves. SCARY!

They made an attempt at a repair, but it's laughable, and ineffective.

At this point, I'm thinking of simply building an entire secondary wall on the inside. This new wall would properly support the roof, and the weight would be on the concrete. I'm fairly sure they made the garage over a proper footing/etc, since the bottom under the wall seems to be cement. It's hard to tell, actually.

Here are some photos. They actually make it look less bad than if you were looking at it in person. :S

This first part just made me laugh, and scratch my head. I have NO idea why they didn't just remove the block, or shorten the piece of pine tacked to the stud.

Photobucket

And what's that block? It's actually an original plinth block (for a doorway) that's in reusable shape. And it was barely held on the wall by one nail.

Photobucket

Note that they had actually cut the OSB to go around this block, and it looked ridiculous: Click to see a "before" shot from a while back.

Then this is where things started to go downhill. I was wondering why they had added some 2x6s at the top of the wall. I removed a short length of it, and you can see that one of the two top studs is water damaged into an 'S' shape. You can also start to see some of the cupped t-g boards.

Photobucket

I did not remove the rest of the 2x6, since it might actually be holding something together, but this is how much more of it there is. It covers about 1/2 the length of the garage.

Photobucket

Here's the really bad spot. It continues up about another 2 feet (over the wood rack which is blocking the view). That centre stud is completely rotted into crumbly bits, and the other two are also damaged.

Photobucket

This spot is closer to the front of the garage (towards the street), and it's not quite as bad here, but it's not good either.

Photobucket

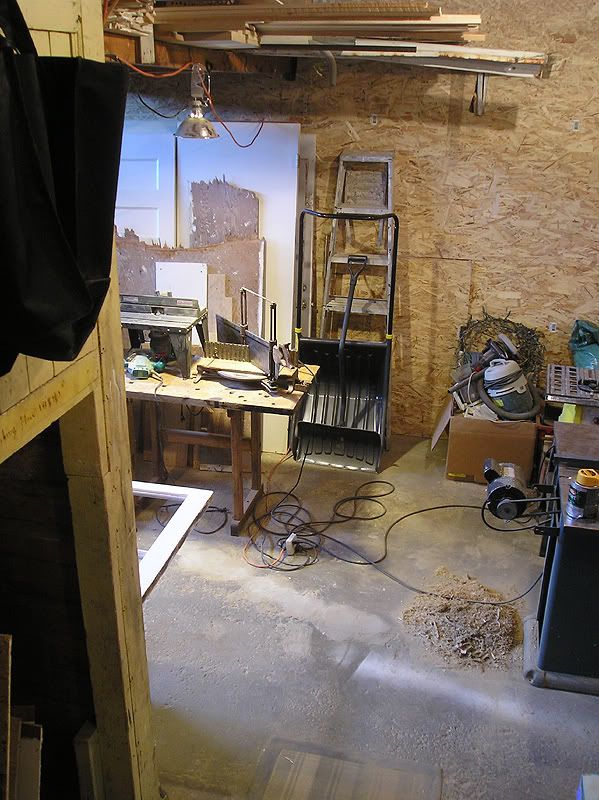
This shot shows the bad portion of the wall (towards the street). The corner stud is in line with the centre of the ladder (for reference). From the corner, I have maybe 1-2 feet that are ok, then it's bad up to the edge of the photo.

Photobucket

The good news is that the other half is in great shape. This is the half that's towards the neighbour's house (the building next door is literally that concrete block wall.

Photobucket

So ummm, yeah. Fun times, eh? I think this is the point where most people would break down and cry their eyes out, but I'm actually not that surprised/upset. I can fix it, it's just gonna be a lot of extra work to do. :(

Saturday, August 20, 2011

Local Houses

This will be just a short post regarding two local houses. One is a "good news" the other is a "bad news", so as with most people's usual choice, I'll start with the good news. This part is cross-posted (with slight tweaks) to "Old House Web Forums" under the Hangout section.

This is a house I've passed by on many occasions, and for the past couple of years (at least) it's been completely boarded-up and uninhabited. Just recently (early summer?) I noticed that the house had been opened-up again, and it looks like someone is living there again.

It's a rather plain little house, but it has some great charm and a ton of original features: original wood siding, original windows with wavy glass, stained glass, full length front porch, etc.

Photobucket

It's gonna need work, (mainly paint and new roofing) but it's a cute house.

It's also not visible in this photo, but the decorative window over the porch is decorated with stained glass squares around a clear centre glass. I believe some of the squares were an aqua blue, and one or two other shades, which I can't recall just now.

I should also mention that this is on the same street as my house, but about 4 blocks down.

Now the bad/sad news is regarding a lovely old Victorian house. This is one of the few remaining old houses in this particular area of town. I would guess that the house is from the late 1800's at least. The porch details match a similar house that I visited back when I was house hunting, and I think I might post one of the photos just for comparison, since I love the woodwork.

So yeah, just recently, maybe a few months ago, I noticed that they boarded up the house, cut off the power (literally), disconnected the gas, and I also assume the water is cut off. It's really looking as though it will be demolished, which breaks my heart, but I understand how much work, and how insanely expensive it would be to restore this house.

I actually have a friend who knows the people/family who owns the house. She told me that it was an old lady who's lived there probably her whole life. She said the family is probably going to keep the land, but she has no idea what's going on with the house. If I wanted, I could probably get in contact, and find out, but I'm undecided. I also have a feeling that there's a possibility that the old lady died it the house, which could be a factor in why the house is likely to be demolished.

Photobucket

Photobucket

Photobucket

This is the other house I had looked at, which has similar porch details (top brackets). That house was dated 1890, I think.

Photobucket

Getting Sick of Antique Lighting Babble Yet?

As the title suggests, I'm starting to wonder weather you guys are getting sick of me discussing the antique lighting? If not, would anyone be interested in a step-by-step (illustrated, of course) tutorial on rewiring one of these fixtures?

Anyhow. I went and bought some more spray paint, and I'm not quite sure how helpful the new colours will be (copper and gold). I think I will really need to play around with it to get the look I want.

I also happened to come across a local add recently for this "Moving Man's General Store" (The Moving Man is a local company that does moving, as the name suggests). So it's this big flea market type store filled with a mix of antiques, collectibles, and junk. Just the kind of place I love visiting. And it's actually back at the little strip-mall where I used to live (I lived in an apartment over the mall).

The store was much larger than I had thought it would be, and I found 3 antique glass shades at only 1$ each! I bought 2 matched round ones, and a matching "squash blossom" shaped one in the same pattern. I decided that the round set would look good on my "spare" fixture, so I assembled it this evening and it looks quite good. The other shade will be a spare.

My basement is really starting to look like an antique lighting store, LOL.

Photobucket

You'll note that the oval fixture with the round globes has the canopy sitting inside it. I haven't drilled the holes in it to mount the loop rings for the chains. I also set up the other fixtures-up with some temporary loops (to have them hang down straight).

Here's the other shade:

Photobucket

I worked some more on the MB floor this afternoon, and I finally decided that I would patch the two "so-so" damaged boards, so I got started on that.

Photobucket

I installed my reinforcement blocks too. I just cut a piece of 2x2 and wedged them in place tightly, followed with a long screw at each end (into the joists). These will serve as support for the side of the board that will have the bottom groove (of the tongue and groove) cut away to fit into place.

Photobucket

More soon.

Floors, Paint, and Lighting

Alright, just a few random things to share. First, the progress on the MB (that's Master Bedroom BTW) floor. So far I have the entire south room, and the centre where the closets used to be, filled and sanded, and I just finished puttying the other (north) half of the room this morning. I have just the closet left, but I'm out of filler.

Photobucket

Sanding the putty is made quite easy by simply scraping off the bulk of it flush with the floor with a scraper tool, and then giving it just a very quick pass with sand paper to smooth it. I should have this done by tonight if it's dry enough by later today.

Second: I've already had a couple of people who have asked me about the colour I used in the master bedroom. I will admit that it's not the colour I originally wanted, but it has grown on me and I quite like it. Depending on the light, it can look either blue, grey, or green. The colour I liked was originally the display colour from a bathroom at Rona. I asked what colour they used, and it was their ECO recycled paint in the "ocean" colour. BUT, the colour on the wall did not match their colour swatch since every can can vary slightly. So I got them to match the wall colour to an actual paint swatch, which was "Great Grey Whale". From that, I matched the paint chip over at Home Depot so I could use their "Behr Premium Plus Ultra" Paint and Primer in one. I used it on the bathroom, and I love the paint. Smells mild, goes on very smoothly and richly, and covers completely in 2 coats. It's not cheap at nearly 50$/can but I think it's better to use a good wall paint. I balanced out the cost by using a cheaper white trim paint.

All this to say: if you want to try out this paint, this is the recipe for it (if you're using Home Depot). If you decide to use it, or sample it, please let me know!

Photobucket

Third: The lovely Mrs. D has asked me to post the recently received lot of shade holders from eBay. I am 100% convinced that they are unused "New Old Stock", meaning that they are genuine antique parts, but they were never used on a fixture. The paint on them is a match to some of my other fixtures, but it's not worn or dirty, and it's much brighter/cleaner than all the others (as you'll see below).

I mounted them to the two main fixtures that need them, and I plan to paint the pans and canopies (in a 2-tone brass and copper-look effect) to match the shade holders.

Photobucket

You can see the colour difference between the shade holders here. Both are old, but the one on the left is one from one of my fixtures, and the one on the right is from the lot on eBay. The one on the left (under the dirt, which is too hard to remove and is also partially faded, it's the same colour).

Photobucket

The fixture that's in the living room also used to be the same copper colour, but I wanted to match the aged paint, so I didn't restore it to the copper colour. The final colour for that one was a dulled brown. But, if you recall this photo, the original copper was still visible under the cast brass arms:

Photobucket

To match the newer copper colour I'll need to grab one or two other shades of copper spray paints.

Friday, August 19, 2011

Floors

Another small update. I decided to do a bit more work on the MB floors this evening, and I'm happy to report that I now have half the floor ready for paint! I would have continued, but my hands and knees were getting sore. I really need one of those kneeling pad things.

Wednesday, August 17, 2011

Another Lighting Update

Ok so I just received the lot of 8 shade fitters and I'm rather excited. They actually look new, as if they were never used (new old stock maybe?) They were all stacked tightly together in a row (like paper cups) and they have all the original screws to them. What I plan to do now is to match the orange/copper kind of finish on them to the fixtures they will go with. Should look great, but I'll need to go buy more paint(s) again. It's a really good thing that oil based spray paints are really cheap!

Sunday, August 14, 2011

Patching Old Siding

This entire ordeal started off with just wanting to move a light switch over about a foot.

This whole area deals with the heating "stack" for the upstairs "L" bedroom, which runs next to the living room door and next to the front door. I took down this drywall stack so that I could fix the botch job they did. First, they were covering a light switch, which I'm sure isn't legal, since you need to be able to access it, and there was a really hideous "access door" at the bottom.

This is the best views I have of it:

Photobucket

Photobucket

I love demolition. Can you tell?

Photobucket

What a botch job.

Photobucket

Really?

Photobucket

Note where the hole SHOULD have been made...

Photobucket

And just so you realize the true butchery of this whole thing, this is how it looks from the bedroom. The register does not even fit in that hole.

Photobucket

So the reason that this repair got so complicated is because of the large patch that I decided to remove in the porch. For months (or nearly a year at this point) I had been wondering what was behind it. I don't have any good photos of it, but it was an OBS boards, screwed down and painted white.

Photobucket

The reason I removed it, is because from this spot, I had clear access to the wires/plug/etc to move and rewire the new switch.

Once I had the switch moved, I re-packed the wall with insulation.

Photobucket

Photobucket

Photobucket

Photobucket

SO much better.

Photobucket

But now I had a huge unsightly hole right at the front of the house, which has a glass window porch. Not good.

So I got the work making some patch pieces. In this whole process I discovered that the original siding is cedar! I love cedar (smells wonderful and doesn't rot easily).

I made the boards on the table saw only. The only other tool I used was a sander, and clamps.

For most people, a table saw has limited use, but to a cabinetmaker, there's all kinds of great things you can do with one, including cove mouldings. To make cove on a table saw, you need to match the curve of the blade to the profile you need. You need to run your boards through the blade at an angle. The angle depends on how narrow or wide your cove will be. You ABSOLUTELY MUST use guide blocks on both sides to do this. You must also do it in several light passes. You CAN go through the blade even at 90 degrees for a very shallow curve, but you have to go much slower.

This is the best shot I could get of how to match the curve by eye.

Photobucket

Guide blocks, secured in place by clamps.

Photobucket

Photobucket

Photobucket

Next, I had to remove the lip, and create the rest of the grooves/cuts, which was pretty straightforward.

Photobucket

Sanding wasn't too hard since I was using pine. If you are doing this with hardwood, it will take a lot of scraping/sanding to get a nice profile.

Photobucket

Photobucket

All that's left now was to install them. I found that the profiles matched better when lining up the curved cut rather than the bottom edge, since many of the bottom edges seemed irregular (paint drips, small chips, etc).

Photobucket

Photobucket

Photobucket

Photobucket

Photobucket

A bit of latex silicone on the joints, a bit of putty, and a quick coat of paint, and you can hardly see the repair! I did do a bit of sanding over the joints also.

Photobucket

Photobucket

Patching Tongue and Groove Floors

Patching the upstairs hallway floors was a bit nerve wracking, even for me, who knows what he's doing most of the time. I had brought-in a sample to work, and during my lunch break, I made up a small batch of patch boards to fix the floor.

When working with t-g flooring, you must remember that all edges of each board need support. So when you cut out old boards, it's not always possible to slide them back into place (where the tongue and groove on each side is held in place). In some areas, such as a small patch, you may need to cut the bottom half of the groove to be able to slide the board in place. In this case, you will need to provide a support underneath that edge, otherwise it will snap when you put your weight on it (the exception to this is if you have a sub-floor. In that case there's no problem since the entire board is supported.

I was lucky with the odd layout and gaps in the bottom of the stair wall (since it was added over the laminate (not a bright idea but I'm not rebuilding the entire thing including the MB closet to fix this), so for the most part, I was able to slide almost all my boards in place.

The first step was to cut away all the bad spots. When ding this, try (as much as possible) to stagger the joints.

Photobucket

Photobucket

In my case, I was just top-nailing all my boards down on the joists. I didn't take many "during" photos, since there wasn't much to see. On several of the long boards, I had to carefully slide them in place, then use a large hammer and a block to drive them in. If you do this, make a bit of a rounded end on the edged of the tongue and groove at the end of the board, to help it slide more smoothly.

Finished patch job:

Photobucket