Today marks the second year since I first set foot in my first house. I can still remember some of what was going through my head that day. The possibilities, the disgust at some of the filthy crap left behind by the former tenants, and generally wondering weather I had made the right choice.
I remember that I first drove by with my friend Angelina after I got the keys from the lawyer, and some of the tenants were still moving stuff out, so we went out for lunch to wait for them to finish/leave. I'm pretty sure we had some sandwiches from Riley's Bakery downtown (a wonderful little place that sells well priced and generously proportioned fresh sandwiches - on fresh baked bread, as well as a wide assortment of pastries).
I also remember that it was a nice warm day. Today was fairly warm-ish, but lately it's still been pretty cold, and I'm still heating the house.
Last year, to celebrate, I threw a rather decent party/get together with all my available friends, and some of the parents who helped me move, plus dad, and my aunt also showed up. This year, however, I'm doing the party a little bit more low-key, and I'm inviting just friends. I'm expecting around 10 people.
I still have a lot of cleaning and organizing left to do during the week (the party will be on Saturday).
I thought it would be fun to compile a list of all the work that got done this year so far, but I don't know if I'll end up having the time.

Monday, April 30, 2012
Saturday, April 28, 2012
L Room Trim Work
I can't remember weather or not I mentioned any of this already (and I'm too lazy to check). I patched the old hole in the wall where the built-in bookcase used to be (formerly a window). Reasons for this have already been discussed/explained.
This is just the first (rough) coat, and I haven't done the second coat yet.


I did finish the drywall mudding on the portion of the (newly rebuilt) wall with the entrance door and closet door, and I installed the trim for those two doors.
I found a few scraps of wood for the bases, and I already had some side pieces. I was able to do most of the pieces, but then I ran out of nails. :(

I stopped by a Home Hardware and picked up 2lbs of nails (much MUCH cheaper to buy them in bulk than in packages), so I was able to finish these up. I had to make a set of parting beads (transition bead moulding over the side columns). These were done Tursday/Friday.

The real finishing touch is always the crown mouldings over the doors. I have quite a bit of this left, but I still need at least 6 more pieces ~40" and the pieces that are left are really chipped/damaged, so they may require more creative patching.
Side note: because of the angle, the doors look like they are odd sizes, but they are both 30".

I also started scraping/fixing/patching one of the two windows in the L Room (the last 2 windows in the house to fix). These had been heavily plastered-over with drywall compound to avoid fixing some peeling paint issues and other damage (nails, holes, and staples). They REALLY caked and blobbed it on, too. Luckily, though, it does scrape off pretty easily. I spent no more than an hour on this window, and it's about 80% done. I'll also need to make some more of my custom Roman Ogee trim to fit around the vinyl window gap.

The only other bit of house news is that this afternoon I finally put the issue of the door hinges to rest. For those who are avid readers, you'll know that since FEBRUARY, I've been waiting for some Stanley 3" ball-tip hinges. These guys:

These are the closest thing to a historically accurate (and affordable) ball-tip door hinge. They're not super cheap at 6.98$ per hinge, but I wasn't willing to settle for flat-top (plain) hinges, and I also didn't want to pay 20$+shipping for these (admittedly much nicer) ones from Rejuvenation: http://www.rejuvenation.com/fixshow7659/templates/selection.phtml?n=v&fin_selected=LQ&img=Z005768
That's 400$ + shipping, VS ~160$
I had originally wanted 20 (enough for 10 doors). They only had a few in the store and some of the packages were opened and re-taped, so I had them (Home Depot) order 20 of them. I waited a week or so, then I called in ahead of time to make sure that they had them (they said yes). When I went in, they only had 10 on the shelf. I asked about the others, and apparently the system was telling them that they were in the store, but not out on the shelf yet, so I was told that they might just be somewhere "in the back" and that they would be put out on the shelf by the next day, and to just come back.
So I did. Still no hinges. The guy said it was a bit of a "mess back there" and to try again next week. I went back AGAIN the next week, and he still had no idea where the hinges had disappeared to. So the guy in hardware ordered another 10 (after the second or third visit).
So this charade of going back again and again and again) has been going on since FEBRUARY. I literally go in every week (or two) and I'm told the same thing. I even went to the help desk and complained, so they took my name and number along with the item number, and they said they would call me as soon as the hinges came in. A few weeks back, I did manage to find 5 of them in the wrong place with some other hinges and I bought them, but I'm still missing another 5.
So fast forward to today. It's always the same guy from hardware, and he knows what I'm going to ask each time he sees me. But today he told me it was his supervisor who was taking care of it. So I walked away, and then decided to have some balls and I turned around and asked if I could speak directly to his supervisor. He said sure, and I was handed over to another older gentleman in charge, and I explained the whole story to him, and he checked some stuff on their system.
Apparently there's some kind of problem with this particular item since it wasn't even showing up in their system that they had sold any of them (and I bought 15 so far since Feb.), and the system was still showing that they had a bunch of them available. So he found a store in Brockville (a city 2 hours away) and they apparently had 39 of them in stock. He got on the phone with them, and got them to send over 10 of them (5 for me and 5 to add to their stock, since they only have 2 on the shelf).
So now they are supposed to be in by this Wednesday/Thursday. He also printed out an invoice with the info/details/price, etc.
So yeah. WHY this took so long to sort-out is beyond me. It's just a bunch of hinges. I should not have had to wait over 2 months and bug the employees about the same issue over a dozen times before the issue got fixed. It took less than 10 minutes to fix this.
I'm not impressed with Home Depot. At least the last time they f-ed up, they compensated me slightly (20$ bag of mortar to redo all the bathroom tiles that didn't stick and never dried). All I got was an apology for having to wait so long.
Sossy if that turned into a bit of a long rant. This has just been dragging and annoying me since I really don't want to end up stuck with missing hinges. I tend to end up getting screwed by buying obsolete/discontinued items, and then not being able to find equivalent replacements. It's the exact same problem that happened with the mortise lock sets. The ones I bought (and liked) are not sold anymore. They are still selling them, but they're another brand and I don't like how they're made.
This is just the first (rough) coat, and I haven't done the second coat yet.
I did finish the drywall mudding on the portion of the (newly rebuilt) wall with the entrance door and closet door, and I installed the trim for those two doors.
I found a few scraps of wood for the bases, and I already had some side pieces. I was able to do most of the pieces, but then I ran out of nails. :(
I stopped by a Home Hardware and picked up 2lbs of nails (much MUCH cheaper to buy them in bulk than in packages), so I was able to finish these up. I had to make a set of parting beads (transition bead moulding over the side columns). These were done Tursday/Friday.
The real finishing touch is always the crown mouldings over the doors. I have quite a bit of this left, but I still need at least 6 more pieces ~40" and the pieces that are left are really chipped/damaged, so they may require more creative patching.
Side note: because of the angle, the doors look like they are odd sizes, but they are both 30".
I also started scraping/fixing/patching one of the two windows in the L Room (the last 2 windows in the house to fix). These had been heavily plastered-over with drywall compound to avoid fixing some peeling paint issues and other damage (nails, holes, and staples). They REALLY caked and blobbed it on, too. Luckily, though, it does scrape off pretty easily. I spent no more than an hour on this window, and it's about 80% done. I'll also need to make some more of my custom Roman Ogee trim to fit around the vinyl window gap.
The only other bit of house news is that this afternoon I finally put the issue of the door hinges to rest. For those who are avid readers, you'll know that since FEBRUARY, I've been waiting for some Stanley 3" ball-tip hinges. These guys:
These are the closest thing to a historically accurate (and affordable) ball-tip door hinge. They're not super cheap at 6.98$ per hinge, but I wasn't willing to settle for flat-top (plain) hinges, and I also didn't want to pay 20$+shipping for these (admittedly much nicer) ones from Rejuvenation: http://www.rejuvenation.com/fixshow7659/templates/selection.phtml?n=v&fin_selected=LQ&img=Z005768
That's 400$ + shipping, VS ~160$
I had originally wanted 20 (enough for 10 doors). They only had a few in the store and some of the packages were opened and re-taped, so I had them (Home Depot) order 20 of them. I waited a week or so, then I called in ahead of time to make sure that they had them (they said yes). When I went in, they only had 10 on the shelf. I asked about the others, and apparently the system was telling them that they were in the store, but not out on the shelf yet, so I was told that they might just be somewhere "in the back" and that they would be put out on the shelf by the next day, and to just come back.
So I did. Still no hinges. The guy said it was a bit of a "mess back there" and to try again next week. I went back AGAIN the next week, and he still had no idea where the hinges had disappeared to. So the guy in hardware ordered another 10 (after the second or third visit).
So this charade of going back again and again and again) has been going on since FEBRUARY. I literally go in every week (or two) and I'm told the same thing. I even went to the help desk and complained, so they took my name and number along with the item number, and they said they would call me as soon as the hinges came in. A few weeks back, I did manage to find 5 of them in the wrong place with some other hinges and I bought them, but I'm still missing another 5.
So fast forward to today. It's always the same guy from hardware, and he knows what I'm going to ask each time he sees me. But today he told me it was his supervisor who was taking care of it. So I walked away, and then decided to have some balls and I turned around and asked if I could speak directly to his supervisor. He said sure, and I was handed over to another older gentleman in charge, and I explained the whole story to him, and he checked some stuff on their system.
Apparently there's some kind of problem with this particular item since it wasn't even showing up in their system that they had sold any of them (and I bought 15 so far since Feb.), and the system was still showing that they had a bunch of them available. So he found a store in Brockville (a city 2 hours away) and they apparently had 39 of them in stock. He got on the phone with them, and got them to send over 10 of them (5 for me and 5 to add to their stock, since they only have 2 on the shelf).
So now they are supposed to be in by this Wednesday/Thursday. He also printed out an invoice with the info/details/price, etc.
So yeah. WHY this took so long to sort-out is beyond me. It's just a bunch of hinges. I should not have had to wait over 2 months and bug the employees about the same issue over a dozen times before the issue got fixed. It took less than 10 minutes to fix this.
I'm not impressed with Home Depot. At least the last time they f-ed up, they compensated me slightly (20$ bag of mortar to redo all the bathroom tiles that didn't stick and never dried). All I got was an apology for having to wait so long.
Sossy if that turned into a bit of a long rant. This has just been dragging and annoying me since I really don't want to end up stuck with missing hinges. I tend to end up getting screwed by buying obsolete/discontinued items, and then not being able to find equivalent replacements. It's the exact same problem that happened with the mortise lock sets. The ones I bought (and liked) are not sold anymore. They are still selling them, but they're another brand and I don't like how they're made.
Sunday, April 22, 2012
Weekly Update
Oh wow, apparently there's a whole new look for the "New Post" page. It seems so vast and spacious. I'm not sure if I like it yet, but it's alright. I tend to dislike changes, but I think I'll like the extra room to see more of the text as I scroll up/down to edit.
Ok, so I haven't posted in a while. Not because nothing's been happening, but because I have either lacked the time or the motivation. With that said, I have something like 18 photos to post. So this might end up being the norm for me. One long post a week, with the occasional one in between.
I've been sick with a fever since Thursday night, so Friday was completely unproductive. Saturday, I did manage to do a bit of work (details farther down). Earlier in the week, on Tuesday, I had a dentist appointment and I skipped the entire morning from work (since it would have cost me an insane amount of $$ to take a taxi twice). So I got a bunch of drywall and small jobs done. Unfortunately, I have another dentist appointment next Wednesday (25th), and probably a few more after (if I can afford it). I apparently need 8 fillings. O_o! My bank account is crying. And no, I have no coverage or benefits at work.
On that morning, just outside my window, I saw a lovely sight. There was a whole bunch of lovely black and orange butterflies on the porch. I counted at least 5 of them. I took photos from inside, but when I tried to go outside to get better shots, they all flew away :(


My friend Gen (who is oddly terrified of moths and butterflies) said that they looked like "Painted Lady" butterflies, but I checked, and those are very similar, but they have a lot more pattern to their wings. These are fairly common, and a Google search shows that these are even found over in Europe (but I didn't find their name).
AHA! Red Admiral.
Here's some of the drywall I did (started). This is in the L Room.

I realized a week ago that I never showed a picture of the fully scraped ceiling in the L Room. This was a lot of work, but I'm a perfectionist, and I wanted to remove the chunky/lumpy coating of mud so that I could straighten-out the old ceiling before installing the new drywall over top. I also moved the light fixture location to be centered with the window. You can probably see all the added screws with washers, which pulled-up all the sagging portions of the ceiling.

On Wednesday, I made a side trip after work to visit a friend at work. It's her last day in town before she moves to Timmins, Ontario (which is something like a 6 hour drive north). I wanted her opinions on what mattress I should buy (since I'll need one once the master bedroom is finished). On the way, I stopped in the nearby woods to photograph the trilliums. They were just starting to open, so I got a lot of nice shots with some that were partially open/fully open, or just starting to open. I also found some Red Trilliums (aka Stinking Benjamins). I had something like 20 photos, but I trimmed them down to 6.
The White Trillium is Ontario's provincial flower. I absolutely love them. I have a photo (somewhere in an album) of my friend Meghan in a forest packed full of large trilliums.


This pair was a slightly lighter red than the previous ones I saw. There are pink varieties, but they are much lighter than these, so these are still Red Trilliums.


Around the same time (Tue-Wed), I received the parts to finish my two incomplete light fixtures. I was happy to finally cross these off my to-do list.
New canopy (I tried to antique the brass as much as I could, but it's still too shiny, so I'll leave the rest up to time (natural oxidation).


This is a random shot of the upstairs hallway shade.

This one was only missing the brass tube at the top, which I also antiqued.


Lastly, yesterday I finished the office built-in, installed it, and filled the voids with insulation. It's ready for finishing or trim.

It looks like it's too short from the top and bottom, but I made it to be the same size as the original window opening/casings would be, to keep things consistent.
I also think it's been a long time since I posted a photo (last year, maybe), so this is me. The photo was taken this morning. I need to shave.

Ok, so I haven't posted in a while. Not because nothing's been happening, but because I have either lacked the time or the motivation. With that said, I have something like 18 photos to post. So this might end up being the norm for me. One long post a week, with the occasional one in between.
I've been sick with a fever since Thursday night, so Friday was completely unproductive. Saturday, I did manage to do a bit of work (details farther down). Earlier in the week, on Tuesday, I had a dentist appointment and I skipped the entire morning from work (since it would have cost me an insane amount of $$ to take a taxi twice). So I got a bunch of drywall and small jobs done. Unfortunately, I have another dentist appointment next Wednesday (25th), and probably a few more after (if I can afford it). I apparently need 8 fillings. O_o! My bank account is crying. And no, I have no coverage or benefits at work.
On that morning, just outside my window, I saw a lovely sight. There was a whole bunch of lovely black and orange butterflies on the porch. I counted at least 5 of them. I took photos from inside, but when I tried to go outside to get better shots, they all flew away :(
My friend Gen (who is oddly terrified of moths and butterflies) said that they looked like "Painted Lady" butterflies, but I checked, and those are very similar, but they have a lot more pattern to their wings. These are fairly common, and a Google search shows that these are even found over in Europe (but I didn't find their name).
AHA! Red Admiral.
Here's some of the drywall I did (started). This is in the L Room.
I realized a week ago that I never showed a picture of the fully scraped ceiling in the L Room. This was a lot of work, but I'm a perfectionist, and I wanted to remove the chunky/lumpy coating of mud so that I could straighten-out the old ceiling before installing the new drywall over top. I also moved the light fixture location to be centered with the window. You can probably see all the added screws with washers, which pulled-up all the sagging portions of the ceiling.
On Wednesday, I made a side trip after work to visit a friend at work. It's her last day in town before she moves to Timmins, Ontario (which is something like a 6 hour drive north). I wanted her opinions on what mattress I should buy (since I'll need one once the master bedroom is finished). On the way, I stopped in the nearby woods to photograph the trilliums. They were just starting to open, so I got a lot of nice shots with some that were partially open/fully open, or just starting to open. I also found some Red Trilliums (aka Stinking Benjamins). I had something like 20 photos, but I trimmed them down to 6.
The White Trillium is Ontario's provincial flower. I absolutely love them. I have a photo (somewhere in an album) of my friend Meghan in a forest packed full of large trilliums.
This pair was a slightly lighter red than the previous ones I saw. There are pink varieties, but they are much lighter than these, so these are still Red Trilliums.
Around the same time (Tue-Wed), I received the parts to finish my two incomplete light fixtures. I was happy to finally cross these off my to-do list.
New canopy (I tried to antique the brass as much as I could, but it's still too shiny, so I'll leave the rest up to time (natural oxidation).
This is a random shot of the upstairs hallway shade.
This one was only missing the brass tube at the top, which I also antiqued.
Lastly, yesterday I finished the office built-in, installed it, and filled the voids with insulation. It's ready for finishing or trim.
It looks like it's too short from the top and bottom, but I made it to be the same size as the original window opening/casings would be, to keep things consistent.
I also think it's been a long time since I posted a photo (last year, maybe), so this is me. The photo was taken this morning. I need to shave.
Monday, April 16, 2012
Office Built-In
Guess what I did today!?!?
I had half a day off, so I took the opportunity to get off my lazy a** and I got 99% of the office's built-in made. I plan to eventually make one the same for the kitchen, except that the doors will be different (for those not in the loop, the one in the office will have glass doors and the one in the kitchen will have wood panel doors).
The one going in the office was made to match the custom built-in upstairs, and I'll be staining them all the same colour. I was thinking about making them out of oak veneer or something, but I kind of like the old fashioned look of the fir plywood.
I just finished routing the "tongue & groove" in the 1/2" back. The surrounding frame is done (It had to have tracks routed into them for the adjustable shelf hardware.
The only part I couldn't finish was to cut the back out of the 4x8 sheet. I couldn't do this because my saw (circular saw) is at my friend's place (and it's raining so I don't want to walk over to get it).
More soon!
Sunday, April 15, 2012
A Tale of Two Mirrors
I mentioned the other day that I purchased an antique mirror that was a twin to one I already owned. Why would I buy a second identical mirror, I hear you asking? Well, a few reasons. First, for some unexplained reason, I always like to have sets of things (not all the time). I like symmetry, and I also think it's neat to have a pair of unusual items rather than just the one. These, however, are large mirrors, and I don't think I would pair them together in the same room. The primary reason for me was the condition, and the price. I did not even think I would buy this second mirror, because I assumed they would be asking too much for it, but I asked anyways, and the owner said he'd take 25$ for it. SOLD!
I fancy myself to be quite an antiques buff (clocks, mirrors, lamps, and furniture), and condition is always very important. The first mirror that I bought (several years ago at a yard sale, for probably no more than 10-15$) had been stripped and sanded. I have thought about refinishing it with a stain and varnish many times, but now that I have the second mirror, I'm glad I waited.
This second mirror still has a wonderful original shellac finish on it. I plan to eventually copy this finish on the other mirror (the other mirror is bare wood).

Both mirrors are made of solid walnut (a very beautiful and expensive wood), and are in the Eastlake style. I would also guess that they date to this time period (1880-1890). They both have the same kind of thick cut glass. I avoid using the term "beveled" for these, since they are actually not cut on a bevel.

The cut on these mirrors is actually quite unusual, and difficult to photograph. They basically have a shallow concave (scoop) cut along the edges, which gives an interesting "tube" style reflection on the edges. These criss-cross at the corners, creating an X. Another nice thing to note is how WIDE the cut is. Generally, when you buy beveled glass from a glass shop, you pay by the square inch. The deeper the cut, the more expensive it will be. The standard is about 3/4" and sometimes a bit wider at 1". The cut on these mirrors is 1 1/2".
Both mirrors have damage to their silvering, but the second mirror is a bit worst. I should note, however, that I *LOVE* mirrors with imperfect silvering. The large mirror (last photo) is actually my least favourite because it looks too perfect. The glass is definitely old, and there are distortions in it, but it's not as interesting as a spotty dull old mirror.

The backs both have the same t-g pine planks screwed in place with slot screws.

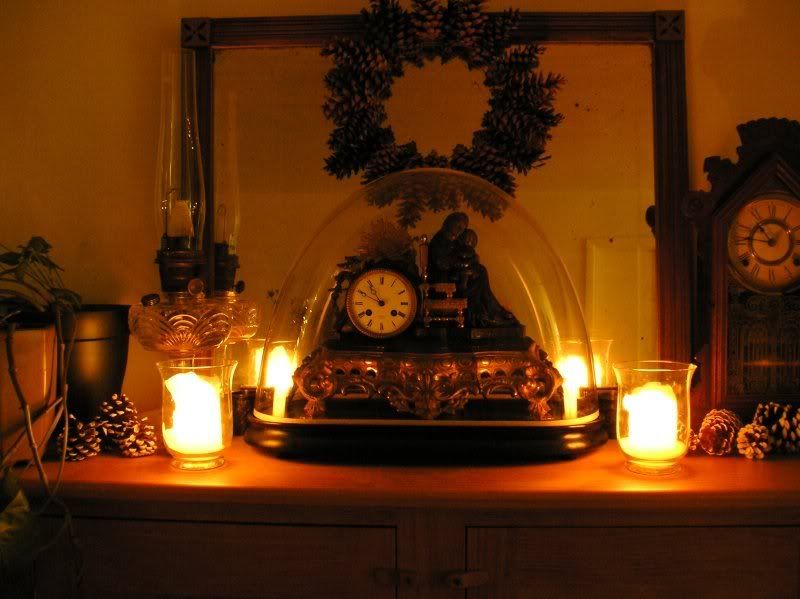
For years at my old apartment, I used the mirror over my diamond panel bookcase, until it got replaced with an even larger mirror (another yard sale find). You can see the setup in these two photos. One was at Christmas time (with white-tipped pine cones and candles).
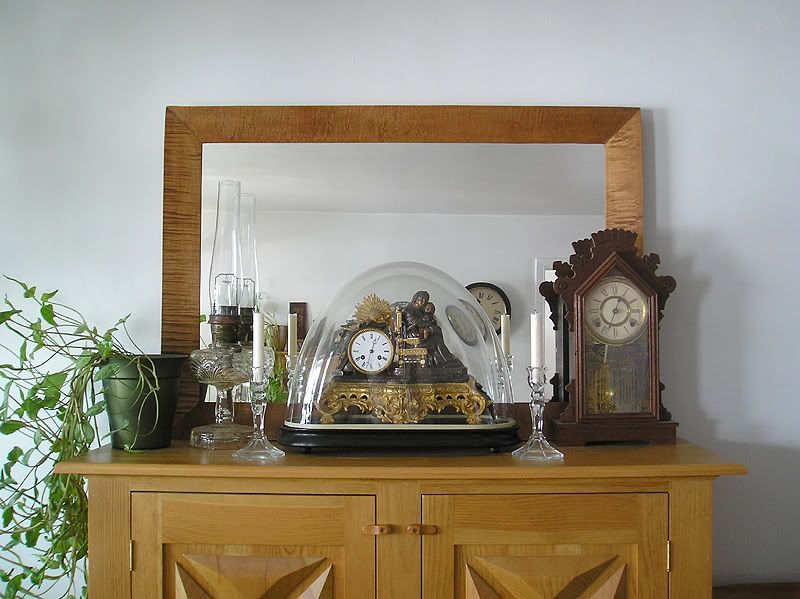
The current (larger) mirror (which was also a whole other restoration story on its own) works better with the scale of the bookcase:
I have plenty of other smaller mirrors (some very plain, some very ornate), which I will eventually be digging out of boxes and putting up once I'm closer to the decorating stage in my renovations. I also have a number of beautiful old lamps, like the Aladdin in the above photo.
I fancy myself to be quite an antiques buff (clocks, mirrors, lamps, and furniture), and condition is always very important. The first mirror that I bought (several years ago at a yard sale, for probably no more than 10-15$) had been stripped and sanded. I have thought about refinishing it with a stain and varnish many times, but now that I have the second mirror, I'm glad I waited.
This second mirror still has a wonderful original shellac finish on it. I plan to eventually copy this finish on the other mirror (the other mirror is bare wood).
Both mirrors are made of solid walnut (a very beautiful and expensive wood), and are in the Eastlake style. I would also guess that they date to this time period (1880-1890). They both have the same kind of thick cut glass. I avoid using the term "beveled" for these, since they are actually not cut on a bevel.
The cut on these mirrors is actually quite unusual, and difficult to photograph. They basically have a shallow concave (scoop) cut along the edges, which gives an interesting "tube" style reflection on the edges. These criss-cross at the corners, creating an X. Another nice thing to note is how WIDE the cut is. Generally, when you buy beveled glass from a glass shop, you pay by the square inch. The deeper the cut, the more expensive it will be. The standard is about 3/4" and sometimes a bit wider at 1". The cut on these mirrors is 1 1/2".
Both mirrors have damage to their silvering, but the second mirror is a bit worst. I should note, however, that I *LOVE* mirrors with imperfect silvering. The large mirror (last photo) is actually my least favourite because it looks too perfect. The glass is definitely old, and there are distortions in it, but it's not as interesting as a spotty dull old mirror.
The backs both have the same t-g pine planks screwed in place with slot screws.
For years at my old apartment, I used the mirror over my diamond panel bookcase, until it got replaced with an even larger mirror (another yard sale find). You can see the setup in these two photos. One was at Christmas time (with white-tipped pine cones and candles).


The current (larger) mirror (which was also a whole other restoration story on its own) works better with the scale of the bookcase:

I have plenty of other smaller mirrors (some very plain, some very ornate), which I will eventually be digging out of boxes and putting up once I'm closer to the decorating stage in my renovations. I also have a number of beautiful old lamps, like the Aladdin in the above photo.
Saturday, April 14, 2012
Antique Table, L Room Ceiling, & Cornwall Homes 4
Antique Table:
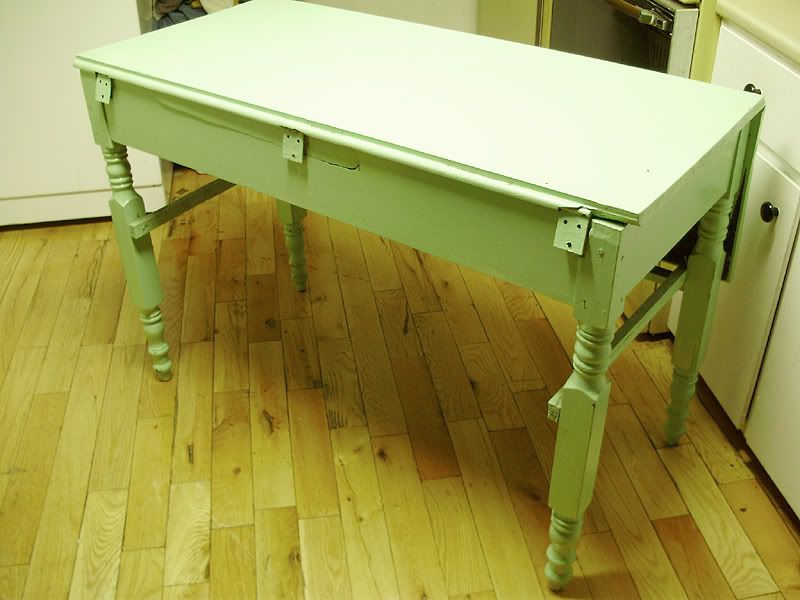
Alright, so I took a closer look at the table. While it doesn't have hand forged hinges, it still has plenty of quirks. One of the first things I looked at, was to compare the turned legs. Often, on older pieces, they will be hand turned. On later pieces they would be done on a copy lathe, or by very skilled craftsmen who could duplicate them very precisely. This set, however, is mind bogglingly (and charmingly) inaccurate. I am not the best at making matched sets by hand, but even I can't understand how they messed this up THIS much.
One leg in particular is quite a bit "off". So much so, that if the leaf is down on that side, the legs look mismatched. See here:

Three of the legs are done like the one on the right, but the one on the left is the "bad" one. The reason I can't understand why they messed it up so bad, is that usually when you make multiples of a pattern, you make yourself a "story stick", which is sort of a pattern that marks all the start/stop locations of each major element on your turned item. Obviously they didn't do this. But like I said: it's a bit charming this way.
L Room Ceiling:
Alright. I've been dreading this job for months, and I wasn't sure which way I was going to do it, and I finally bit the bullet and did it the "better but unsafe" way, which was to remove the "bad" sheet of drywall and replace it. If you want a refresher as to what was going on with this ceiling, go to this post: . Basically, 90% of the ceiling was scraped of the putty easily (haha not really), except for one section about 4x8. On this section, the mud that they smeared on was completely cemented in place. The reason for this, is that they changed the drywall in this 4x8 section, and they added the textured mud directly over the paper. I had 2 choices for fixing this:
1. Carefully remove the 4x8 section, while trying not to fill the house with hundreds of thousands of possibly asbestos-contaminated dust particles from the attic above.
2. Shim-up the entire ceiling to match-up with the uneven thickness of the replaced sheet and leave it alone since it will all be covered up anyways.
As I just mentioned, I went with option 1.
I was nervous as hell, and I did end up dropping a bunch of insulation dust/particles/crumbs all over the floor, but luckily the 4x8 section had been put up in two 4x4 sections, and I was able to contain most of the mess. For reasons unknown, when they removed/replaced the sheet, they also removed the protective layer of thin cardboard that would have PREVENTED the old insulation from trickling down through the cracks in the t-g ceiling. So as soon as I had the sheet off, and the floor vacuumed, I capped it with vapour barrier plastic and sealed all the seams.
Here's what the open ceiling looks like. It's very wide (7") t-g face-nailed to the attic/ceiling joists (which run the whole length of the house).

All those little white crumbs are particles of the vermiculite insulation.

I only felt safe at this point:

The second section went even better, since I was able to loosen 90% of the sheet, and then lean it down just a bit. Then I was able to just vacuum-up all the loose bits on the sheet before taking it down off the edge of the wall (where the corner tape was holding it like a hinge).


Don't even ask me HOW I got this 4x8 sheet of 3/8" drywall up BY MYSELF without breaking it or killing myself. I'll just say that it was a huge PITA.

I still need a narrow strip to fill that gap where the tape is visible. When it comes to installing the new (1/2") drywall over this mess, I'll be getting some friends to help out.
Cornwall Homes 4:
These were taken this afternoon. We'll start with what I consider to be the nicest foursquare in Cornwall. It is in immaculate condition, and boasts ALL of its original windows, original storm windows, original exterior doors, and even the wooden fascia and trim around the roof line. I love that they accented all the storm windows and secondary doors in a classic forest green.


Just next door (2 houses down) is this fine Victorian with a beautiful enclosed circular porch. This house also has all of its original windows, and beautiful (red) arched front doors (not pictured). I love how this photo looks vintage. It was purely caused by the late afternoon sun.

This is another very nice foursquare. I want to make a door for my porch that is similar to theirs, to complement my porch windows (which are also 4 over 2).

Lastly, this is the grand entrance of a gorgeous apartment building not too far away on one of the main roads. The building has massive fluted columns that span the whole building (3 storeys), and the centre windows are all art deco styled stained glass. The balconies also have nicely detailed wooden railings (which you can partially see on the sides of the photo).

Alright, so I took a closer look at the table. While it doesn't have hand forged hinges, it still has plenty of quirks. One of the first things I looked at, was to compare the turned legs. Often, on older pieces, they will be hand turned. On later pieces they would be done on a copy lathe, or by very skilled craftsmen who could duplicate them very precisely. This set, however, is mind bogglingly (and charmingly) inaccurate. I am not the best at making matched sets by hand, but even I can't understand how they messed this up THIS much.
One leg in particular is quite a bit "off". So much so, that if the leaf is down on that side, the legs look mismatched. See here:
Three of the legs are done like the one on the right, but the one on the left is the "bad" one. The reason I can't understand why they messed it up so bad, is that usually when you make multiples of a pattern, you make yourself a "story stick", which is sort of a pattern that marks all the start/stop locations of each major element on your turned item. Obviously they didn't do this. But like I said: it's a bit charming this way.
L Room Ceiling:
Alright. I've been dreading this job for months, and I wasn't sure which way I was going to do it, and I finally bit the bullet and did it the "better but unsafe" way, which was to remove the "bad" sheet of drywall and replace it. If you want a refresher as to what was going on with this ceiling, go to this post: . Basically, 90% of the ceiling was scraped of the putty easily (haha not really), except for one section about 4x8. On this section, the mud that they smeared on was completely cemented in place. The reason for this, is that they changed the drywall in this 4x8 section, and they added the textured mud directly over the paper. I had 2 choices for fixing this:
1. Carefully remove the 4x8 section, while trying not to fill the house with hundreds of thousands of possibly asbestos-contaminated dust particles from the attic above.
2. Shim-up the entire ceiling to match-up with the uneven thickness of the replaced sheet and leave it alone since it will all be covered up anyways.
As I just mentioned, I went with option 1.
I was nervous as hell, and I did end up dropping a bunch of insulation dust/particles/crumbs all over the floor, but luckily the 4x8 section had been put up in two 4x4 sections, and I was able to contain most of the mess. For reasons unknown, when they removed/replaced the sheet, they also removed the protective layer of thin cardboard that would have PREVENTED the old insulation from trickling down through the cracks in the t-g ceiling. So as soon as I had the sheet off, and the floor vacuumed, I capped it with vapour barrier plastic and sealed all the seams.
Here's what the open ceiling looks like. It's very wide (7") t-g face-nailed to the attic/ceiling joists (which run the whole length of the house).
All those little white crumbs are particles of the vermiculite insulation.
I only felt safe at this point:
The second section went even better, since I was able to loosen 90% of the sheet, and then lean it down just a bit. Then I was able to just vacuum-up all the loose bits on the sheet before taking it down off the edge of the wall (where the corner tape was holding it like a hinge).
Don't even ask me HOW I got this 4x8 sheet of 3/8" drywall up BY MYSELF without breaking it or killing myself. I'll just say that it was a huge PITA.
I still need a narrow strip to fill that gap where the tape is visible. When it comes to installing the new (1/2") drywall over this mess, I'll be getting some friends to help out.
Cornwall Homes 4:
These were taken this afternoon. We'll start with what I consider to be the nicest foursquare in Cornwall. It is in immaculate condition, and boasts ALL of its original windows, original storm windows, original exterior doors, and even the wooden fascia and trim around the roof line. I love that they accented all the storm windows and secondary doors in a classic forest green.
Just next door (2 houses down) is this fine Victorian with a beautiful enclosed circular porch. This house also has all of its original windows, and beautiful (red) arched front doors (not pictured). I love how this photo looks vintage. It was purely caused by the late afternoon sun.
This is another very nice foursquare. I want to make a door for my porch that is similar to theirs, to complement my porch windows (which are also 4 over 2).
Lastly, this is the grand entrance of a gorgeous apartment building not too far away on one of the main roads. The building has massive fluted columns that span the whole building (3 storeys), and the centre windows are all art deco styled stained glass. The balconies also have nicely detailed wooden railings (which you can partially see on the sides of the photo).
SCORE!
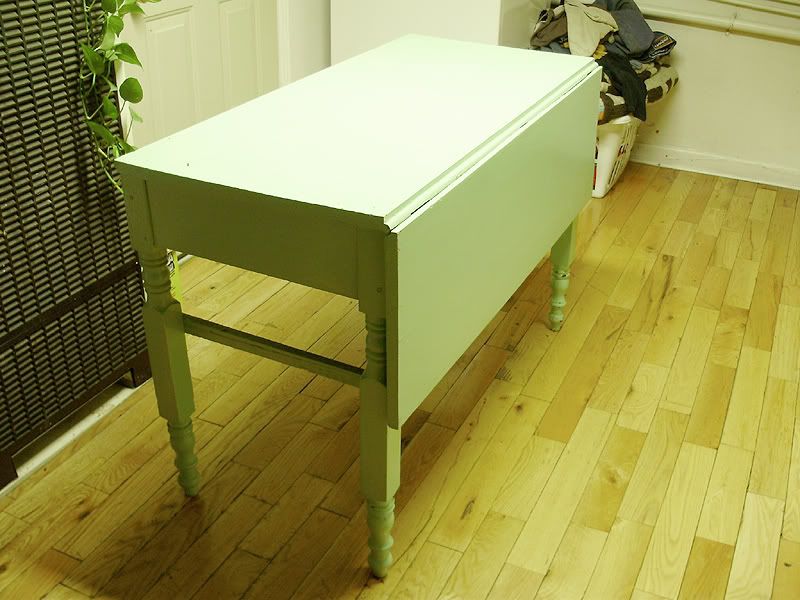
Alright, so the first yard sale I went to (I only had one I wanted to go to since I'm on foot) was a total bust. Nothing. I had brought my cheque with me so since I was near the bank, I went and dropped that off. I took a different route home, and I saw that the neighbours down the street (who are sadly muddling-up their foursquare) were having a yard sale. This is the first one I see them do, and it didn't look like they had much, but I popped over and saw a nice antique table & chairs.
I asked her how much, and she said 30$ for the set. I knew I was going to buy it, and I was just thinking about how I'd get it home (if I wanted to come back and pick it up with my Mom), and then the husband says 20$ and it's yours. So I said yes. And I decided I'd just walk it down the street right away.
What a steal! The set is in TERRIBLE condition, and it will take HOURS of labour/stripping/disassembling/patching/regluing to bring it back, but it's gorgeous.
Have a look!


The chairs are in the worst shape. One has been painted with one of those textured marble spray paints (ewwww). There's only 3 chairs, but they seem to closely match the table both in style, and the type/colour of the wood under the paint. I think it's birch with a dark stain. Birch is a beautiful wood.

What's fun about this table is that it's built very similar to another antique table that I am halfway done restoring. That table had been given to me by my great aunt (I think... It's my grandmother's sister) and it was in worst shape than this table since it was covered in about 10 layers of glossy oil paint, the top has been chopped down, one of the aprons is damaged, and one leaf is missing. But that one was free.
The table from my aunt has the same kind of "pocket screw" setup under the top, and hers had HAND FORGED leaf hinges(!) and old style wood screws (I can't remember if they were hand cut, flat tip screws or not). Either way it was a VERY old table. So I won't know until I take it apart, but this new table looks nearly as old. I'd guess at least 1880, perhaps even older, but definitely pre-1900.
It looks like most of the paint on this table will flake off easily, since it's separating from the shellac. I have no idea when I'll start working on it, since I have so many other projects, but for 20$ I couldn't pass it up.
For comparison, here was my aunt's table (as received):
I also bought an antique mirror on Thursday after my dentist appointment. It's actually a twin to another mirror I already have, but I'll post about those later, since I have to go pick up this second mirror later (today/tomorrow). It was much too heavy to carry around.
***
I finished the attic door last weekend, but I was waiting for a day with nice natural sunlight to photograph it, so I did it just a while ago after I photographed the table set.

I like how it turned out. It looks like a traditional opening with mouldings, but it's recessed into the ceiling, which I prefer. I also like that the glossy/matte difference between the door and ceiling paint isn't really noticeable.
***
Since I just posted about work, I thought I would share a recent, and somewhat nice project we did for a client. This is a custom kitchen island on wheels. It has 6 drawers (full ext soft-close), and the two side panels open up to some narrow cabinets (like a spice cabinet with a few shelves). The back side has 3 panels. It is mostly made in MDF (which is why I said "somewhat nice" since I'd prefer solid wood doors/panels), and custom 1/4 fluted columns (wood). The finish is a sprayed-on opaque lacquer (that's fancy talk for: white coloured lacquer - we can have it tinted ANY colour). The top is curved on the ends, with a laminate top, and Corian edge (which we made at the shop). Don't ask the price, since I honestly haven't got a clue. I almost never see the invoices.


So yeah, that's the kind of stuff I make at work. The projects are not always this nice, but the quality is always there. This island was insanely heavy.
Also, as a side note, this was going in a gorgeous old house out of town. Look at that BEAUTIFUL floor!!! *envy*
I asked her how much, and she said 30$ for the set. I knew I was going to buy it, and I was just thinking about how I'd get it home (if I wanted to come back and pick it up with my Mom), and then the husband says 20$ and it's yours. So I said yes. And I decided I'd just walk it down the street right away.
What a steal! The set is in TERRIBLE condition, and it will take HOURS of labour/stripping/disassembling/patching/regluing to bring it back, but it's gorgeous.
Have a look!
The chairs are in the worst shape. One has been painted with one of those textured marble spray paints (ewwww). There's only 3 chairs, but they seem to closely match the table both in style, and the type/colour of the wood under the paint. I think it's birch with a dark stain. Birch is a beautiful wood.
What's fun about this table is that it's built very similar to another antique table that I am halfway done restoring. That table had been given to me by my great aunt (I think... It's my grandmother's sister) and it was in worst shape than this table since it was covered in about 10 layers of glossy oil paint, the top has been chopped down, one of the aprons is damaged, and one leaf is missing. But that one was free.
The table from my aunt has the same kind of "pocket screw" setup under the top, and hers had HAND FORGED leaf hinges(!) and old style wood screws (I can't remember if they were hand cut, flat tip screws or not). Either way it was a VERY old table. So I won't know until I take it apart, but this new table looks nearly as old. I'd guess at least 1880, perhaps even older, but definitely pre-1900.
It looks like most of the paint on this table will flake off easily, since it's separating from the shellac. I have no idea when I'll start working on it, since I have so many other projects, but for 20$ I couldn't pass it up.
For comparison, here was my aunt's table (as received):


I also bought an antique mirror on Thursday after my dentist appointment. It's actually a twin to another mirror I already have, but I'll post about those later, since I have to go pick up this second mirror later (today/tomorrow). It was much too heavy to carry around.
***
I finished the attic door last weekend, but I was waiting for a day with nice natural sunlight to photograph it, so I did it just a while ago after I photographed the table set.
I like how it turned out. It looks like a traditional opening with mouldings, but it's recessed into the ceiling, which I prefer. I also like that the glossy/matte difference between the door and ceiling paint isn't really noticeable.
***
Since I just posted about work, I thought I would share a recent, and somewhat nice project we did for a client. This is a custom kitchen island on wheels. It has 6 drawers (full ext soft-close), and the two side panels open up to some narrow cabinets (like a spice cabinet with a few shelves). The back side has 3 panels. It is mostly made in MDF (which is why I said "somewhat nice" since I'd prefer solid wood doors/panels), and custom 1/4 fluted columns (wood). The finish is a sprayed-on opaque lacquer (that's fancy talk for: white coloured lacquer - we can have it tinted ANY colour). The top is curved on the ends, with a laminate top, and Corian edge (which we made at the shop). Don't ask the price, since I honestly haven't got a clue. I almost never see the invoices.
So yeah, that's the kind of stuff I make at work. The projects are not always this nice, but the quality is always there. This island was insanely heavy.
Also, as a side note, this was going in a gorgeous old house out of town. Look at that BEAUTIFUL floor!!! *envy*
Subscribe to:
Posts (Atom)