Tuesday, January 31, 2012

MB Closet (Photo)

Alright, by popular request, I went and took a photo. There's really not much to see, but here ya go.

Photobucket

It's basically just the painted version of this previous photo:

Photobucket

For the curious, the clear boxes have some of my shoes (leather dress shoes mainly), and the woven baskets are currently empty. The clothes in there now are just my "day to day" stuff (mainly work clothes and a few nice weekend shirts). The rest of it is still hanging in the basement (about 3x more than this).

Monday, January 30, 2012

Master Bedroom Closet

It's finally painted! The only thing I might add (later) are some adjustable shelves on the sides, but that might depend how low the clothes hang down (in other words, how much usable space there is).

But yeah, I just did the last coat of paint now.

Sunday, January 29, 2012

An Actual, Decent, Post! Wow!

It feels like I haven't done a decent, good quality post in weeks, and to my readers: I'm sorry. I am one of those blog readers who mainly likes to skim-read posts and look at the photos, so to others who do the same, I feel your pain. But you wait is now over. My bandwidth issue is now reset (it resets every month) and now I'll be saving my files in a smaller format.

To those who are curious, the photos will look exactly the same, but as an example, the group of 16 photos in this post was originally 9.48MB, and with the "Save For Web" option, these same 16 photos only take up 1.55MB. This will drastically reduce any future issues.

***

The following is the pre-written post that I had prepared on Jan 22nd when I had started working on the drywall corners. I'll reread it and revise it as I add-in the photos.

Jan 22nd

In house news, I did something that kind of annoys me, and at the same time, is progress. Basically I'm kicking myself for starting on yet another project before finishing other ones (like painting the master bedroom closet shelf, which has been waiting for months).

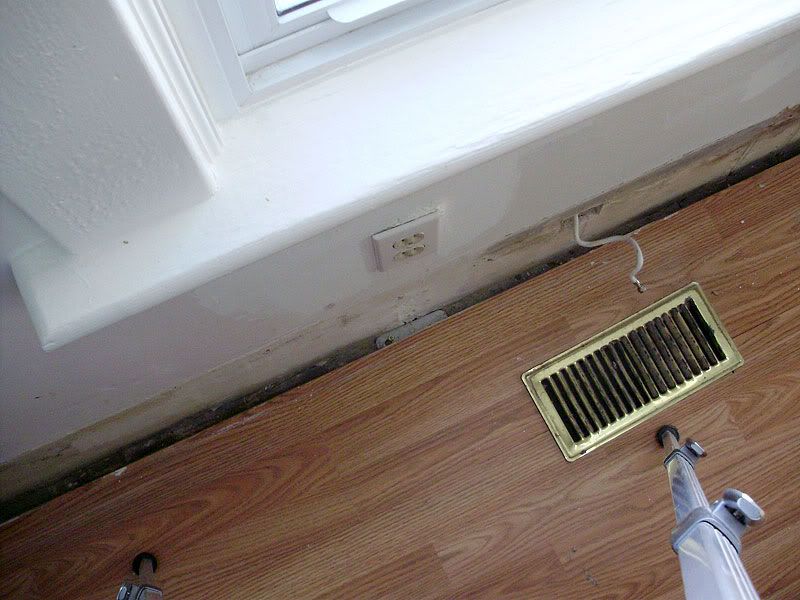
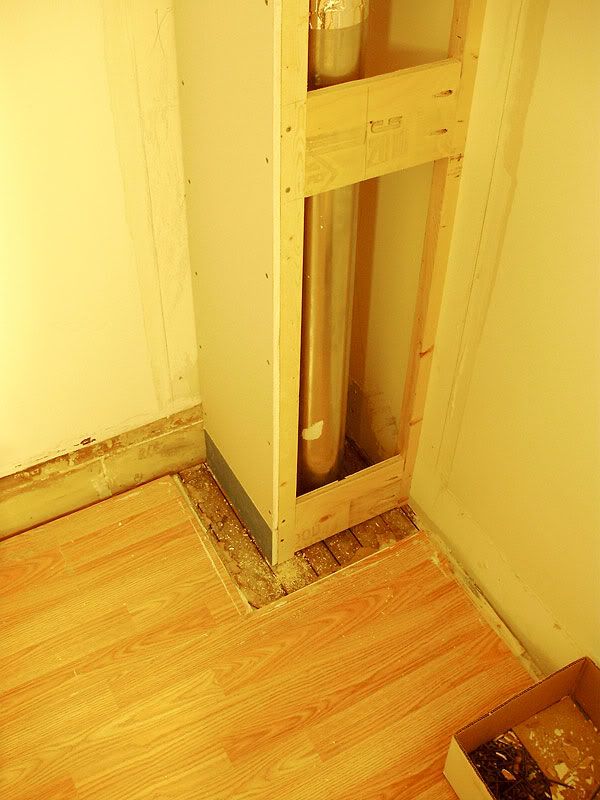
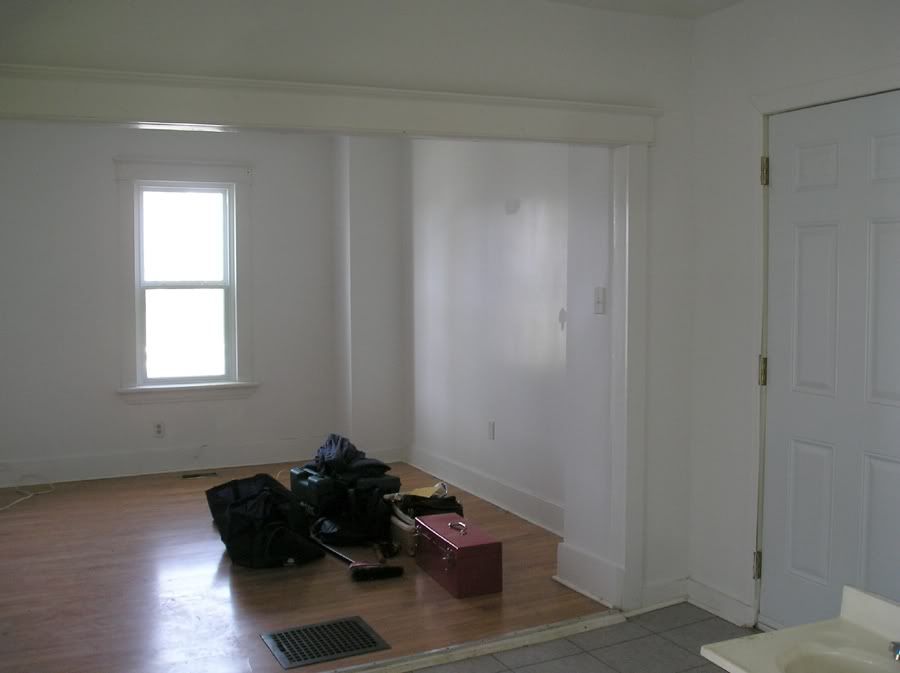
What happened is that I wanted to start redoing the drywall columns on the main floor that cover-up the duct work (since I’m working on drywall upstairs). In the living room, everything is good to go, but in the dining room, there was a small issue that I wanted to fix before rebuilding the "wall": the baseboard was in the way.

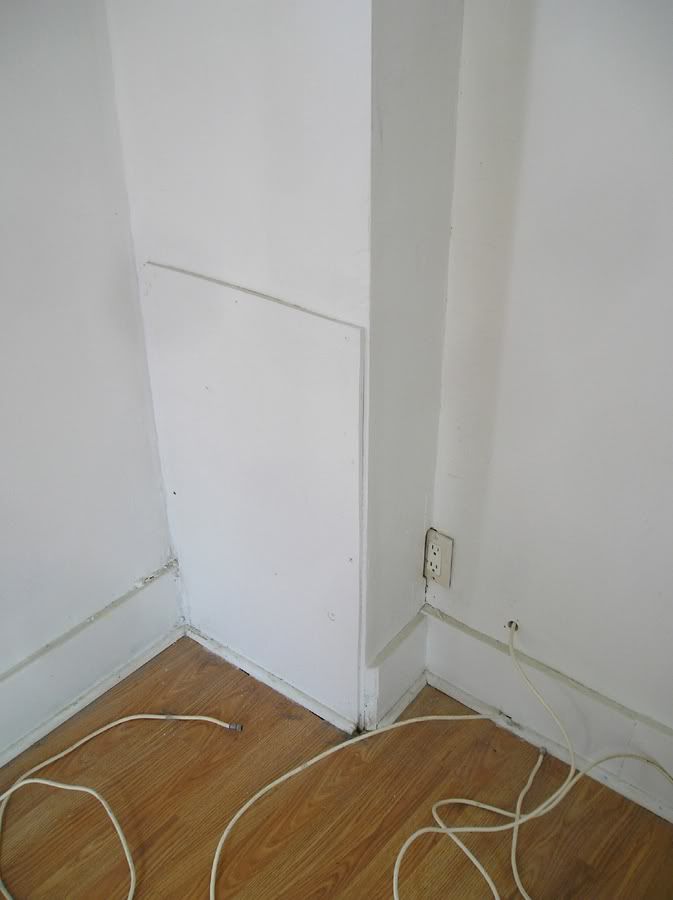
Now in most of the house, this isn't a problem, because the baseboards were not removed, and they still line-up everywhere, etc. However, in the dining room (and a few other places on the first floor), the baseboards had been removed, and then SCREWED back in place (instead of using nails, y’know, like NORMAL PEOPLE!). This was, of course, extremely ugly looking, and worst of all it was CROOKED. You can see a “before” photo (from the office, though) that shows the screws here:

Photobucket

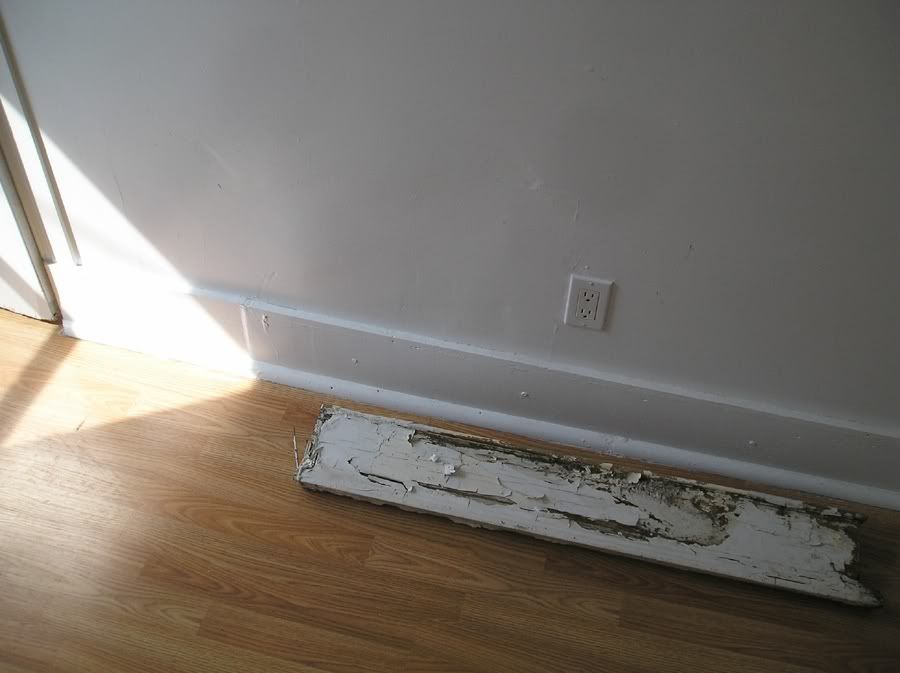
To add to the f*ckery, when I removed the 1/4 round, I could see that they had broken off a huge chunk from the bottom of the baseboard, and they had just installed it crooked to hide this. *facepalm* You can also see some of the screws in this picture.

Photobucket

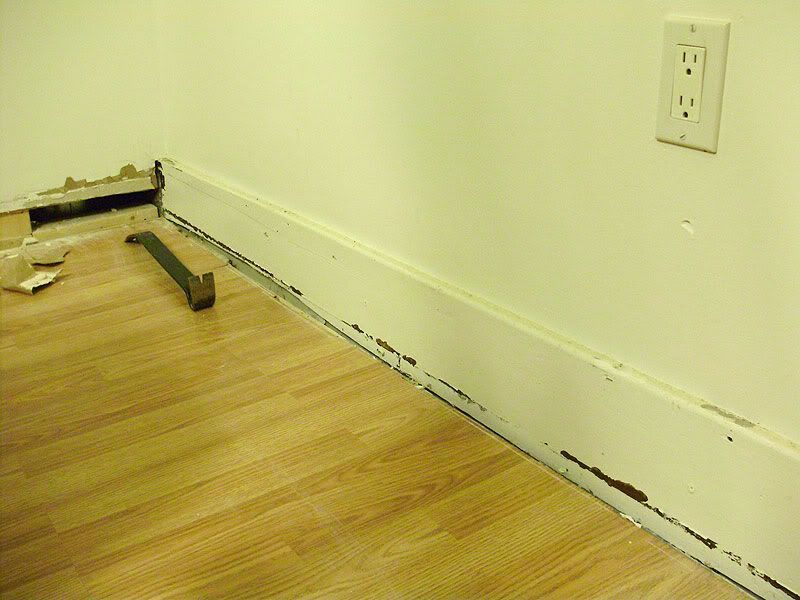
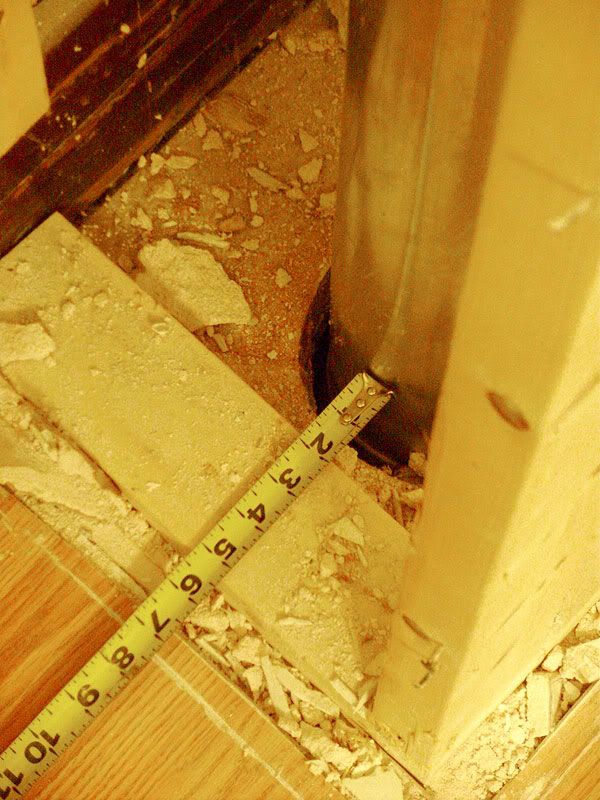
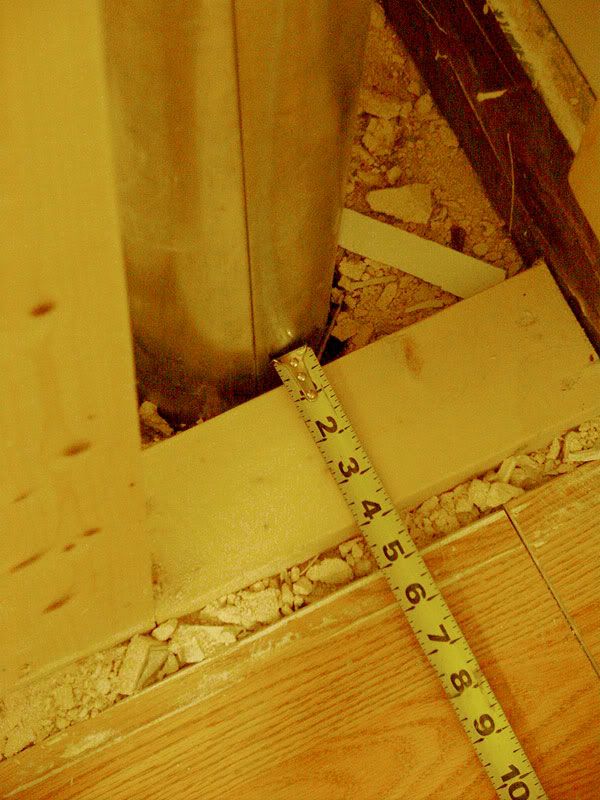
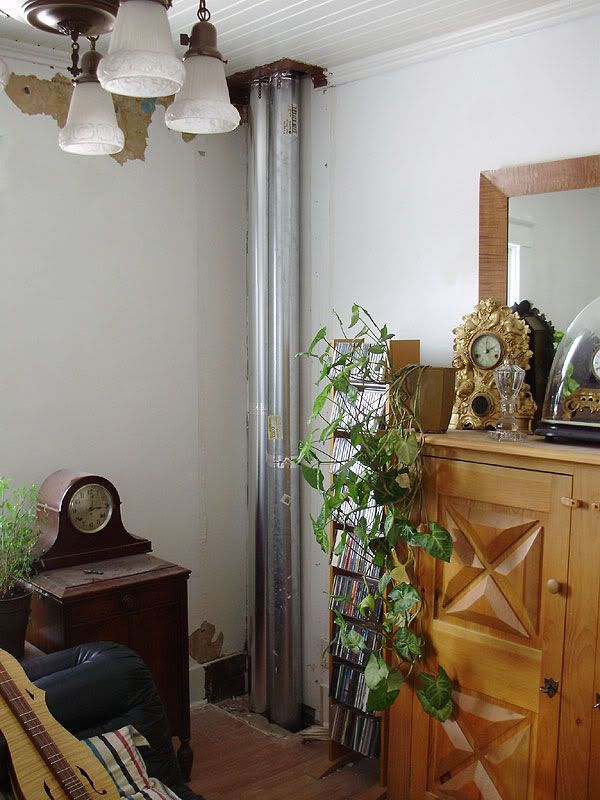
Here’s the “corner #2" before:

Photobucket

Photobucket

Can you spot the height difference in the corner where both baseboards meet?

This is why:


Photobucket

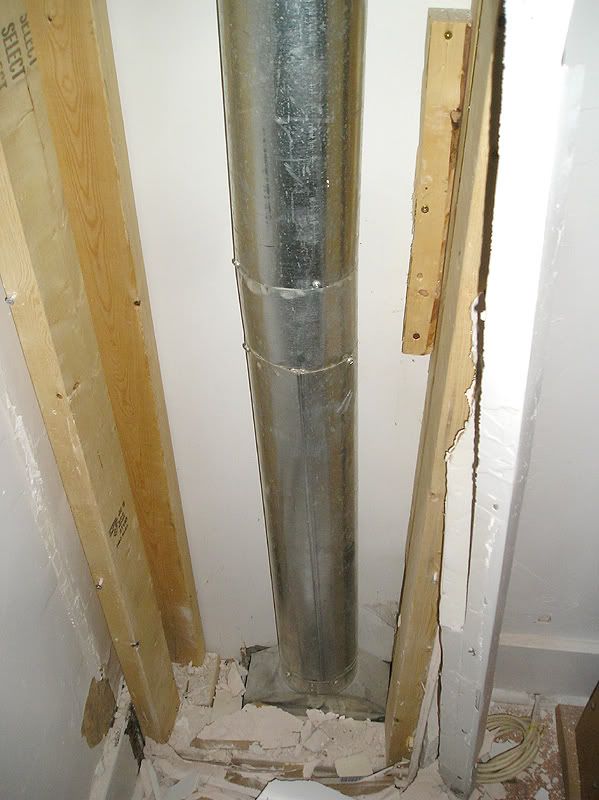
I had not originally planned to remove the far corner wall (corner #2) but I took a peek behind the small 3" bottom section, and I could see that it was REALLY HUGE for nothing, so that one had to come down, too (see above).

Photobucket

Photobucket

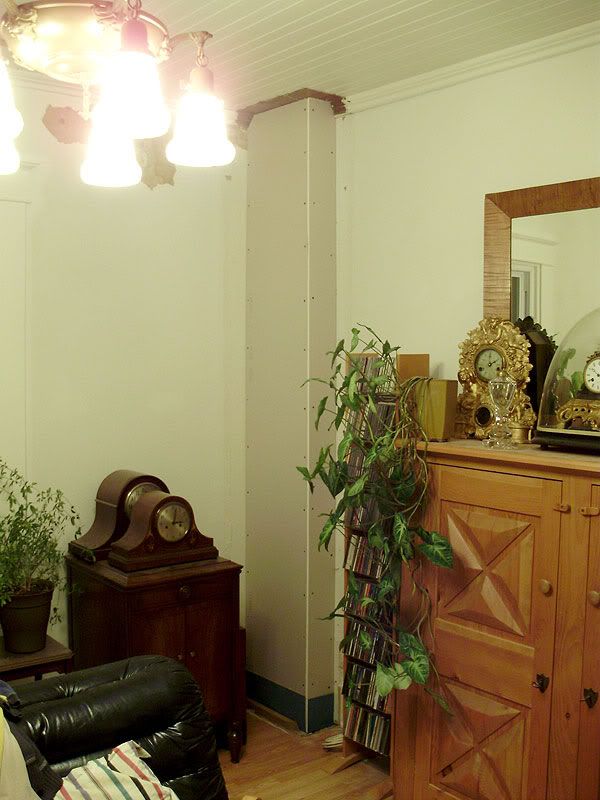
I was happy to find two pieces of reusable crown moulding! It's sad to think that someone yanked it all down and threw it in the trash. The entire first floor used to have this crown and now at least 60% is missing.

Photobucket

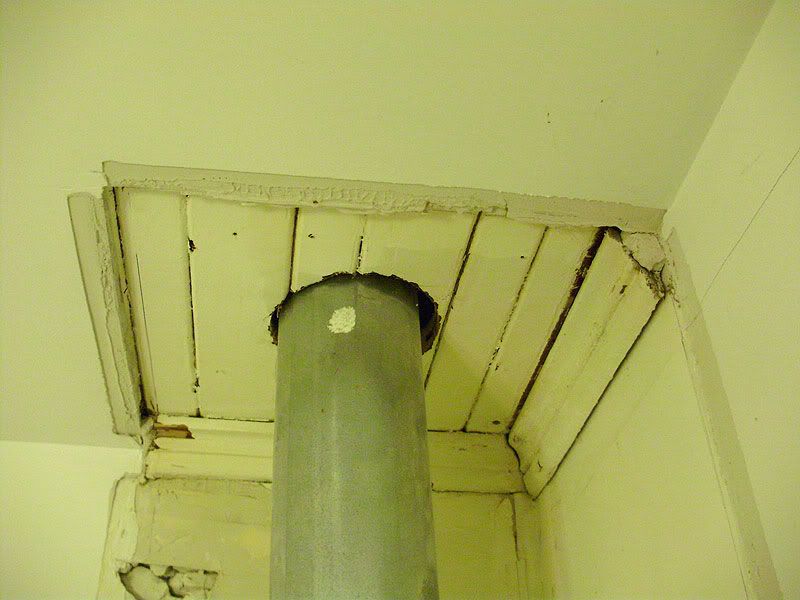
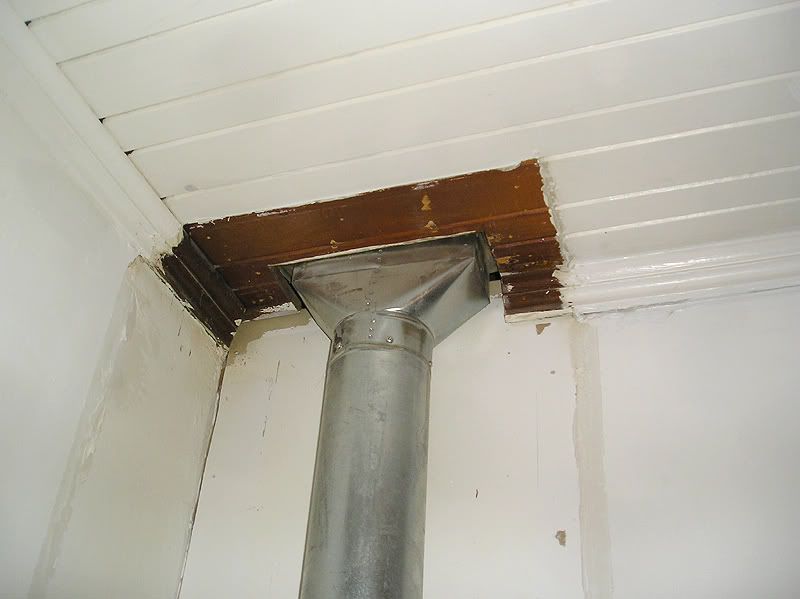
According to what a previous tenant had told me, they were told that it had to be 1 ½" from the drywall (which isn’t even true since I was told 3/4"), so why 5"?

So once that whole corner wall was out, I had the same baseboard problem, where the baseboard along the other wall was also screwed back in place, and very badly patched, so I ended up taking ALL the baseboards out of the whole room.

Photobucket

This is about the point where I was telling myself: “JC, you said you were NOT going to start serious work on the main floor until the upstairs was mostly done!”

:(

But I stopped at that point. I put everything back in place (and I did some reorganizing/cleaning at the same time). But now I can redo the far corner ducts (horrible middle joint), and do both drywall corners PROPERLY.

In all this, I was also really fighting the urge to rip-up the floor. I’m dying to see how bad the original floor is, since I can see several sections of it, all of which look pretty crummy.

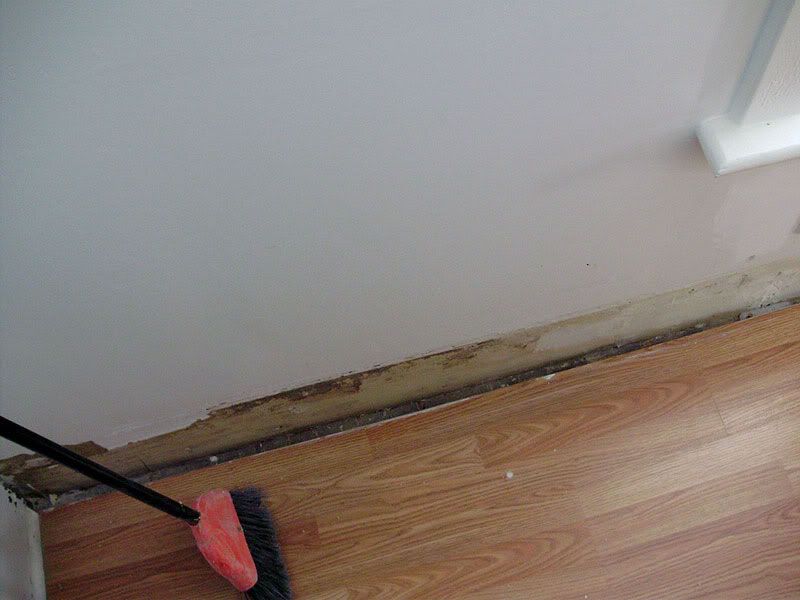
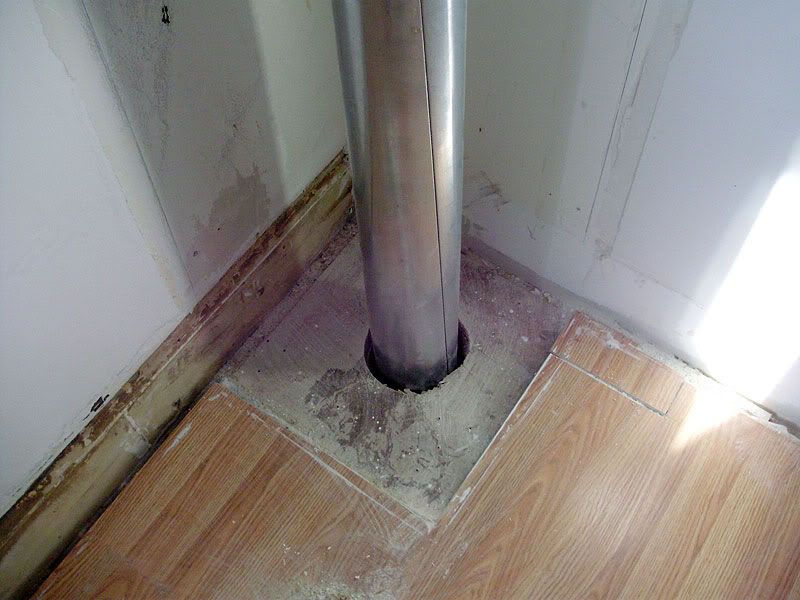
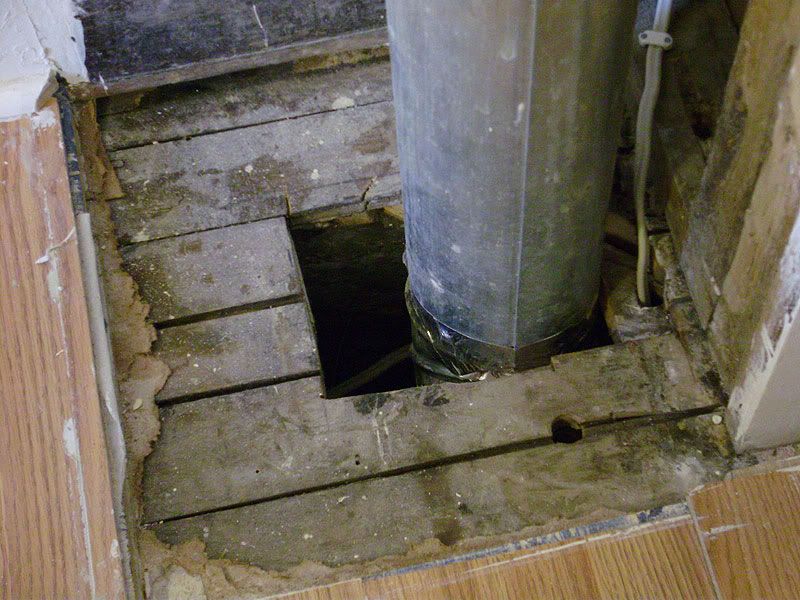
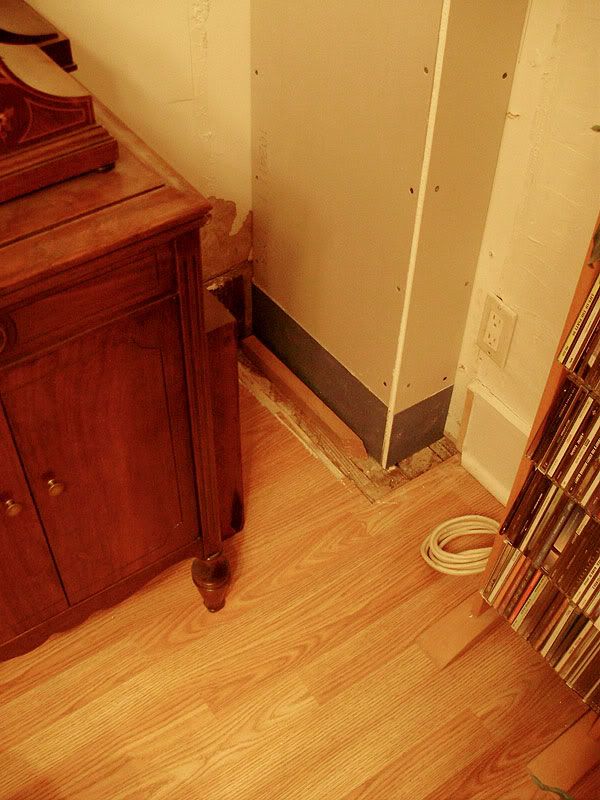
I also made a rather horrible and depressing discovery. Apparently they were really lazy and destructive when they ran the new wiring. Rather than work around the flooring to pass the wires, they drilled straight through the maple floor, and notched into the bottom of the wall to run the wire for the outlets. How do I know? Because of this:

Photobucket

So if I *DO* end up wanting to save the floor, I’ll have a whole bunch of additional patching to do to it. More than likely, I’ll have to replace the floor, and if I do, I’ll probably redo the ENTIRE main floor all in hardwood (including the entry/hallway, office, living room, dining room, and kitchen). Unfortunately: $$$$$$. WE’LL SEE when I get to that point.

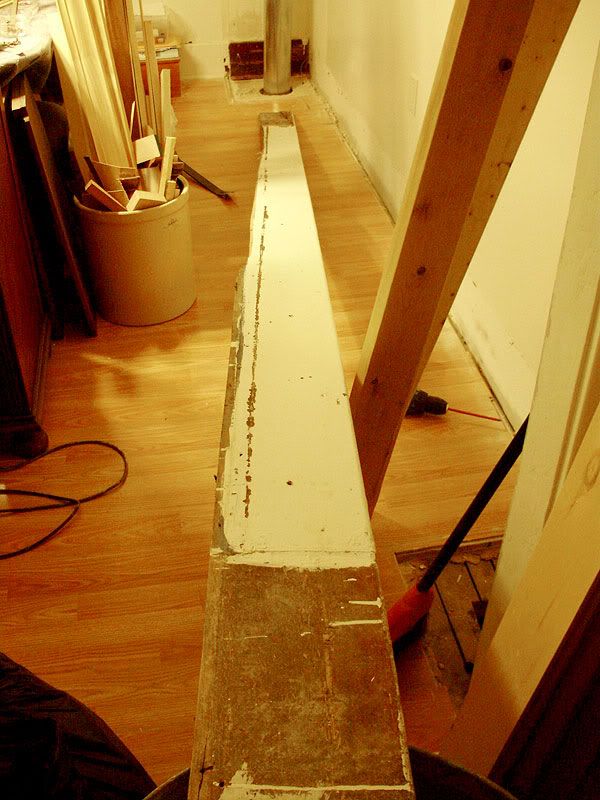
So yeah, now that the baseboards are out, I’s pretty clear that a bunch will need to be redone. I’ll save and reuse as much of the old as I can, but there’s about 6 feet damaged on one 10' board, and there’s about a 2 foot chunk off another one. Out of the three main lengths, only one is still perfectly reusable, which is kind of crappy.

Otherwise, the drywall and other bits seems to be in fairly decent shape. I’ll need to just do a thin skim coat along the bottom since there’s a crusty paint/silicone edge.

Photobucket

Today (Jan 29th):

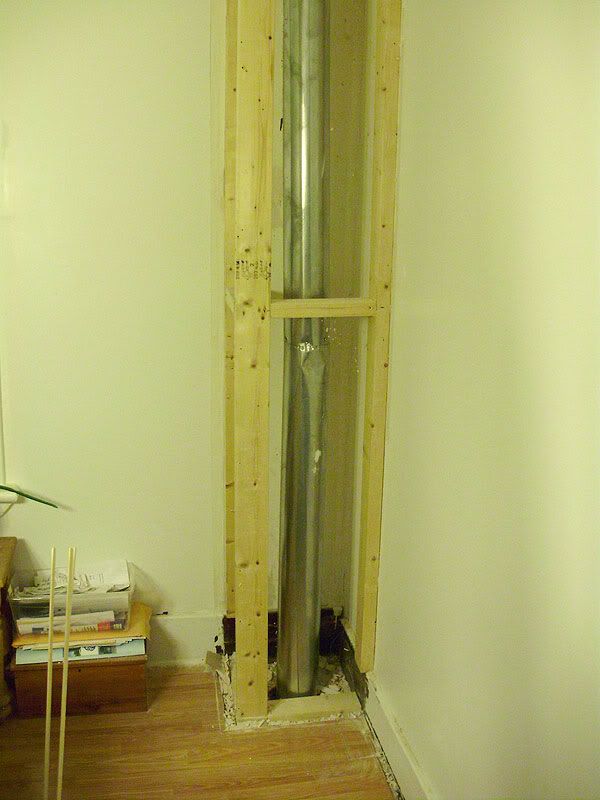
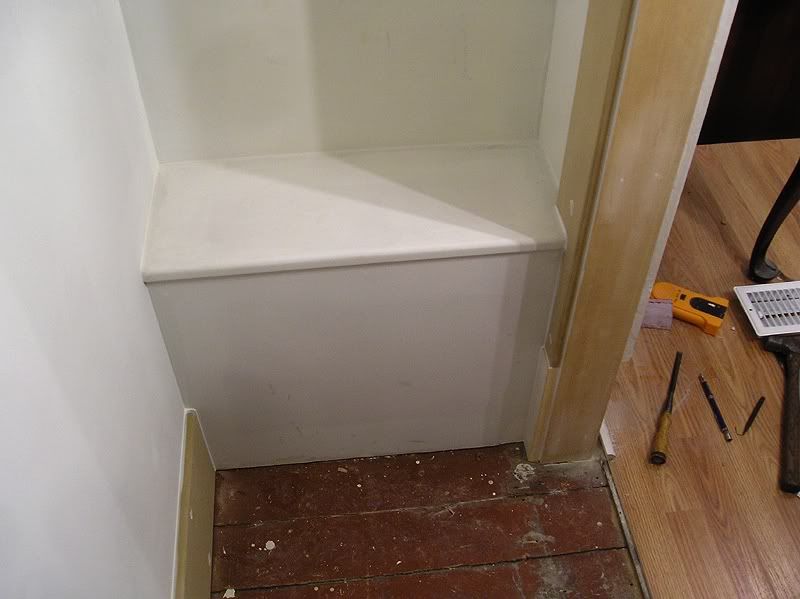
Here’s “corner #2" mostly finished (as of yesterday). It’s only missing a few pieces of drywall, but you can see that the duct work is now fixed, and some nice sturdy new bracing/framing was put in place.

Photobucket

Photobucket

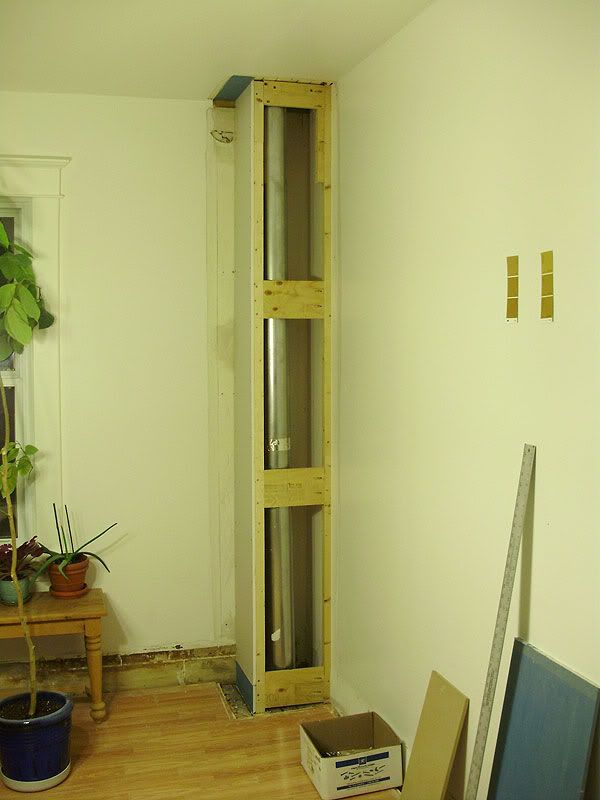
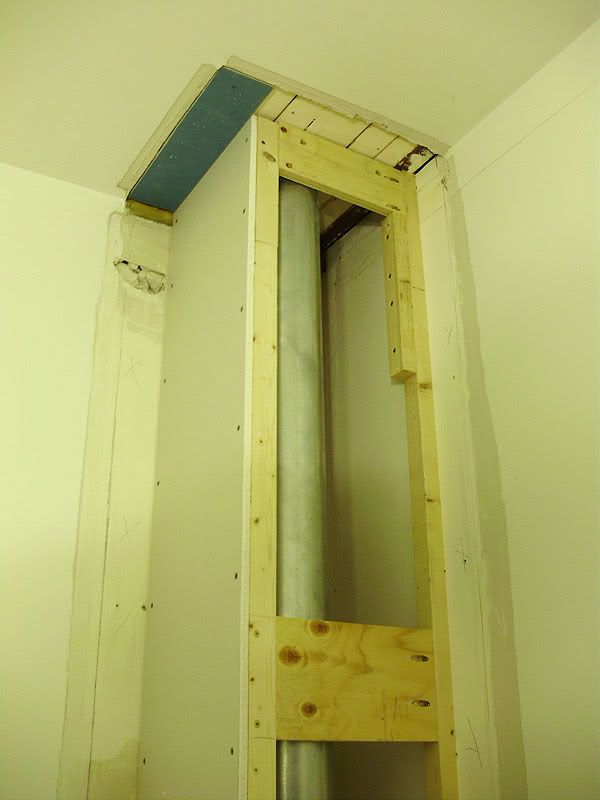
You can see just how much space I gained:

Photobucket

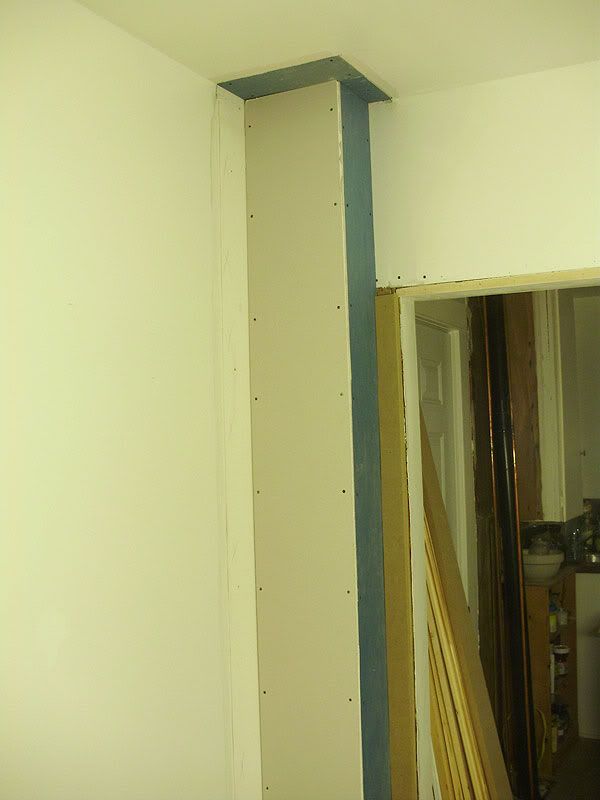
Here’s “corner #1" next to the arch. Again, I’m recycling leftover pieces of drywall along with new pieces, so that’s why some are blue (the expensive water proof stuff from the bathroom reno).

Photobucket

Photobucket

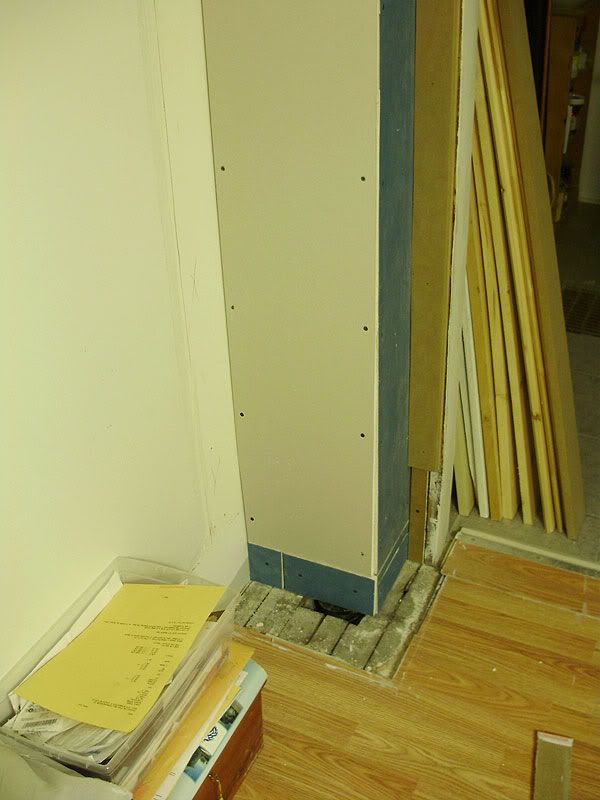
This corner actually shrunk dramatically because I was able to widen the hole in the floor, and have the duct nearly flush to the wall. The hole in the hardwood won’t be completely covered by the baseboard either, so if I’m keeping the old floor, that would be another spot that would need patching.

Side note: this is what the original maple hardwood will look like under all the new flooring. All the gaps along the floor will be about this big/unsightly.

Photobucket

Photobucket

Compare these with the before:
Photobucket

Note that the “corner #1" came up flush with the edge of the arch (which looked really stupid and awful). I also moved the light switch to the kitchen side a long while back, though now that I check, apparently I never showed a photo of it. It’s now on the kitchen side, on the short section of wall between the arch and the garage-side wall.

The living room corner looks about the same, since it’s so wide, even though it’s much smaller. I still gained enough space to completely clear the plug that had previously been half covered.

Fresh new duct work! (I had forgot to post this a while back)

Photobucket

Photobucket

Photobucket

As you can see from the following before photos, this is SO much better than this:

Photobucket

Photobucket

Photobucket

I now realize that I’m missing a few photos.... so now I’m going back through my files, finding those, editing them, and re-adding them into the bunch so the “16" photos I mentioned earlier are now up to 20... And this post also contains a few previously posted pics that I’m not counting...

Hopefully all my photos are in pretty much the right places and in the right order. Till next time (which will probably be showing off the newly replaced and painted second floor mouldings).

:)

Painting~

It's nearly 1am and I just finished painting a coat of white on the already primed closet shelf (which has been waiting months to get painted), and I put all the primer on the new casings & baseboards in the upstairs hallway.

I expect to make a real update with photos tomorrow.

:)

Saturday, January 28, 2012

More Drywall

I've been working on more of the drywall corners this afternoon, and a bit during the week.

Basically, I now have the one in the LR done (not mudded), the one in the kitchen next to the arch done (not mudded), and the second one in the kitchen 90% done.

I've also got an entire pre-typed post about some of the work done so far (from Jan 22nd) but I've been waiting to post it until I take the photos off my camera and edit them.

No one wants to see a big long post without any photos. That's just boring.

Tuesday, January 24, 2012

Dining Room

I started putting up some drywall over the newly rebuilt "corner #1" (of 2) next to the archway. I also started adding casings to the archway (I can't wait to reinstall the salvaged old one, and blend/putty everything to match.

I only did half, really, and I won't be able to install the top until I mud the corner joint. The only casing I put in place is the left and right centre "columns" (side pieces), which aren't in the way of anything else.

I also disassembled, fixed, and reconnected all the screwed-up duct work in "corner #2". Everything is now straight, uncrumpled, and all the joints are taped (except the one I couldn't reach, which is at the end of the run (right before the floor vent).

Pics soon.

Sunday, January 22, 2012

Yo.

So apparently I've exceeded my bandwidth for the month on my Photobucket account. It's free, and it's only the second time in a few years that it happens, so I'll probably have to start saving the photos in a special "webpage quality" setting (very minimal quality loss but it gives much smaller file sized photos that will also load faster) it's just a pain to go through the extra steps to save each photo when I edit them.

In the meantime, all blanked-out photos should be reset in 3 days (Jan 25th).

Friday, January 13, 2012

A Very Snowy Day (...& Duct Work)

The weather today was insane. On my morning walk to work, I went through some freezing rain, and my entire umbrella got enough of a coating that it was solid and heavy, so when I tried to close it, it all crunched together as shards of ice popped off.

Following the freezing rain, we had a large quantity of snow. The roads were pretty bad. I shoveled a path to my door as well as the steps, etc, and in some spots it was over a foot thick. This isn't all that unusual for this area or time of year, but it all came down very quickly.

Photobucket

Photobucket

Here's part of the graveyard near my house.

Photobucket

In house-related news, I took the afternoon (we had a half day at work) to FINALLY call about the duct work clearances, and I also decided to work on the other cold air return in the MB.

As it turns out, the clearances are much smaller than I had thought, which is awesome. I can go as close as 1/4" with my drywall columns, but I'll err on the side of caution and leave about 3/4" which is SIGNIFICANTLY less than the former 2-3".

I decided to take some step-by-step photos of my custom tinsmithing job. This kind of custom duct "box" is really not that hard to make, and I used very few tools.

You need:
- sheet metal (I used SCRAPS left over from previous bad duct connections, and leftovers that were in the basement).
- Shears (I used a pair of tin snips that I have on hand. Basically they are heavy duty scissors, and are used the same way.
- Aluminum tape
- A marker (Sharpie)
- Optional but useful: pop-rivets and tool

Here's what I'm creating. It's a box that measures about 12" x 8" x 8" with a side take-off:

Photobucket

To crate the box, you have a few options. If possible, make all 4 sides in one continuous piece. I was using scraps, so I created the box in 3 pieces rather than just 2. If you are making all the sides in one piece, start by marking out your sections for each part (12x8 - 8x8 - 12x8 - 8x8) Add a 1" tab on one side section (left or right, it doesn't really matter), and a 1" tab along each bottom edge.

Photobucket

Note that I used just a regular piece of 5" round pipe to make this box. I just unclipped it, flattened it out, and I kept the nice folded edge to the top for extra strength.

Next, score along each line. You can use just about anything to do this, but press firmly and use a straight-edge.

Photobucket

Note 2: I removed the paint smears before making my folds.

If you have a thick edge (as I did at the top), press, or crease these along your fold lines. Fold all your corners using a straight-edge along the line. I just used the large metal square that I was using to mark everything.

Photobucket

Since I had to make an extra side, I did that one in the same way. This 4th side was going to have the take-off in it, so I marked the location where I wanted it (close to the bottom, and far enough from the edge to avoid the 1" corner tab. I also doubled the bottom flap to make an extra strong seam since it will be thin along that edge (because of the hole).

I cut straight through the small edge to cut out the rectangle. This corner will be reinforced later with tape and rivets.

Photobucket

Photobucket

Once everything is cut, folded, and ready, all you need to do is assemble it. I used aluminum tape to hold it together around the outside, and I added some pop-rivets in the corner joints, and to hold the bottom (which was just a rectangular sheet).

And voila!

Photobucket

Time spent: probably 1-2 hours?
Cost: 0$ (scrap metal, and a tiny bit of aluminum tape, 8 rivets - all things I already had on hand)

Note 3: Do not attach the side take-off. The box needs to be set into the floor first, which will be impossible to do with the take-off attached.

Tuesday, January 10, 2012

Update

Alright, I need to make this as short and sweet as possible, since it's late and I'm headed to bed.

Here's the work on the built-in. The grooves look like they're rectangular because of the plywood effect, but they are definitely V grooves. Unfortunately the first photos are blurry, but they're all I have.

The V grooves were just marked out at 3" intervals (centred on the board), and I set up the router with just an MDF straight-edge (actually a baseboard piece).

Photobucket

Photobucket

Photobucket

Photobucket

Photobucket

Here's the issue I'm dealing with regarding the old drywall at the ceiling in most fo the upstairs. Basically, back then, they only nailed it in place around the edges of the sheets, and a bit down the centre, so over time, under the weight, it has all sagged in rounded sections. My solution is to add new drywall over the old (for several different reasons which I won't go into). To do this properly, I still need to snug-up the old drywall back flush, so I used washers and drywall screws. You can see just how terrible the ceiling looks here.

This is in the Guest Bedroom (aka Laundry Room).

Photobucket

The ceiling in the bathroom was just as bad. I covered over it the same way. The ceiling in the hallway, staircase, and half of the MB have already been previously capped over with new. One half of the MB is sagging a bit, but I left it as-is.

The L Room, however, is a whole other nightmare. Some dipshit smeared a thick layer of plaster over all the awful old ceiling using a BROOM. Doesn't that look just awesome?

Photobucket

Photobucket

So fortunately, most of it chips off pretty easy, so I started on that a few months ago, and did a whole lot more this past week.

Photobucket

Photobucket

Photobucket

FUN. The worst, however, is that I think they replaced one full 4x8 sheet, and it was unpainted when they added the plaster, so it will be an insane nightmare to try and chip that crap off.

Here's some random shots of the recent drywall and closet work between the Guest Bed and L Room.

Photobucket

This is the outline of the Guest Bedroom closet. Obviously it won't be functional until the chimney is gone, but I'm really hoping I can get that removed next year?

Photobucket

From the Guest Room side:

Photobucket

Photobucket

PS: I've been reusing some spare pieces of the waterproof (blue) drywall leftover from the bathroom reno, along with new sheets of regular drywall, so that's why there are random blue sheets.

This shows the inside of the L Room closet, over the built-in. There's a decent amount of space up there, and there will be a wooden shelf mounted over the top (since drywall would eventually get damaged too easily). It should look quite similar to what I did for the duct work in the MB closet (see here: http://i1018.photobucket.com/albums/af308/clockmaker15/HOUSE/PB018430.jpg) only MUCH higher.

Photobucket