
Earlier this month, or possibly late July, I was approached by a neighbour from down the street from whom I had bought a nice old (damaged) Black Forest clock. He was wondering if I'd be interested in buying an old cedar chest. I had told him I'd go have a look at it sometime. He spotted me while I was painting the porch, and I told him I'd go have a look that evening.
As it turns out, it was a rather nice Walnut veneered chest by the Roos company, and it was in... restorable condition.

I had never heard of the company before, but they made some really beautiful (and well made) chests. One style in particular is made to look like a wonderful early American dresser.
Anyways, I decided to buy it because the interior was in pristine shape. The chest has all the original hardware, and it still has both original keys still stapled on the inside!

The paper labels on the lid are also in perfect shape.


The interior of the bottom section is fitted with the patented "Guardex" system. Basically it's a perforated cardboard liner that is meant to let the cedar breathe, while keeping your clothes from direct contact with the wood.

The chest is not without its drawbacks, though. In the photo above, you'll note that the tip lid isn't currently attached to the base. This is because both lid stays are broken (but I can re-weld them), and the hinges are unscrewed. You'll also note that the portion over the lock is all chewed-up. This is not visible when the lid is closed.
Additional issues are two broken turned feet. One has the missing segment, one doens't. There is also a section of moulding missing, and one detached. The entire bottom skirt is also all coming apart, and the top needs a veneer repair along the back edge. It also needs refinishing.
Fortunately, I got it for 40$. I think it was well worth it. It will look nice at the foot of my (currently nonexistent) bed, and it will match my other walnut furniture.
***
Projects that I worked on today (I had the day off), were some baseboards in the L Room, and this cabinet below.
I don't know weather of not you guys (and gals) recall, but this little yellow cabinet had been installed between the stairs in the garage, leading up to the second storey spare bedroom.
You can see it in this early photo of the house:
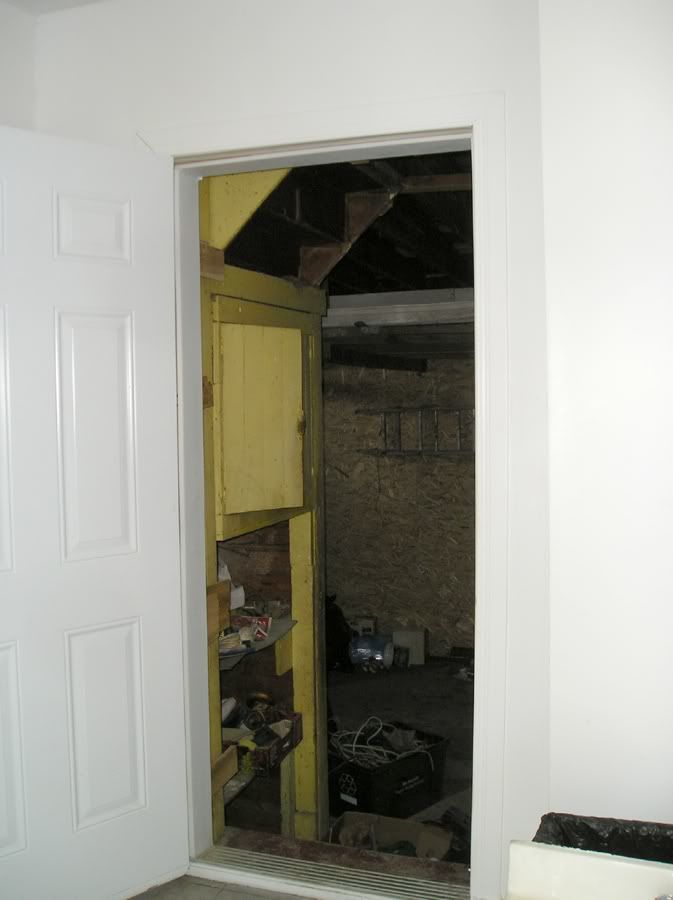
The cabinet is VERY rustic, and it's been sitting on the garage floor for months. I had thought of just throwing it away, but I decided to take another look at it, and see if I could spruce it up a bit.
Here are the initial photos. It had been missing the bottom rear stretcher, but I found an old piece of scrap wood that was EXACTLY the right size/width/length to fit, so I reattached it.

Very simple t-g doors.

The interior is partially painted, partially rough sawn wood, and t-g.


A very crappy repair was made to the side to hold the hinge for the left door. I'll be fixing this, but keeping the rustic feel. The sides are painted a greenish navy blue.

Someone scratched-in what looks like "Mike/Michel/Michael Rox" on the left door. There is also some faded-out black marker on the bottom board that looks like "???ting Place ?????" (see first photo).

After some small repairs, and a few nail holes filled, I decided that this little cabinet deserved a bit of trim. Nothing too fancy, since I wanted to keep the rustic look. I decided to route a round-over on a scrap of rough sawn pine for the base, and to finally use some large cove moulding that I've had in my wood bin for years, just waiting for that "special project" where I'd need it. I nailed the mouldings in place and scratched/dinged/antiqued them.
The reason for the trim is mostly for looks, but also to hide the ends of the t-g boards that make up the top and bottom of the cabinet.
I think it looks pretty awesome now! I just need to repair the left door (the hinge edge is all rough and cut-up, and that top block "repair" is a mess.

Once I have that repaired, I'll be ready to paint it! I want to strip the hinges and handles, and then paint it on the inside and outside in glossy oil paint (since I have no idea what kind of old paint is currently on it).
Any colour suggestions? I'm partial to green, blue, and red, but I'm open to just about any colour... Mint green? Navy Blue? Light yellow again? What about the inside? Off white, or something fun like bright blue or red?
No comments:
Post a Comment