Details and lots of photos soon.
But a quick recap:
Saturday: remove rotted old siding, and dismantle the old wall (in sections), nail down the new 3/4 plywood (code requirements only require 7/16" minimum but that was just way too thin and weak for my taste, so I beefed-it up to 3/4").
This was the most gruelling and stressful day. My first big problem was what to do with all the trash. I ended up finding a temporary spot for it, but I'll elaborate more in the official post.
Sunday: remove busted-up gutters and rotted soffit/fascia. Finish nailing the top few inches of the plywood sheets.
Install the Typar (waterproof house wrap sheeting) and tape all the edges.
Patch other small section at the front with more plywood, and repair slightly busted aluminum siding corner piece.
Today (Monday - Victoria Day holiday): Install all the vinyl "J" trim pieces (top and both vertical edges).
Install the bottom starter strips.
Install all the siding.
Done!
Now I just need to rebuild the rotted/busted soffit (which is no longer perfectly straight, and will need some reworking (slightly).
I may need to go buy some more wood or plywood for this. I would have liked to use the rest of my pressure-treated plywood, but I won't have enough. I will probably do just the front face in the PT plywood. I'll have to find/buy some decent pine for the underside piece.

Monday, May 19, 2014


Thursday, May 15, 2014
Small Updates
Alright, I've made a few small tweaks to the blog's layout and design.
I've had one or two readers who've expressed difficulties clearly reading the text in the posts due to the transparency, so I've switched it to a coordinating dark greenish black. I've also slightly increased the font sized, and switched font to "Georgia".
I had also noticed that for some reason my 600x800 photos were touching the right edges of the frames, so I've adjusted the widths again.
Hopefully that will make everyone (including myself) happy. If there's any other small bugs you've noticed, please let me know. That said, also be aware that I'm just using modified existing Blogger templates, so I'm slightly limited. For example, I haven't done any kind of checking for what the blog looks like on mobile devices.
***
House-wise, I've continued to work in the garage by installing a beautiful salvaged door at the base of the staircase leading upstairs. There WAS a door here when I moved, but it was a recycled closet door which was too short, and it was very poorly installed.
Before:

The door was hung on the inside of the stairwell, which made it really awkward:

I really want to beautify and improve the garage/shop so I'll be installing insulation, repairing the cracks in the concrete, installing wall coverings (either OSB or drywall), painting, and putting in new lights, plugs, and probably even a sub-panel.
Having a nice old door at the bottom of the stairs is part of that "beautification" process. The door opening was fairly small, so I could realistically only install a 26" door or smaller. I ended up installing a 24" door, since it was one of the nicer ones that I had, and I had nowhere else that I was planning to use it.

The door I picked is a beautiful 2 panel Fir door (salvaged from the trash just 2 or 3 houses down the street) and I removed the top panel. I will install a glass panel here.
I spent several hours over the past two days installing and tweaking this door. First, I built a new frame (jamb) for it, and then I installed the jamb into the wall opening.

I found 2 beautiful antique ball-tip hinges in my stash of antique hardware, and stripped the paint off of them. These hinges were silver, so they don't match anything else I will have in the house, so they're prefect for the shop.
The hinges were installed, and the door placed in the door opening. Before I could install the door in the new jamb, I had to re-trim the top of the door slightly.
Once I had the door fitted, I had to pick some hardware. I was going to change the really Art Deco plates that were on the door to something more plain, but the old plates were really tall and left holes and shadows. I decided to just keep the old plates for now.
For the knobs, I wanted to use the same black ceramic clay knobs I'll have (eventually) on the interior doors. The ones I used on this door are slightly oversized, so they don't match the rest of the others I have. Again - perfect for the garage.
The lockset I used was the original one from this door. I took it apart, cleaned it, and gave it a quick paint job (flat black spray paint on all the internal metal pieces for moisture protection).
If you look at the white paint on the 2x4s flanking the door, and compare it to the first photo, you can tell how much the height of the door was adjusted. This door isn't even a full "new" standard door height either. A new door is usually 80" and this one is around 78".

Isn't the old hardware just beautiful?

The door jamb still needs the stop mouldings (I have old ones I'm recycling, but I'm missing 24" for the top piece).
I've had one or two readers who've expressed difficulties clearly reading the text in the posts due to the transparency, so I've switched it to a coordinating dark greenish black. I've also slightly increased the font sized, and switched font to "Georgia".
I had also noticed that for some reason my 600x800 photos were touching the right edges of the frames, so I've adjusted the widths again.
Hopefully that will make everyone (including myself) happy. If there's any other small bugs you've noticed, please let me know. That said, also be aware that I'm just using modified existing Blogger templates, so I'm slightly limited. For example, I haven't done any kind of checking for what the blog looks like on mobile devices.
***
House-wise, I've continued to work in the garage by installing a beautiful salvaged door at the base of the staircase leading upstairs. There WAS a door here when I moved, but it was a recycled closet door which was too short, and it was very poorly installed.
Before:
The door was hung on the inside of the stairwell, which made it really awkward:
I really want to beautify and improve the garage/shop so I'll be installing insulation, repairing the cracks in the concrete, installing wall coverings (either OSB or drywall), painting, and putting in new lights, plugs, and probably even a sub-panel.
Having a nice old door at the bottom of the stairs is part of that "beautification" process. The door opening was fairly small, so I could realistically only install a 26" door or smaller. I ended up installing a 24" door, since it was one of the nicer ones that I had, and I had nowhere else that I was planning to use it.
The door I picked is a beautiful 2 panel Fir door (salvaged from the trash just 2 or 3 houses down the street) and I removed the top panel. I will install a glass panel here.
I spent several hours over the past two days installing and tweaking this door. First, I built a new frame (jamb) for it, and then I installed the jamb into the wall opening.
I found 2 beautiful antique ball-tip hinges in my stash of antique hardware, and stripped the paint off of them. These hinges were silver, so they don't match anything else I will have in the house, so they're prefect for the shop.
The hinges were installed, and the door placed in the door opening. Before I could install the door in the new jamb, I had to re-trim the top of the door slightly.
Once I had the door fitted, I had to pick some hardware. I was going to change the really Art Deco plates that were on the door to something more plain, but the old plates were really tall and left holes and shadows. I decided to just keep the old plates for now.
For the knobs, I wanted to use the same black ceramic clay knobs I'll have (eventually) on the interior doors. The ones I used on this door are slightly oversized, so they don't match the rest of the others I have. Again - perfect for the garage.
The lockset I used was the original one from this door. I took it apart, cleaned it, and gave it a quick paint job (flat black spray paint on all the internal metal pieces for moisture protection).
If you look at the white paint on the 2x4s flanking the door, and compare it to the first photo, you can tell how much the height of the door was adjusted. This door isn't even a full "new" standard door height either. A new door is usually 80" and this one is around 78".
Isn't the old hardware just beautiful?
The door jamb still needs the stop mouldings (I have old ones I'm recycling, but I'm missing 24" for the top piece).
Friday, May 09, 2014
Garage Wall Progress
Although I haven't posted much about it yet, the rebuilding of the garage wall is progressing nicely. So far I have:
- Jacked-up the roof for temporary support.
- Jacked-up the wall.
- Cut away the bottom of the wall.
- Cleaned-out about 200 lbs of rotted wood and dirt at the base of the wall.
- Made custom concrete forms for the new footings.
- Hand-mixed and filled the forms (26 1/2 bags of concrete, which was pure hell).
- Installed the bottom plate (pressure treated wood).
- Temporarily re-supported the wall at each 2x4 to remove the braces.
- Cut away the top of the wall.
- Installed the top plates (2 layers of 2x4s).
Now I'm at the point where I can install the vertical 2x4s (the easy part). I need to go pick up some more nails, and mark all the crowns in my 2x4s (the crowns are the cupped or curved edges).
I've been working at the "wall project" several hours a day, and I'm quite happy with the pace I've been managing to keep. The garage will be so nice and solid once this job is done. It will also mean that I can finally have the roof (safely) replaced. The roof should have been redone right after I bought the house, but after I discovered the condition of the wall I was afraid to have any workers up there.
I also plan to add electrical (probably with a small sub-panel) new lights, and drywall + paint.
I only plan to show a recap (photos) once the whole project is done (the wall - not the entire garage).
***
I've been keeping quite busy here. Aside from the "wall project" I've also redone the framing for the sloped ceiling in the back stairwell (which was quite tricky to figure out). That's now pretty much ready for insulation and wall covering (either drywall or beadboard).
I also started to do the taping and mudding in the "L" Room upstairs. I've been procrastinating about doing it for almost a year, and I was going to hire someone else to do it, but in the end, I'll do it myself. My imperfections (I'm only so-so at drywall) will just match the rest of the house.
- Jacked-up the roof for temporary support.
- Jacked-up the wall.
- Cut away the bottom of the wall.
- Cleaned-out about 200 lbs of rotted wood and dirt at the base of the wall.
- Made custom concrete forms for the new footings.
- Hand-mixed and filled the forms (26 1/2 bags of concrete, which was pure hell).
- Installed the bottom plate (pressure treated wood).
- Temporarily re-supported the wall at each 2x4 to remove the braces.
- Cut away the top of the wall.
- Installed the top plates (2 layers of 2x4s).
Now I'm at the point where I can install the vertical 2x4s (the easy part). I need to go pick up some more nails, and mark all the crowns in my 2x4s (the crowns are the cupped or curved edges).
I've been working at the "wall project" several hours a day, and I'm quite happy with the pace I've been managing to keep. The garage will be so nice and solid once this job is done. It will also mean that I can finally have the roof (safely) replaced. The roof should have been redone right after I bought the house, but after I discovered the condition of the wall I was afraid to have any workers up there.
I also plan to add electrical (probably with a small sub-panel) new lights, and drywall + paint.
I only plan to show a recap (photos) once the whole project is done (the wall - not the entire garage).
***
I've been keeping quite busy here. Aside from the "wall project" I've also redone the framing for the sloped ceiling in the back stairwell (which was quite tricky to figure out). That's now pretty much ready for insulation and wall covering (either drywall or beadboard).
I also started to do the taping and mudding in the "L" Room upstairs. I've been procrastinating about doing it for almost a year, and I was going to hire someone else to do it, but in the end, I'll do it myself. My imperfections (I'm only so-so at drywall) will just match the rest of the house.
Saturday, May 03, 2014
Super Simple Curtain Rod
This is a post that I've been meaning to write for probably almost a year now.
In most of the house, I'm planning to use Roman Shades (the master bedroom ones are STILL not made, despite the fact that I have already bought 90% of the materials needed for them), but for the office (aka computer room) I wanted more window & lighting options, and I wanted a sheer curtain (to be eventually paired with a top-down & bottom-up Roman shade).
Back when I was living in my apartment, I was a huge fan of tab-top curtain panels on simple rods. I had come up with a brilliant and extremely inexpensive curtain rod setup that cost only about 6-7$, and they were in all the main windows.
What did I use, you may be asking? A 5$ chrome shower rods (in 6 foot lengths) paired with some specialty 1" hoop holders I was able to find. To plug the open ends, I just found some 1" plug caps at the hardware store, and Boom! Beautiful, professional (and very strong) curtain rods for 6-7$ each.
I've also heard that a lot of people use electrical conduit pipes, which are a bit thinner, and also very cheap & strong. Who really wants to pay 50-60$ for a metal pole?
Here's the break down of all the components I used:

As you can see, there are also chrome grommets and shower curtain rings. These were to add a bit of a classier look to the huge sheer panel that I found at my local thrift store. I have tall ceilings (100 inches) and I needed a panel that was close to "floor-to-ceiling" length.
With the grommets in place, and all the hardware mounted, it turned out looking like this, and I couldn't be happier. Since this was all re-used hardware from my apartment, I only spent about 3-4$ on the rings and grommets, and I believe the sheer panel was under 10$.

In most of the house, I'm planning to use Roman Shades (the master bedroom ones are STILL not made, despite the fact that I have already bought 90% of the materials needed for them), but for the office (aka computer room) I wanted more window & lighting options, and I wanted a sheer curtain (to be eventually paired with a top-down & bottom-up Roman shade).
Back when I was living in my apartment, I was a huge fan of tab-top curtain panels on simple rods. I had come up with a brilliant and extremely inexpensive curtain rod setup that cost only about 6-7$, and they were in all the main windows.
What did I use, you may be asking? A 5$ chrome shower rods (in 6 foot lengths) paired with some specialty 1" hoop holders I was able to find. To plug the open ends, I just found some 1" plug caps at the hardware store, and Boom! Beautiful, professional (and very strong) curtain rods for 6-7$ each.
I've also heard that a lot of people use electrical conduit pipes, which are a bit thinner, and also very cheap & strong. Who really wants to pay 50-60$ for a metal pole?
Here's the break down of all the components I used:
As you can see, there are also chrome grommets and shower curtain rings. These were to add a bit of a classier look to the huge sheer panel that I found at my local thrift store. I have tall ceilings (100 inches) and I needed a panel that was close to "floor-to-ceiling" length.
With the grommets in place, and all the hardware mounted, it turned out looking like this, and I couldn't be happier. Since this was all re-used hardware from my apartment, I only spent about 3-4$ on the rings and grommets, and I believe the sheer panel was under 10$.
Friday, May 02, 2014
Whale Oil Lamps
It's no secret that I love antiques. I tend to buy mainly small furniture, tools, and clocks (too many to count), but I also really love antique lamps.
I have quite a few oil lamps, some found at yard sales and thrift stores, while others were bought online.
My favourites are whale oil lamps.
If you're not familiar with these, they were one of the first "fancy" oil lamps created for home illumination. Before they came along, indoor lighting was done mainly with candles, a fireplace, and betty lamps (lard/fat lamps). The latter being crudely fashioned from sheet metal or cast iron.
I should stress that at the time when they came along (1820s to the early 1840s) kerosene lamps had not been invented yet.
The original fuel for these new lamps was refined oil from the sperm whale. The oil was very expensive to buy, but produced a beautiful and brilliant light. One whale oil lamp produced twice as much light as a regular candle, and the lamps were also a bit of a status symbol.
The majority of these lamps are made from leaded glass or flint glass (aka crystal), which gives a bit of a greyish quality to the glass. The lead content makes them more brilliant and also easier to cut and polish. They are also more fragile, and the bases are very prone to chipping (both my lamps shown below have chipped bases). It is not uncommon to find lamps that have been ground-down and re-polished on the base, or that have had chips repaired.
Some early examples have hand blown fonts (often in the shape of a light bulb) while others have cut and polished fonts, or feature acid etched decorations, usually paired with a cast (fancy) base connected with glass "wafers" in the centre. The presence of wafers in the centre is usually a good indicator of an original lamp since reproductions are usually cast from moulds and will not be made in 2 pieces.
These are a few examples of some beautiful (and pricey) examples:

Note the slightly uneven wafers in between the hand blown tops and cast bases:

It is extremely common to find whale oil lamps with later "fluid lamp" burners. These burners have longer tapered pipes and are meant to burn a volatile (and potentially explosive) mixture of turpentine and alcohol known as "burning fluid". Burning fluid was a cheaper alternative to whale oil, but it was critical to use the correct burners. Whale oil burners have short and stubby tubes that descend deep into the font (to help draw down the heat and soften the whale oil). Burning fluid, when used with whale oil burners, often caused catastrophic explosions, since the correct burners operate with the pipes extended far away from the highly flammable fuel.
Fluid burners usually also have cute little caps and chains to keep the fluid from evaporating when the lamp is not in use.

Perfect examples with no chips or breaks can cost a small fortune (several hundred dollars), with matched pairs fetching more than individual lamps, but there are still bargains out there. I was very lucky to snatch this matched pair for a very low price since they were missing the original burners, and had chipped bases (which I don't mind).
Here are my matched pair of lamps. You will note that my lamps have the same cast base as the example above. Aside from this original pair from the early 1800s, I also have 2 reproduction whale oil lamps, and one other original one (missing the burner - which is an odd size).


I shot a small video for YouTube this evening showing the use/operation/lighting of whale oil lamps, since the web seems to have a very limited resource showcasing these wonderful lamps. Enjoy!
I have quite a few oil lamps, some found at yard sales and thrift stores, while others were bought online.
My favourites are whale oil lamps.
If you're not familiar with these, they were one of the first "fancy" oil lamps created for home illumination. Before they came along, indoor lighting was done mainly with candles, a fireplace, and betty lamps (lard/fat lamps). The latter being crudely fashioned from sheet metal or cast iron.
I should stress that at the time when they came along (1820s to the early 1840s) kerosene lamps had not been invented yet.
The original fuel for these new lamps was refined oil from the sperm whale. The oil was very expensive to buy, but produced a beautiful and brilliant light. One whale oil lamp produced twice as much light as a regular candle, and the lamps were also a bit of a status symbol.
The majority of these lamps are made from leaded glass or flint glass (aka crystal), which gives a bit of a greyish quality to the glass. The lead content makes them more brilliant and also easier to cut and polish. They are also more fragile, and the bases are very prone to chipping (both my lamps shown below have chipped bases). It is not uncommon to find lamps that have been ground-down and re-polished on the base, or that have had chips repaired.
Some early examples have hand blown fonts (often in the shape of a light bulb) while others have cut and polished fonts, or feature acid etched decorations, usually paired with a cast (fancy) base connected with glass "wafers" in the centre. The presence of wafers in the centre is usually a good indicator of an original lamp since reproductions are usually cast from moulds and will not be made in 2 pieces.
These are a few examples of some beautiful (and pricey) examples:
Note the slightly uneven wafers in between the hand blown tops and cast bases:
It is extremely common to find whale oil lamps with later "fluid lamp" burners. These burners have longer tapered pipes and are meant to burn a volatile (and potentially explosive) mixture of turpentine and alcohol known as "burning fluid". Burning fluid was a cheaper alternative to whale oil, but it was critical to use the correct burners. Whale oil burners have short and stubby tubes that descend deep into the font (to help draw down the heat and soften the whale oil). Burning fluid, when used with whale oil burners, often caused catastrophic explosions, since the correct burners operate with the pipes extended far away from the highly flammable fuel.
Fluid burners usually also have cute little caps and chains to keep the fluid from evaporating when the lamp is not in use.
Perfect examples with no chips or breaks can cost a small fortune (several hundred dollars), with matched pairs fetching more than individual lamps, but there are still bargains out there. I was very lucky to snatch this matched pair for a very low price since they were missing the original burners, and had chipped bases (which I don't mind).
Here are my matched pair of lamps. You will note that my lamps have the same cast base as the example above. Aside from this original pair from the early 1800s, I also have 2 reproduction whale oil lamps, and one other original one (missing the burner - which is an odd size).
I shot a small video for YouTube this evening showing the use/operation/lighting of whale oil lamps, since the web seems to have a very limited resource showcasing these wonderful lamps. Enjoy!
Saturday, April 26, 2014
Garage & Upholstery
It's been quite a while since I've posted any upholstery "Projects of the Month", so I thought I would share these two pieces with you guys. These are both from the same set, and both were horribly butchered and just awful. They took a lot of work to restore, and the before vs the after is so shocking you'd swear they're not even the same pieces of furniture.
I won't be re-posting all the photos here, simply because there are over 120 photos and a lot of text, so I will just post a before and after of the chair to whet your appetites:
Chair Before:

Chair After!:

Here are the links to the chair, and the matching settee (the settee was done first, and you should see that piece first since there are details done on the settee that are not shown again for the chair).
http://lefebvreupholstery.blogspot.ca/2014/04/fully-restored-eastlake-settee-red-toile.html
http://lefebvreupholstery.blogspot.ca/2014/04/fully-restored-eastlake-chair-red-toile.html
I'm also not sure if I ever shared with you guys the beautiful antique sofa that we redid (also for the same client, who has a ton of antiques). I really loved how this one turned out, and there was a lot of work involved in that one (so many coils to string, plus some frame repairs):
http://lefebvreupholstery.blogspot.ca/2014/03/wonderful-antique-sofa-bold-orange-dark.html
In that post you get to see me and my boss, Pierre, covered in feathers after we had to redo the seat cushion. This is the finished sofa. I love the fabric, and it would have looked great in my living room.

***
As for house renovations, I'm currently working on repairing the 28 foot long exterior wall of the garage. For now, I'm just cleaning up, and making room to work. Some of you who have been reading for a while will remember that a good section of this wall (almost half of it) is completely rotted and almost ready to collapse. You can see how much of a sag there is in the roof in this photo from my bedroom window. Compare the roof line to the siding on the neighbour's house.

I actually measured the sag of the roof last night, and it's surprisingly not as bad as I had thought. The lowest dip (the part shown above) is about 2 inches low.
Just yesterday, I was able to finally get rid of the old washing machine that was in the basement washroom when I first bought the house in April 2010. I had wheeled-it up into the garage with a dolly, and it's been sitting there for the past 4 years. I wasn't sure if it worked, since I hadn't used it, but I knew the motor worked. I hated to just throw it away or have it scrapped, so I saw an ad for a local guy who picks up and sells used appliances. I contacted him and told him he could have it for free if he picked it up, so now it's finally gone!


I also bought a wonderful vintage Craftsman joiner on Thursday. I usually don't have much luck when it comes to nice old tools, because they are HEAVY, and difficult to move (remember that I don't own a vehicle). Since my Mom's latest car is now tiny (she went from a mini-van to a hatch-back to a small car) I'm pretty much on my own with these things now. Luckily for me, I took a chance and asked the seller if he'd be able to deliver it, and he was more than happy to drive it down (from just out of town) if I was interested in it. He even said I could plug it in and test it out, and that if I didn't want it, that it was okay as long as I'd help him load it back in his truck.
:D
So he came down and I was really happy with it (it's in excellent shape and works well - it just needs the blades to be sharpened), and the price was great.
I've wanted a joiner for a while now. I would have preferred something larger, but larger is just harder to move around, and I don't really need it to be much bigger.
It's a pretty small machine (maybe 3 feet long) but it's solid cast iron, and with the stand and motor, it probably weighs close to 100 lbs.

For those who aren't familiar with woodworking tools, this is a tool that is used to trim (and square-up) the rough edges of boards. It is extremely useful when you want nice flat square edges to glue several boards together. It can also be set to trim at an angle, and you can do fun stuff with it, like tapered legs.
More garage updates soon.
I won't be re-posting all the photos here, simply because there are over 120 photos and a lot of text, so I will just post a before and after of the chair to whet your appetites:
Chair Before:
Chair After!:
Here are the links to the chair, and the matching settee (the settee was done first, and you should see that piece first since there are details done on the settee that are not shown again for the chair).
http://lefebvreupholstery.blogspot.ca/2014/04/fully-restored-eastlake-settee-red-toile.html
http://lefebvreupholstery.blogspot.ca/2014/04/fully-restored-eastlake-chair-red-toile.html
I'm also not sure if I ever shared with you guys the beautiful antique sofa that we redid (also for the same client, who has a ton of antiques). I really loved how this one turned out, and there was a lot of work involved in that one (so many coils to string, plus some frame repairs):
http://lefebvreupholstery.blogspot.ca/2014/03/wonderful-antique-sofa-bold-orange-dark.html
In that post you get to see me and my boss, Pierre, covered in feathers after we had to redo the seat cushion. This is the finished sofa. I love the fabric, and it would have looked great in my living room.
***
As for house renovations, I'm currently working on repairing the 28 foot long exterior wall of the garage. For now, I'm just cleaning up, and making room to work. Some of you who have been reading for a while will remember that a good section of this wall (almost half of it) is completely rotted and almost ready to collapse. You can see how much of a sag there is in the roof in this photo from my bedroom window. Compare the roof line to the siding on the neighbour's house.
I actually measured the sag of the roof last night, and it's surprisingly not as bad as I had thought. The lowest dip (the part shown above) is about 2 inches low.
Just yesterday, I was able to finally get rid of the old washing machine that was in the basement washroom when I first bought the house in April 2010. I had wheeled-it up into the garage with a dolly, and it's been sitting there for the past 4 years. I wasn't sure if it worked, since I hadn't used it, but I knew the motor worked. I hated to just throw it away or have it scrapped, so I saw an ad for a local guy who picks up and sells used appliances. I contacted him and told him he could have it for free if he picked it up, so now it's finally gone!
I also bought a wonderful vintage Craftsman joiner on Thursday. I usually don't have much luck when it comes to nice old tools, because they are HEAVY, and difficult to move (remember that I don't own a vehicle). Since my Mom's latest car is now tiny (she went from a mini-van to a hatch-back to a small car) I'm pretty much on my own with these things now. Luckily for me, I took a chance and asked the seller if he'd be able to deliver it, and he was more than happy to drive it down (from just out of town) if I was interested in it. He even said I could plug it in and test it out, and that if I didn't want it, that it was okay as long as I'd help him load it back in his truck.
:D
So he came down and I was really happy with it (it's in excellent shape and works well - it just needs the blades to be sharpened), and the price was great.
I've wanted a joiner for a while now. I would have preferred something larger, but larger is just harder to move around, and I don't really need it to be much bigger.
It's a pretty small machine (maybe 3 feet long) but it's solid cast iron, and with the stand and motor, it probably weighs close to 100 lbs.
For those who aren't familiar with woodworking tools, this is a tool that is used to trim (and square-up) the rough edges of boards. It is extremely useful when you want nice flat square edges to glue several boards together. It can also be set to trim at an angle, and you can do fun stuff with it, like tapered legs.
More garage updates soon.
Monday, April 21, 2014
Small Project Updates
So as I mentioned the other day, I did some stripping for a few small projects, and here they are!
First off, it's nothing too exciting, but it was a *LOT* of work, and I want to show it off: the living room heating grate. It still needs the thumb latch, and I'm getting a copy cast for it:

Next is the inlay maple desk/table. I can't tell you how thrilled I am to finally have some semblance of a proper desk after 4 years of dealing with a rickety card table. I also took the opportunity to thoroughly vacuum the floor, clean out the computer (inside) case, and clean all the wires.
The desk turned out pretty well. The finish isn't perfect (since it's hand-brushed), but it should be quite durable. I like the edge a lot better without the brown paint, and I also fixed the drawer and replaced the runner boards.
The only problem now, is that my office chair (which I reupholstered last week) is now too low (the lift on it is broken). So I need to fix it, since the desk is now about 2" taller than before. Two inches doesn't sound like much, but it's a big difference.

You can see the office's matching heating grate in these next two photos.


Additional notes: There was a bit of a burn mark in the wood which is still a bit noticeable in the photo above, but it's not enough to bother me. I also decided not to do any modifications to the top (I had thought of routing another profile on the edges, or sanding it flush to eliminate the double bead, etc. I also didn't bother to do any veneer repairs (there was one large-ish chip). Instead, I just used wood filler in a light golden yellow, and it was a close enough match to do all the little chip and nick repairs.
First off, it's nothing too exciting, but it was a *LOT* of work, and I want to show it off: the living room heating grate. It still needs the thumb latch, and I'm getting a copy cast for it:
Next is the inlay maple desk/table. I can't tell you how thrilled I am to finally have some semblance of a proper desk after 4 years of dealing with a rickety card table. I also took the opportunity to thoroughly vacuum the floor, clean out the computer (inside) case, and clean all the wires.
The desk turned out pretty well. The finish isn't perfect (since it's hand-brushed), but it should be quite durable. I like the edge a lot better without the brown paint, and I also fixed the drawer and replaced the runner boards.
The only problem now, is that my office chair (which I reupholstered last week) is now too low (the lift on it is broken). So I need to fix it, since the desk is now about 2" taller than before. Two inches doesn't sound like much, but it's a big difference.
You can see the office's matching heating grate in these next two photos.
Additional notes: There was a bit of a burn mark in the wood which is still a bit noticeable in the photo above, but it's not enough to bother me. I also decided not to do any modifications to the top (I had thought of routing another profile on the edges, or sanding it flush to eliminate the double bead, etc. I also didn't bother to do any veneer repairs (there was one large-ish chip). Instead, I just used wood filler in a light golden yellow, and it was a close enough match to do all the little chip and nick repairs.
Saturday, April 19, 2014
Stripping
Most of yesterday was spent stripping. Not the sexy kind of stripping, though, the messy kind.
I have several projects that need stripping, and I've been putting them off for a while (mainly due to the weather, since I need SOME ventilation).
Some of the projects include:
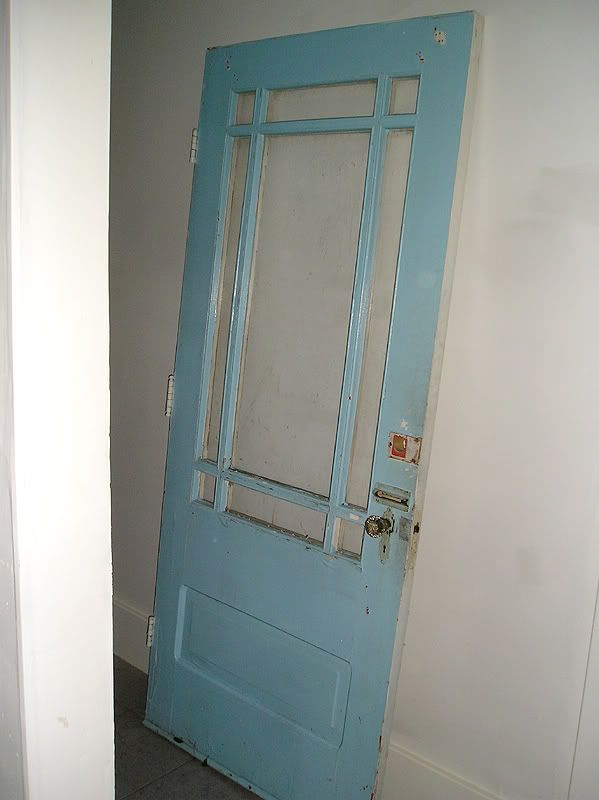
- Antique front door
- Two antique chairs (needing new upholstery)
- The living room heat grate
- An antique (1920s or 30s) cedar chest
- The maple table/desk
- The antique Eastlake walnut desk
- Several clocks
- Etc., etc., etc...
There's no way I could handle all these in just one day (it takes hours), so I worked on a few items that have been driving me nuts, namely the maple inlay table/desk, and the living room heating grate (which you might remember had a TON of old paint sloppily applied).
No photos on the table yet, but that was a fairly simple stripping job, since everything comes apart into many small flat pieces (4 legs, 4 aprons, the drawer, and the top). The grate, however, was another story.
The grate was a huge pain in the rear to strip because of all the nooks and crannies. I had to mostly slather it in stripper, and cover it with cellophane to sit for a while. Considering how strong the chemical stripper is, I'm surprised that the cellophane doesn't melt into goop, but I've seen this trick elsewhere, and it worked well.
Grate before (as purchased from an antiques salvage store):

And after stripping, and new paint. I should have taken a photo of the grate stripped (it was a beautiful flashed copper look and in decent shape), but I was tired and looking forward to getting it DONE.


Note: The interior is flat black, with the front parts in gloss white. These are just standard oil based spray paints, applied in several coats.
Not shown are the 2 interior flaps (lever operated shutter), which also had to be stripped, buffed clean of rust, and repainted (also in flat black). Next, I will need to have a new latch cast for the one that's missing. I hope this won't be too expensive, but at work we know a guy who knows a guy who does casting, and he had done a few copies of antique dresser pulls for us, and they were gorgeous. The set of 2 pulls (with back rosettes) was something like 60$ for the 4pcs. I only need one piece, so I'm hoping it will be under 50$, since I can buy a whole other grate for 50$.
I have several projects that need stripping, and I've been putting them off for a while (mainly due to the weather, since I need SOME ventilation).
Some of the projects include:
- Antique front door
- Two antique chairs (needing new upholstery)
- The living room heat grate
- An antique (1920s or 30s) cedar chest
- The maple table/desk
- The antique Eastlake walnut desk
- Several clocks
- Etc., etc., etc...
There's no way I could handle all these in just one day (it takes hours), so I worked on a few items that have been driving me nuts, namely the maple inlay table/desk, and the living room heating grate (which you might remember had a TON of old paint sloppily applied).
No photos on the table yet, but that was a fairly simple stripping job, since everything comes apart into many small flat pieces (4 legs, 4 aprons, the drawer, and the top). The grate, however, was another story.
The grate was a huge pain in the rear to strip because of all the nooks and crannies. I had to mostly slather it in stripper, and cover it with cellophane to sit for a while. Considering how strong the chemical stripper is, I'm surprised that the cellophane doesn't melt into goop, but I've seen this trick elsewhere, and it worked well.
Grate before (as purchased from an antiques salvage store):
And after stripping, and new paint. I should have taken a photo of the grate stripped (it was a beautiful flashed copper look and in decent shape), but I was tired and looking forward to getting it DONE.
Note: The interior is flat black, with the front parts in gloss white. These are just standard oil based spray paints, applied in several coats.
Not shown are the 2 interior flaps (lever operated shutter), which also had to be stripped, buffed clean of rust, and repainted (also in flat black). Next, I will need to have a new latch cast for the one that's missing. I hope this won't be too expensive, but at work we know a guy who knows a guy who does casting, and he had done a few copies of antique dresser pulls for us, and they were gorgeous. The set of 2 pulls (with back rosettes) was something like 60$ for the 4pcs. I only need one piece, so I'm hoping it will be under 50$, since I can buy a whole other grate for 50$.
Saturday, March 29, 2014
My Settee Project (Part 4) Finishing The Settee
Note: Originally posted this past Sunday (March 23rd).
The settee has been finished and brought home for a week now (Monday the 17th) and I've been procrastinating about writing-up this last part.
I was excited when my fabric came in. It came in around 3 in the afternoon, and I waited until work was done (4:30) to open it, unroll it, and look at it. I was really lucky to find that although I had ordered only 5 yards, they had sent approximately 7 because it was the end of the roll. As it turns out, I end up needing those two extra yards!

The pattern was a bit brighter and more "lime green" than I had thought, but otherwise, it was pretty much what I was expecting.
Continuing with my seat stuffing, I fixed the cotton (removed some from the front) and finished my rough cover.

Next, I prepared and sewed my cover. Originally I wasn't going to have a piping running across the front edge, but Pierre suggested that I put one to "square-up" the look of the seat.
Because there's a piping there, I wanted to match-up my fabric band. Basically, because there's a sewing there (the seat cover is 3 pieces consisting of the main seat, the piping, and front band) you lose an inch of the pattern if you use the same piece because of the 1/2 inch seam allowances. In order to match the pattern, you need to cut both pieces (main seat and front band) from two separate places on your fabric. Does that explanation make sense? Basically you need to waste quite a bit of fabric to avoid having the pattern mismatched at the piping seam.
To make things even worse, I cut my front band WRONG the first time (the pattern ended up in the wrong spot), which wasted most of 2 yards of fabric that could have been used as my side arms or possibly the back panel. I was very upset with myself, but we carefully planned out the other pieces, and it turned out okay.

Once the seat fabric was finally put together properly (photo above) and tacked in place, I started working on the back. It's at this point that I realized that all the added height of the finished seat made it VERY difficult to add the webbing, burlap, and other "foundation" work on the frame. It should have been in place after the springs were covered, and the edge roll was reattached, but before any stuffing was done on the seat.
It was difficult to do, but I managed to get the back webbing and burlap installed.
Next was redoing the "lumbar roll". This was a padded roll of straw wrapped in burlap. I have never seen one like this, and neither had Pierre. It serves as extra support at the base of the back. I simply transferred the straw into a new burlap sleeve, and sewed it shut on 3 sides.

It was then tacked on the bottom rails, and hand-stitched to the back burlap/webbing (as before).

Here's a detail. Also note the added piece of webbing on the arm. Originally the fabric was just pulled around the burlap and stuffing of the side arms, but having a webbing here (folded in half) helps add a lot of strength in this area. Other sofas often have a wooden rail here for this purpose.

Re-installing the horsehair and moss padding.

After the moss/horsehair was a layer of new cotton, followed by the rough muslin cover.

Finished fabric:

Work on the arms was next. Burlap was added (tacked only on 3 sides - none where the webbing strap above is), followed by the original horsehair padding. This was the only photo I got of this step.

I reused some of the original cotton for the arms. I had wanted to do the same for the back panel, but it was unevenly worn, and I didn't use it there. The reason: the old cotton is more compacted, and has fewer gritty imperfections than the new stuff. It's also a bit thinner, and I wanted to keep the arms relatively "slim".

Patterns were cut from the existing old covers (beige stripe ones) and used on the rough covers as "test fitting" since they don't need to be 100% perfect. This is prior to nipping and tacking them in place.

Rough arm covers installed:

Some adjustments were made to the patterns, and applied to the finished arm panels. These are also made of 3 pieces (top "wing", piping, and lower arm). These were matched and mirrored for height, but not matched with the back panel (which I could have done if I were super picky, and if I had a lot more fabric to work with). Additionally, the top wings were loosely matched with the arm as best as possible (the arm end where it meets the wing has a large curve, so getting a match is difficult). The left arm has a near perfect match because of the large leaf pattern that flows well into the bottom piece, but the right one was harder to match.
Side note: the seat's front band had been only temporarily tacked, since the arms wrap around under it.

Finished inside arms, along with the finished front band. This shows the piping being installed around the perimeter.

Side panel installed. Note: these are always tricky to install. There is a combination of 4 different fixing methods used on this single side panel:
- Cardboard "blind tacking" strip along the top horizontal section of the arm.
- Ply-Grip (a flexible metal edging) used along the curve of the wing top.
- Metal tacking strip along the front edge (basically a metal bar with nails in it, where the fabric is wrapped-over and tacked down).
- And a simple row of staples tacked down the backside of the sofa, as well as on the bottom edge.

Next, the back panel.

I wanted to stick with historic materials, so I used stretched burlap panels as a stiffener here.

The shallow curve was carefully tacked using cardboard strips (along the top), and metal tacking strips on both sides.

The last step was the bottom fabric. I used our "better" bottom fabric, which we use on our antiques, and hand tacked it in place.

ALL DONE!


Finished sofa as seen in my living room (note that the colours from the shop above are closer to the actual colours, and they look darker/dimmer in my house photos below).


The settee has been finished and brought home for a week now (Monday the 17th) and I've been procrastinating about writing-up this last part.
I was excited when my fabric came in. It came in around 3 in the afternoon, and I waited until work was done (4:30) to open it, unroll it, and look at it. I was really lucky to find that although I had ordered only 5 yards, they had sent approximately 7 because it was the end of the roll. As it turns out, I end up needing those two extra yards!
The pattern was a bit brighter and more "lime green" than I had thought, but otherwise, it was pretty much what I was expecting.
Continuing with my seat stuffing, I fixed the cotton (removed some from the front) and finished my rough cover.
Next, I prepared and sewed my cover. Originally I wasn't going to have a piping running across the front edge, but Pierre suggested that I put one to "square-up" the look of the seat.
Because there's a piping there, I wanted to match-up my fabric band. Basically, because there's a sewing there (the seat cover is 3 pieces consisting of the main seat, the piping, and front band) you lose an inch of the pattern if you use the same piece because of the 1/2 inch seam allowances. In order to match the pattern, you need to cut both pieces (main seat and front band) from two separate places on your fabric. Does that explanation make sense? Basically you need to waste quite a bit of fabric to avoid having the pattern mismatched at the piping seam.
To make things even worse, I cut my front band WRONG the first time (the pattern ended up in the wrong spot), which wasted most of 2 yards of fabric that could have been used as my side arms or possibly the back panel. I was very upset with myself, but we carefully planned out the other pieces, and it turned out okay.
Once the seat fabric was finally put together properly (photo above) and tacked in place, I started working on the back. It's at this point that I realized that all the added height of the finished seat made it VERY difficult to add the webbing, burlap, and other "foundation" work on the frame. It should have been in place after the springs were covered, and the edge roll was reattached, but before any stuffing was done on the seat.
It was difficult to do, but I managed to get the back webbing and burlap installed.
Next was redoing the "lumbar roll". This was a padded roll of straw wrapped in burlap. I have never seen one like this, and neither had Pierre. It serves as extra support at the base of the back. I simply transferred the straw into a new burlap sleeve, and sewed it shut on 3 sides.
It was then tacked on the bottom rails, and hand-stitched to the back burlap/webbing (as before).
Here's a detail. Also note the added piece of webbing on the arm. Originally the fabric was just pulled around the burlap and stuffing of the side arms, but having a webbing here (folded in half) helps add a lot of strength in this area. Other sofas often have a wooden rail here for this purpose.
Re-installing the horsehair and moss padding.
After the moss/horsehair was a layer of new cotton, followed by the rough muslin cover.
Finished fabric:
Work on the arms was next. Burlap was added (tacked only on 3 sides - none where the webbing strap above is), followed by the original horsehair padding. This was the only photo I got of this step.
I reused some of the original cotton for the arms. I had wanted to do the same for the back panel, but it was unevenly worn, and I didn't use it there. The reason: the old cotton is more compacted, and has fewer gritty imperfections than the new stuff. It's also a bit thinner, and I wanted to keep the arms relatively "slim".
Patterns were cut from the existing old covers (beige stripe ones) and used on the rough covers as "test fitting" since they don't need to be 100% perfect. This is prior to nipping and tacking them in place.
Rough arm covers installed:
Some adjustments were made to the patterns, and applied to the finished arm panels. These are also made of 3 pieces (top "wing", piping, and lower arm). These were matched and mirrored for height, but not matched with the back panel (which I could have done if I were super picky, and if I had a lot more fabric to work with). Additionally, the top wings were loosely matched with the arm as best as possible (the arm end where it meets the wing has a large curve, so getting a match is difficult). The left arm has a near perfect match because of the large leaf pattern that flows well into the bottom piece, but the right one was harder to match.
Side note: the seat's front band had been only temporarily tacked, since the arms wrap around under it.
Finished inside arms, along with the finished front band. This shows the piping being installed around the perimeter.
Side panel installed. Note: these are always tricky to install. There is a combination of 4 different fixing methods used on this single side panel:
- Cardboard "blind tacking" strip along the top horizontal section of the arm.
- Ply-Grip (a flexible metal edging) used along the curve of the wing top.
- Metal tacking strip along the front edge (basically a metal bar with nails in it, where the fabric is wrapped-over and tacked down).
- And a simple row of staples tacked down the backside of the sofa, as well as on the bottom edge.
Next, the back panel.
I wanted to stick with historic materials, so I used stretched burlap panels as a stiffener here.
The shallow curve was carefully tacked using cardboard strips (along the top), and metal tacking strips on both sides.
The last step was the bottom fabric. I used our "better" bottom fabric, which we use on our antiques, and hand tacked it in place.
ALL DONE!
Finished sofa as seen in my living room (note that the colours from the shop above are closer to the actual colours, and they look darker/dimmer in my house photos below).
Subscribe to:
Posts (Atom)