
It seems so slow, though, since a project like this could have been thrown together in 2 days at work. Especially since all the panels were already made.
Anyhow! The bookcase is nearly done now. I can't do much more on it until I get more sand paper.
If you want to get caught up on this project before I go any farther, check out part 1 here: http://my1923foursquare.blogspot.ca/2013/02/cherry-bookcase-project.html
Alright, when I left off last time, I was still deciding whether or now I still wanted to reuse the original euro hinges, but I decided to scrap those in favour or some more appropriate hinges. I'll also note that if I had kept the other hinges, I would have needed some blocks inside the cabinet's frame to hold the clips for the base of the hinges, and they would have been in the way for the books and shelves (not practical).
I decided to just route-away some rectangular sections and patch the holes with a matching rectangular block of cherry glued in place. It doesn't look that pretty, but the new hinges hide it partially, and it's not visible on the exterior.
Next, I started to rebuild the face frame. The sides and bottom were easy, but I had to calculate the exact width for the middle brace, and the height for the top ones.

Since all the current pieces on the front and sides are sun-bleached (and permanently messed-up), I used matching blocks of wood from other parts of the old cabinet, so that I'd have a continuous "sun-bleached line" going around the top of the cabinet. I have a photo and a bit more of an explanation farther down.
Face frame done, and door edges routed with a 3/8" rabbet around the 4 interior edges. I'm still deciding if I want to use those large wood knobs.

Here's that sun bleached line I'm talking about.

Basically, cherry is well known for it's sensitivity to sunlight. If you're working in a workshop that has natural light, you need to be very careful with cherry. If, for example, you place a board of cherry in the sunlight with a square lying on it, in as little as a few hours you will end up with an L shaped shadow permanently printed onto your wood plank. Likewise, if you have a pile of cherry boards near a window, everything in the sun will darken, and you will end up with shadow lines along the edges of your boards. At our old shop (which had lots of south facing windows), we quickly learned to throw old blankets on top of piles of cherry pieces.
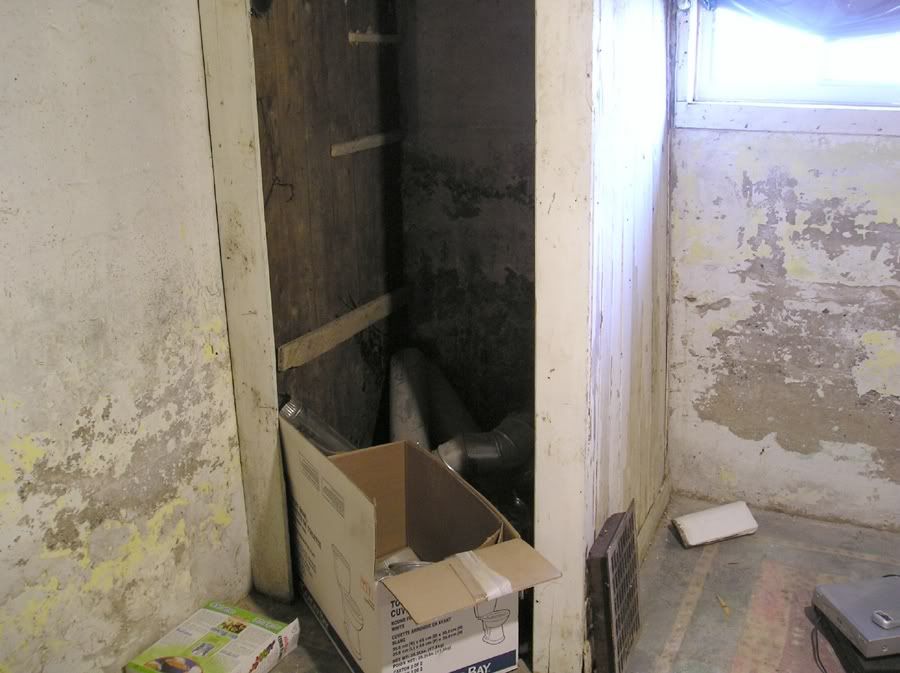
You *CAN* sand some of the discolourations out, but it's tedious, and a lot of the time the exposure is fairly deep into the wood. In the case of this cabinet, there used to be a really wide (and ugly) moulding along the top of the cabinet (now removed). You can see the moulding here:

This moulding was covering the wood for YEARS. In the photo with the sun-line above, I already sanded the pieces down through the varnish to bare wood, and the line isn't going away. To get around this problem, I milled a small bead moulding to cover the line. There will still be a difference in the shade of the wood on each side of the bead, but it's not noticeable and all the lighter wood sections will eventually darken (basically everything will end up matching in a few years). You can see the bead detail farther down.
Next, I ordered some hardware for the cabinet: 2 locks, 2 keys, 2 escutcheons large enough to cover the sun-bleached knob locations, 4 3/8" offset hinges, and some shelf hardware. My order came up to around 66$ but I also had some knobs for the bathroom vanity, and 2 barrel bolts for the Office built-in with the order. So we'll say 40-50$ish. That's about all I'm spending so far on the entire project, plus a few nails, screws, and varnish.
While I was waiting for the hardware to arrive, I decided to plane down a whole bunch of old scrap wood t-g boards from around the house. A lot of this old wood could have been used for clock repairs, antique reproductions, or other projects, but then again I still have a lot more wood, and this is a CHERRY bookcase, so I decided to go ahead and use the old wood. This was mostly boards that were part of the basement "corner shanty" which you can see in this old photo. The entire thing was a crooked, useless mess and I took it down.
Most of the boards were either warped, cracked, painted, or all of the above.

For the back boards, I needed these 3/4" boards planed down to 1/2", Not too bad; only 1/4" to remove off a few boards, right?
Yeah...

Huuuuuuuge pile of saw dust, and it probably took at least an hour.
And here's a quick preview of what those old boards look like. They are random widths, and I plan to add a bead detail on them (I haven't done that yet).

Next was the base. At first, I was going to make just some simple (haha yeah right) turned bun feet, but I really didn't feel like doing all the glue-ups for the blanks, cutting them to size, setting up the lathe, and turning them (especially in the freezing cold), so I abandoned that idea. I remembered that I still had a box full of cherry off-cuts from the old woodworking company I worked at. I found 4 pieces just large enough to make the sides and front feet.
Picking a design was hard. I'm VERY picky with details (as I'm sure you've noticed if you've been reading for a while), and I spent a few hours looking through some of my furniture books, internet auction photos, and searching the web. I didn't find exactly what I wanted, but I did get a few ideas. These next two (horrible) photos show 2 foot options that I drew-up. The photos are upside down, since the cabinet was lying on its top.
Too fancy:

A little too plain/angular:

The third design turned out well, and I cut them out on my scroll saw (not the best tool for this job, but it worked out alright). I'd suggest using a band saw, or a jig saw (I have neither, since my vintage jig saw kinda crapped out on me).


The entire bottom skirt and mouldings are all held together with mitres, biscuits, and lap joints, along with a few glue blocks and screws, followed by a bunch of sanding and a bit of puttying.
With the base done, and enough wood pieces set aside for the top, I noted that I might have enough wood to make an upper cabinet to sit on top. I really like the idea of a very tall (nearly floor to ceiling) bookcase, so I might try to get it done. The only issue is that I don't have cherry for the shelves and the back for the upper cabinet, so the interior would either need to be painted pine (since I'm not spending a crapload of $$$ on cherry for this), or carefully stained pine (to look close to cherry/mahogany). I'm leaning heavily to a painted interior. Maybe light green, beige, or light blue (something historic that pairs nicely with cherry).
This would be the approximate size of an upper case. I'd make some fancy glass panel doors for it. I could make it a bit taller if I also added 2 drawers, but that's also adding a LOT of extra work.

Hardware received and installed (door hinges and locks):

Top glued up. The top is a scrap section of 5/8" cherry veneered particle board with 3/4" x 3" mitred boards on the three exterior edges (biscuits again).

And finally, here's where I'm at today. The top is now routed and sanded on the bottom side. What's left to do is just to sand the top (on the good side), sand the doors, and then mill and install a cove or ogee moulding to go along the top edge of the cabinet (to transition between the cabinet and top where the blue arrow is, and also to hide the screws). I just need to make a trip to "the big orange box" and get some sand paper discs.
I'll also need to finish-up the back t-g boards, and cut 3 simple shelves.

Lookin' pretty good for a pile of "scrap", right?
It's looking very good for a pile of scrap. I have all kinds of nice wood scraps; too bad I can't do this with them. I don't have the skills. =(
ReplyDeleteYou did a great job! All the kinds of work/crafts (the same thing really) lol How in the world do you have time for it all? But thanks so much for sharing. It's fab.
ReplyDeleteWell, I'm currently unemployed, so I've got all the time in the world. I was expecting to get back to my old job in January, but that didn't happen, and there's still nothing. It's not looking too good.
DeleteHaha! Love the pile of sawdust. What do you do with it? The cabinet looks really good. I'm eager to see the finished piece.
ReplyDeleteThe sawdust is going in the trash. I have no use for it, and there's a very high possibility that the paint on it was full of lead. The sawdust we usually have at work ends up going to local farmers, but I don't have anyone in town who'd pick it up (that I know of), and I very rarely have much sawdust to get rid of.
DeleteI'm more eager to put the cabinet to use than to see it done (finishing is always my least favourite part of any woodworking project. The only problem is that the cabinet is going into the Office, and the spot where I want it to go is currently occupied by my old bed and mattress (which will eventually go in the guest bedroom - which won't be done for quite a while). I'm not sure where to move the bed/mattress to in the meantime. I might just have to do some "creative rearranging".
Wow JC, well done! You're certainly putting your free time to good use. Hang tight, something will come up.
ReplyDeleteAnyes
xx