Sunday, October 07, 2012

Brief News (Photos & Bedding)

I decided a while back that I wanted to have some sort of large photo collage (or at least many framed photos of friends and family), so I went to Wal-Mart and got 48 photos printed out. I also bought a fairly inexpensive 24 photo frame.

I'm thinking of getting a second one, actually. The problem is that 90% of my photos are landscape, and this frame takes 12 portrait, and 12 landscape, so I'm missing 2 photos to finish this frame. I have a ton of extra photos, but none that are portrait style.


So I just went through 100's more of my photos and picked out over a dozen portrait ones, and I'll go back tomorrow (if it's open), and get those printed, along with a few others.

In other news, this is the bedding set I bought the other day, next to my curtain fabric. It's nearly the same brown, but I wasn't intentionally trying to match anything. The comforter set comes with 3 pillows, and the other two (not pictured) are hideous.

Saturday, October 06, 2012

The Most Amazing Dollhouse You'll Ever See

I came across a link the other day while I was catching up on recent posts on Old House Dreams. For those unfamiliar with this wonderful site, it's a lady who loves old houses as much as I do, and she shares links to historic homes that are for sale. Some of them are in shambles, and some of them are absolutely amazing, but they are always interesting to look through, and I've picked up a lot of extremely useful information and ideas for my own restoration efforts through browsing the listings and photos. Patterns for leaded glass, design layouts for original kitchens, built-ins, and beautiful old doors, windows, and mouldings.

The site is pretty specifically for old houses, so when I came across a listing for a dollhouse, I was immediately curious. It had to be worth looking at if it was posted on this site.

When I arrived at the site: http://www.historicdollhouses.com/index.html I headed immediately to the photo gallery, and started viewing the slideshow. After a few photos, I had to pause it, simply to be able to absorb the level of detail in this phenomenal house.

The dollhouse is the work of Dustin White, and is based on early American Greek Revival homes built around the 1850s.


The house is entirely hand made, and 100% custom. It has over 4700 pieces, and took about a year and a half to build.

For anyone who is even the least bit interested in old houses, this is an absolute treat to look at.


It has all the details you can possibly imagine in this style house. The cedar roof, side porch, chimney details, attic... It is complete with fireplaces, cast iron wood stoves, hardwood floors, grain-painted doors, and even functional 6-over-6 sash windows and shutters! The icing on the cake is that the house is also electrified with low wattage lighting to simulate old candle light in the fixtures. There are also glowing logs/embers in the fireplaces and old stoves.


I would strongly recommend going through the photo gallery. There are over 150 photos, showing all the rooms. It was hard for me to select just a handful of photos for this post.

As you can probably guess, the house comes at a rather steep price. It is, however, a one of a kind piece of art. It would be wonderful to see it finished with period furniture as well.


***

Having made this post also reminds me that I've been meaning to do a shout-out post for some of my favourite old house blogs. Expect that in the next few weeks.

Friday, October 05, 2012

Progress!

Sh*t got done today! And I'm quite happy to report with photos, too!

Work has been slow lately (not in a good way, either), so we got a 4 day weekend (Monday is Thanksgiving here in Canada). Since I had the day off today, but I knew my boss and his son were going to be in (for phone calls or in case any clients might drop in), I decided it would be a perfect time to do the finishing on my vanity.

I got in to work at my usual time (7:15), and I only left near 2:00pm. I had everything set to be able to do the wet/sand/stain/seal/sand/glaze/lacquer on the vanity (yes those are all the steps involved to get the look I want), but unfortunately, a wrench got thrown into my plans, and Léo (boss) told me that I wouldn't be able to use the spray booth today since the fan belt was busted.

I was still able to do the wet/stain/seal portion of the project, but I was pretty bummed that I wouldn't be able to fully finish the vanity this week.

The stain I decided to use (for the first time) is a water based Aniline Dye. This is a powdered dye that you mix with hot water to make a stain. The amount of powder you use determines the intensity of the colour, and you can mix and match different powders to create just about any colour you want.

Water based dyes have drawbacks (as do traditional oil based stains). One of these is that you need to pre-wet the entire project, and leave it to dry (which took less than an hour - surprisingly), then re-sand the whole thing. This is to pre-raise the grain, before the stain goes on, to eliminate a rough finish, since water swells the wood and gives it a rough texture.

The actual staining was also a bit more of a challenge than a traditional stain. I have about 10+ years experience with stains and finishes, so I didn't have too much trouble, but a novice would have had a nightmare of a time getting a beautiful, even colour.

The instructions suggest staining a light "first coat", followed by a second, stronger coat, but I skipped this, going straight to the full-strength colour with no issues.

It's a lot more work than with a regular stain, but I think the results are more than worth the trouble, especially when dealing with figured woods (curled grain, bird's eye, etc). The dye REALLY makes the variances in the grain POP, unlike a regular stain, which more often than not, will mask the grain, and make things come out more even and "blah".

Here's a teaser photo of the finishing up to this point. The colour is not 100% accurate, since this was in bright light, and with fresh (wet) sealer applied. There will also be a dark glaze added in the cracks/crevices, which will be the next step.

The actual colour is less orange, and appears darker (see other photos below, where the vanity is in the background).

Look at that magnificent grain! I showed it to Léo, and he wasn't that fussy about it, which kind of surprised me. What do you think? Gorgeous, or is it just "too much"?


So while I was working on that, and in between stuff drying, I decided to finally build the doors I need for the rest of the built-ins. These would be the two glass doors for the office display case built-in, and the door for the linen closet upstairs.

Here's the set of 2 doors for the office. They will have some sort of fancy glass insert that I'll make at some point. (Note vanity):


Here's the linen closet door. I'm actually not happy with how it turned out. In hind sight, the frames should have been thicker, and I should have done 5 panels, but it's too late, and I'm not making another one. Once it's painted and installed I'm sure it will look just fine. I STRUGGLED with the decision between raised panels (like the vanity door above), or flat panels, like the original house doors. I decided to go with flat panels for all the built-ins. This will match the little mini door in the office, too. More than likely, I'll also go with flat panels on the new house doors (same as the originals), but when it comes to the kitchen cabinets, those I'll do with raised ones the same as the vanity. That seemed like the best plan.


Lastly, I did some shopping. I went and picked up some black-out fabric (4m/yards) for my roman blinds (which was only 1.50$/m). I also picked up 4 Velcro strips (on sale 50% off) to use along the top of each curtain panel, so that they can be yanked-off and cleaned. In total, that cost only 14$!

I also popped-in to Zellers and had a look around (they had a bunch of stuff on sale, too). They had some nice bedding sets on sale and I REALLY wanted to buy this particular set (with birds), but they only had it in a double.


But I did end up getting a different one. It's brown with a bluish grey pattern that looks a bit reminiscent of Gothic scrollwork. This one wasn't on sale, but the set was only 49.99$ (no photo yet).

Sunday, September 30, 2012

Paint Is Like Magic

It's simply amazing how much a simple coat of paint can rejuvenate something that started out looking like complete garbage.

I'm not usually a fan of painting wood, and I avoid it as much as possible, but in the case of that grubby little cabinet, it was needed.

I went to Home Depot last night with my Ottawa friend, and I picked up one of the only remaining (and easily available) oil paints on the market: Tremclad Rust Paint. It comes in very limited colours, but they had a decent selection. I went with a gloss "dark grey" (which is much more of a "steel blue" if you ask me) for the interior, and a gloss "sand" colour for the exterior. It should look quite nice once I finish painting it, and it finally dries.

Friday, September 28, 2012

September Update (Part 2 - Woodworking Stuff)

Alright, Part 2 will focus on woodworking projects.

Earlier this month, or possibly late July, I was approached by a neighbour from down the street from whom I had bought a nice old (damaged) Black Forest clock. He was wondering if I'd be interested in buying an old cedar chest. I had told him I'd go have a look at it sometime. He spotted me while I was painting the porch, and I told him I'd go have a look that evening.

As it turns out, it was a rather nice Walnut veneered chest by the Roos company, and it was in... restorable condition.


I had never heard of the company before, but they made some really beautiful (and well made) chests. One style in particular is made to look like a wonderful early American dresser.

Anyways, I decided to buy it because the interior was in pristine shape. The chest has all the original hardware, and it still has both original keys still stapled on the inside!


The paper labels on the lid are also in perfect shape.


The interior of the bottom section is fitted with the patented "Guardex" system. Basically it's a perforated cardboard liner that is meant to let the cedar breathe, while keeping your clothes from direct contact with the wood.


The chest is not without its drawbacks, though. In the photo above, you'll note that the tip lid isn't currently attached to the base. This is because both lid stays are broken (but I can re-weld them), and the hinges are unscrewed. You'll also note that the portion over the lock is all chewed-up. This is not visible when the lid is closed.

Additional issues are two broken turned feet. One has the missing segment, one doens't. There is also a section of moulding missing, and one detached. The entire bottom skirt is also all coming apart, and the top needs a veneer repair along the back edge. It also needs refinishing.

Fortunately, I got it for 40$. I think it was well worth it. It will look nice at the foot of my (currently nonexistent) bed, and it will match my other walnut furniture.

***

Projects that I worked on today (I had the day off), were some baseboards in the L Room, and this cabinet below.

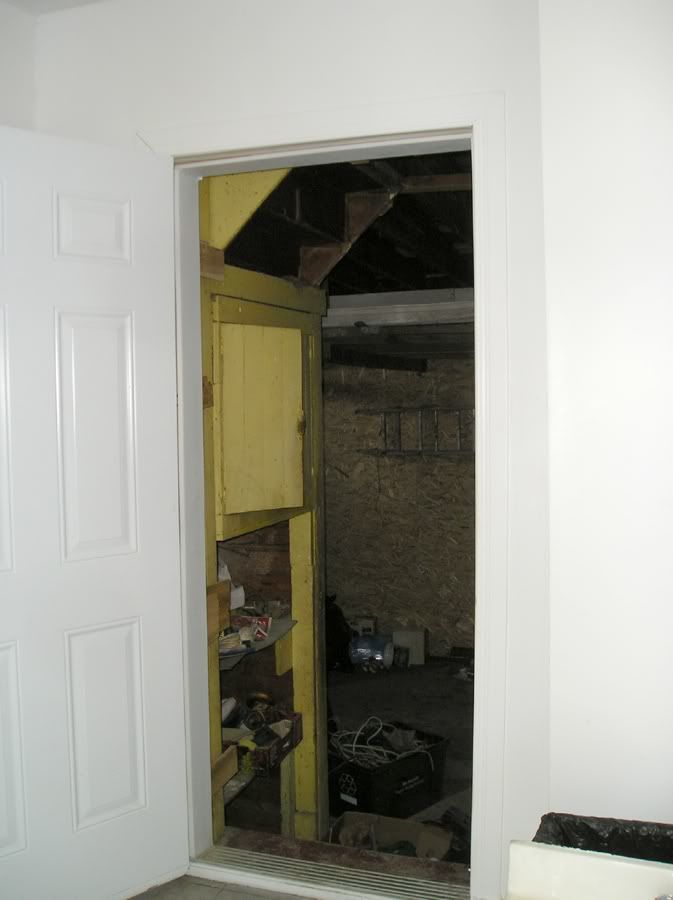
I don't know weather of not you guys (and gals) recall, but this little yellow cabinet had been installed between the stairs in the garage, leading up to the second storey spare bedroom.

You can see it in this early photo of the house:


The cabinet is VERY rustic, and it's been sitting on the garage floor for months. I had thought of just throwing it away, but I decided to take another look at it, and see if I could spruce it up a bit.

Here are the initial photos. It had been missing the bottom rear stretcher, but I found an old piece of scrap wood that was EXACTLY the right size/width/length to fit, so I reattached it.


Very simple t-g doors.


The interior is partially painted, partially rough sawn wood, and t-g.


A very crappy repair was made to the side to hold the hinge for the left door. I'll be fixing this, but keeping the rustic feel. The sides are painted a greenish navy blue.


Someone scratched-in what looks like "Mike/Michel/Michael Rox" on the left door. There is also some faded-out black marker on the bottom board that looks like "???ting Place ?????" (see first photo).


After some small repairs, and a few nail holes filled, I decided that this little cabinet deserved a bit of trim. Nothing too fancy, since I wanted to keep the rustic look. I decided to route a round-over on a scrap of rough sawn pine for the base, and to finally use some large cove moulding that I've had in my wood bin for years, just waiting for that "special project" where I'd need it. I nailed the mouldings in place and scratched/dinged/antiqued them.

The reason for the trim is mostly for looks, but also to hide the ends of the t-g boards that make up the top and bottom of the cabinet.

I think it looks pretty awesome now! I just need to repair the left door (the hinge edge is all rough and cut-up, and that top block "repair" is a mess.


Once I have that repaired, I'll be ready to paint it! I want to strip the hinges and handles, and then paint it on the inside and outside in glossy oil paint (since I have no idea what kind of old paint is currently on it).

Any colour suggestions? I'm partial to green, blue, and red, but I'm open to just about any colour... Mint green? Navy Blue? Light yellow again? What about the inside? Off white, or something fun like bright blue or red?

September Update (Part 1 - Misc Stuff)

Alright, I have quite a few photos that I want to post, so I'm doing it in two parts.

In house news, last weekend, I finished glazing the porch door (which turned out wonderfully), and after a week, it seems fairly dry enough to paint (not like last time when it was still very squishy after nearly a month of drying). I need another can of the exterior porch paint, so I can't finish painting the door until then (I'll go this weekend for the paint). I also need to re-order some slot head brass screws. I'm quite pissed about this. Earlier this summer, I had bought some "size 8" brass screws, and I had assumed that the heads would be the standard size, which is the size of all common deck screws. However, when I tried them in my hinges, they are closer to a size 7, which won't fit.

Last week, my friend from Ottawa visited. She had a favour to ask of me (which I already knew about ahead of time), which was to repair her aquarium. Basically, she just moved earlier this month, and after the move, the aquarium developed a small leak.

I had never done any kind of aquarium repair, but apparently they're only held together with "more or less" regular (but good quality) silicone. The thick, sticky, goopy kind. She bought/provided the special "aquarium sealant" which is basically just clear silicone. I've done a sh*t-ton of caulking after becoming a homeowner, so this was a piece of cake to do.

The only hard/annoying part was to painstakingly scrape off the old silicone. This was done with a glass scraper with a new blade in it. It took several passes with a lot of force/pressure on each joint.

I didn't redo all the seams, and instead focused on all the vertical (thin) seams, which seemed to be the problem ones.

After waiting 2 days, and filling it up, I'm happy to report that it's now leak free (and looking quite wonderful if I say so myself).


I'm actually amazed at the amount of water/weight that this aquarium holds. It's a 33 gallon, which (according to Google) holds 245Lbs worth of water! It took 7-8 mop-pails full (the blue one in the picture) to fill the tank. I'm just amazed that the glass doesn't bow-out and shatter under the weight. Everything seems perfectly fine (and sturdy), so I guess it's fine.

When she came down with her aquarium, she also brought with her the fabric I had picked out for my curtains!

I've already mentioned that it's the Ikea "Stockholm" in Beige (which is actually more of a grey-brown. The only problem with the fabric is that the pattern doesn't go up to the edge. It's 60" wide (and I need 28" for the width of the windows, plus seam allowance), but the pattern leaves a rather wide blank area on each side. I had thought of cutting it perpendicular, but that would make the pattern sideways, and then I'd have a dark area at the top/bottom of each panel, which is worst.

So... I'll just have to "make it work". I don't really mind the asymmetrical look that it'll have, but at least I have 4 windows and I can pair them.


These were some other fabrics that I had looked at in town.

I really liked this one (especially the colours), but I found that the pattern was too busy.


This one was kinda cool, but way too thick and heavy for Roman Blinds.


Nice, but too "matchy-matchy" with my wall colour.


Fun, but a bit too retro for me.


I *REALLY* liked this one, which reminds me a little bit of "toile" fabric, but it was too thick...


...and it was 20$/m! :(


Onto another topic. Remember the Rankin Apartments (I keep mentioning them, since I walk by the building weekly). Well a few weeks ago, I spotted more doors by the dumpster.


That's a rather beautiful door, but I didn't take it for several reasons. Reason 1 was that the entire other side was blackened by fire damage (badly). Reason 2, Condition: The door had been refitted with a more modern knob, and it looked like it had been kicked-in at some point, with damage to the main edge, and big slivers broken off. The glass panels were also all smashed.

What I *DID* save, though, were the wonderful ball-tip hinges! These are very thick QUALITY hinges. They also had half the original screws on the door side (obviously). These are "flashed copper" or "Japanned" copper hinges. I have no freakin' clue why they would call these Japanned, but I've seen the term used several times. Basically they are copper with darker blotchy areas, kinda like an animal print look.

The door behind it was a crappy (modern) busted-up screen door.

There was also (against the building) a damaged old door, so I took the lockset/handles from it.

Weeks earlier, I had also "stolen" a primitive light fixture out of one of the back porches. Nothing fancy, just a porcelain ceiling "disc" a spiral wire, and a socket (from the 20s/30s). I wasn't sure if I should take it, but I was pretty sure that the back porches were going to be torn down. This past week, I was happy to see that I was right. The one fixture was the only one available (or left), otherwise I would have klepto-ed more of them.

These are the back porches I'm talking about (which are no longer there):


More in Part 2.

Wednesday, September 19, 2012

Quickie Update

Not much going on lately. I'm still working on the porch door (I need to go pick up some glass for it), and I'll hopefully be getting fabric for the Master Bedroom curtains thanks to a friend of mine who lives in Ottawa (she knows who she is, and she rocks!) The fabric is from Ikea and it's called "Stockholm" in the beige tint. Basically it's a leaf and berry pattern (line work) in white on a beige background.

Also, I've tested out my aniline dyes (samples) that I was thinking of using for the vanity and I wasn't that thrilled about how they turned out (considering all the extra work involved), so instead, I'll be using a regular oil based stain in a dark mahogany (reddish brown). The colour is a special mix called "Cherry on Maple" (I note this here mainly for my own references).

The only other bit of news that I don't think I mentioned yet is that last Friday I picked up some keys. I had the Yale "night" lock re-keyed on the antique door (the salvaged one that was complete and in good shape), and had 3 keys cut for it, and I also got an antique style (but generic) skeleton key fitted to the lock for the porch door. This was super fun, and since it's a universal key, it also happens to fit 3 more similar Corbin locks in my inventory. It almost works on several others, but not quite. They did have other styles/shapes of these universal keys available, so depending which locks I end up using, I can get keys for them.

Saturday, September 08, 2012

Porch Door Update & Misc.

I finished the joinery on the window insert for the porch door. It's got quite an interesting range and combination of joinery, and I'm very pleased with how it turned out. It's not perfect, but it's more than adequate, considering it's supposed to look old, and it will get puttied and painted.

I wanted to finish it, and mount it into the door frame, but I ran into an unforeseen problem. I was sure that I had a suitable router bit to do the groove for the glass, but I don't. I have a bit that would work, but the bearing that's currently on it is too narrow, which would make the groove too wide. I want no more than 1/4" and I think it would give me 3/8" (which if a lot if you consider that it's going on two sides of a wooden strip that is only 3/4" wide. It would actually eat up all of the 3/4 and leave nothing left in the centre. I'll either need to buy a different bit (which I'm sure I could use several more times on other stuff), or get a set of bearings, which I can swap on my bits.

While the frame was glued and drying, I also put one coat of paint on one side of the door. It looks pretty damn awesome (if I say so myself), and I can't wait to see the finished product.

So I actually uploaded some photos just now, so this won't be a boring post.

Here's a TEASER for the porch!


Note that the tongue and groove floor boards will later be painted grey like the bottom of the porch. I painted them white for now, since they needed protection, and since the new side pieces needed to be painted before winter/rain, etc. I will paint the porch floor (grey) and the bottom of the porch when I have all the lattice/bottom trim redone, as well as the new steps. It will all go in gloss oil paint (floor paint). That won't be until next year.

***

Here's some of the joinery on the window frame. All of this was done with just a table saw, a HAND SAW AND MITRE BOX, and a chisel. Very basic stuff. I was still able to get nice tight joints, with a good amount of accuracy. A lot of stuff was measured by eye (going off the frames, etc).

The centre bar, as well as the two dividing bars that make up the 4 top panes were done with dowel ends. These are ONE PIECE. They are basically a mortice and tenon, but I just used a 1/2" round hole, and I cut the tenon on the ends into a rough circle.


The top horizontal rail is done with a bridle joint on each end. The side stiles (vertical bars) are done with matching bridle joints in each corner, and a mortice for the centre rail.


The bottom rail is twice as wide, and I wanted to use the same setup in each corner, so I made a combination bridle joint and mortice joint. Note that the tenon is cut shorter, since it doesn't protrude all the way through the side stile (like the bridle joint).


The centre bar is one continuous piece that crosses the centre bar, so here, I used a lap joint.


Here's a detail of the mortice and tenon from the centre bar.


Now, I'll just mention that making a window frame like this is NOT a beginner project. You need a lot of time, patience, and accuracy to end up with a decent end product. HOWEVER, if you have some experience with woodworking, there's no reason why you can't build something like this. The joints used are all pretty simple, and you can easily make test samples (as I did) to check all your cut depths, and heights before cutting your good pieces.

Additional Note: Some of you may notice that the frame is built-up from THREE different wood species. The reason for this is because I used what I had on hand. I wanted to make it entirely out of cedar (like the rest of the door), but I did not have enough usable (straight) cedar. The board I used cupped HORRIBLY when I cut it, and there were too many badly spaced knots for the lengths I needed. Bonus points if you can name the three wood species shown!

And no you don't get to see the full shot of the assembled window yet! :P

***

Here's a photo of that mini access door for the office. It's not attached yet (just sitting there for the photo). I'm not sure if I want to mount it flush like this with minimal hardware (and paint it the wall colour), or if I want to deck it out in mini door trim and paint it white like the rest of the trim, along with antique hardware. Thoughts?


***

Remember this old apartment building that had a fire (over a year ago)?


Well, as suspected, it's being gutted to the studs. I can't say that I blame them, and I don't feel nearly as sad for this building as I do for some of the others. It had nice, but fairly plain trim (inside), and it has some nice old doors (which are getting scrapped soon). The windows where what really made it look its age (1920-1930). These too, are all being changed.

I've been checking the dumpster weekly, and I was able to grab the hardware (hinges and lockset) from an old door (which was badly damaged). I also went with my mom to salvage some of the windows. There were at least 3 pairs of the nice 6 panel minis, but I was only able to find one pair. A lot of the other windows were smashed when they were chucked in the dumpster, but I saved two of the upper 3-panel sashes (in near mint shape).

Here's the transition when they were changing the windows. The only thing I'm sad about is that they didn't make any effort to get matching ones with a fake grille for the upper sashes.


Here's the set of 6 panel doors (which I will make into a wall hanging cabinet or some sort of cabinet). You can also see these in the background in the joinery photos above. Note the original (and VERY LARGE) drip edges. The other surprising part of these is that they were still in use up until last year, but they have absolutely no signs of any weatherstripping. They are literally just hinged, with 2 latches to keep them closed. They must have been VERY drafty.


Here are two of the upper 3 panel ones. The paint on them is a nice pinkish oil paint, and it's still in perfect shape. It looks like they were never repainted in the past 60 years or so.


The next two photos are a bit random, but I thought I'd just post them now.

This is a nice, plain Victorian house in town. I pass by it weekly on my way to do groceries. They have remuddled it, and I have mixed feelings about what they did with the house. Some stuff they did an amazing job (like repainting the porch), other stuff is just awful, like blocking off the second porch door, and adding pot-lights (in the porch t-g), removing interior walls, etc. Overall they're keeping the house well maintained, but they're modernizing it a bit too much.

Ok, that was a bit of a tangent, but yeah, they added these two old enameled street signs. These are very recently added, and they look freakin' awesome. But I'm left wondering where the heck they came from. They look like they're in absolutely mint condition, but they also look EXACTLY PERIOD ACCURATE. They are an identical match to other old ones in town. I think it's possible that they found them (unused) in the house. I'm pretty sure they don't make these anymore (not in this exact style/font anyway). And yes, you can totally go on Google Maps and see the whole house.


I noticed this recently, too. A nearby church - St. Columban's, which is just a few blocks away, is being repainted. It looks like it needed it pretty badly, even though the building/roof looks to be in pretty good shape. I took this at 6am on my way to work, which is why the lighting is dark.


Alright, that's it for now! :D

Friday, September 07, 2012

Vanity Construction - DONE

Alright! I was able to stay after work this afternoon (I could have last week, but the weather was crappy and I had a ride back into town). There wasn't a whole lot left to do, but it still took me around 2 hours to finish up the toe-kick and sand the doors.

I also made a quick mini door for the office (the little access door for the main cable and phone jacks which are in a retarded spot).

So here we go, there's only 2 quick little pieces left to do on it, and that's just a flat length of particle board veneer for the back (inside part) of the toe-kick, and a small piece of maple to act as door stops at the top. Otherwise it's ready for finishing. The exterior will be a dark reddish brown, and the interior will stay clear maple.


I'm also working on the porch door window (right now), and it's taking quite a long time with my limited tools. I'm also making it with REAL traditional joinery, which takes longer (mortice and tenon joints, and bridle joints in the corners).

The rest of the door frame is done, including fitting the lock, hinges, and adding a stop moulding on the front, as well as a drip edge along the bottom.

Photos of the door/window/porch only when it's all done, so you can see the big reveal! I might also be changing the blog's banner to reflect the more recent work on the house.

Monday, September 03, 2012

Porch Door

I spent most of the day working on the porch door today. I hollowed-out the opening for the mortice lock (which took a long time), fit the handle, plates/etc. I also installed the strike plate in the jamb (it turned out really well), then I installed the stop moulding, caulked it, and gave it a coat of paint.

Right now I did the caulking around the door panels, putty-filled some old nail holes, and I'm waiting for this to dry. Once that's done, I can start working on the window for it.