
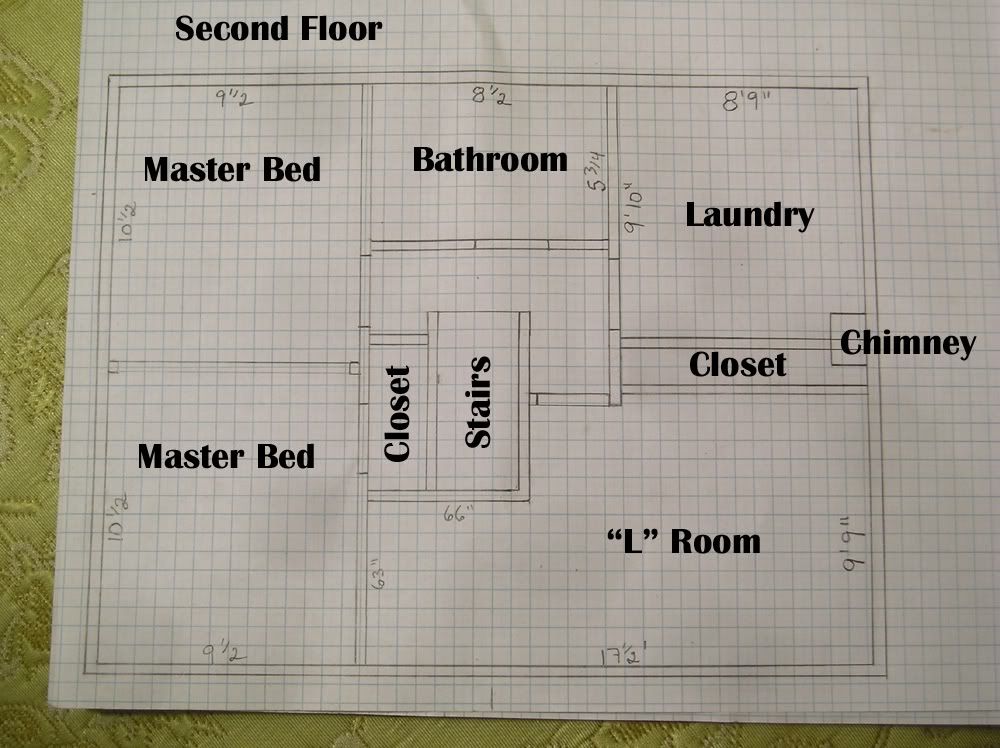
Be warned, this post is image heavy. If you get easily confused and disoriented, I'll try to explain where most of the shots are taken. You can also refer to the floor plan here: http://i1018.photobucket.com/albums/af308/clockmaker15/SecondFloor.jpg
For fun, here are a few before shots from April 2010 (when I first got the house).


Some of you will know that I had already started to tear a bit of it up about a week or so ago, so you know that I discovered that there may have been another room upstairs (6 total original rooms + 4 *TINY* closets).
The first step was to move the furniture out of the way. Once that was done, taking off the click laminate takes only a minute. Under this was loose foam (the MB had it stapled down in one half). I was not that surprised to find that they had just rolled the foam directly over broken and partly removed crumbly "Marbolum" linoleum tiles.

Another view. These are both pointing towards the front of the house, taken from the "laundry room".

Taken from the hallway outside the bathroom:


Taking up the first board revealed something I wasn't expecting. Red. the floor in this room (and only this room) was painted red.

After one more piece taken up, and a bit of sweeping:


This is taken from in the "L room" facing the "laundry" room. The open door (with the bright window) leads down the back staircase to the garage/side of the house (the window, which is one of two, overlooks the roof of the garage).

More plywood gone...


This is standing in the laundry room, and it shows the original layout of the closets, which had super thin walls (thickness of a 2x4 on it's side plus baseboards).

This is the last small section of the original closet, which shows how the wall was arranged. It looks like there was no drywall inside the closet originally, but it's very hard to tell if it was just painted later.

Standing in from of the "centre window" (the one over the porch if you're looking at the front of the house) looking into the room.

From the corner with the furnace vent/cable wire.


You can see exactly where the original wall and doorway(s) used to be.


This is the best photo to show the colour. The floor is also less dirty in this corner. You will notice in all the photos that there are light lines of red in the floor, and dirty black residue. I'm 99% sure that this is from a previous flooring (which I've found pieces of) which was a black tar paper, covered with a one-piece linoleum flooring. The black paper wasn't glued, but from all the walking on the floor, it left residue against the paint.


This will be the last corner left to do, but I have a ton of stuff piled in it at the moment, so I might get to it only in a few weeks.

Are you tempted to return the house to the original floor plan? Or was that too impractical with tiny rooms?
ReplyDeleteIt'd sure tempt me, even though I can't stand small rooms.
And my question would be, are you going to keep the original flooring? For all it's gone through, it looks to be in pretty good shape. I'd replace boards from closet areas.
ReplyDeleteRagnar & Mark:
ReplyDeleteI'm a tad tempted to put the house back the way it was, but it would involve way too much work. I actually like the current layout/room sizes, and I don't really have a use for 4 small bedrooms. If I were to redo it "back to original" I wouldn't remake the closets that small. The originals are only about 16" deep x ~4 feet wide. Pretty useless.
I mentioned previously that the original floors will be preserved/patched/repaired. So far, I've filled all the thousands of nail holes in the master bedroom, and I've patched the floor in the MB in 2 spots, and patched all of the hallway, which was in terrible shape (see about a dozen posts back for the full ordeal).
The last step will be to repaint the floors (I'm using the same colour of brown as what's currently there. It will have a rustic "farm house" feel to it, which will go well with my antiques, clocks, and art. I just hope that the next owner doesn't just cover it up again.
You could take down the exact measurements of the original walls and draw plans so the original footprint won't be lost as you cover up the ghosts with new paint.
ReplyDeleteHi
ReplyDeleteFound your blog a few days ago via Ross. Working my way from the biginning. And I have a couple of questions. :)
Are you sure they are really closets and not something else like built-in bookshelves or something?
Also, why paint the floors? Why not stain and poly for example. I would like to hear your reasoning and thoughts on the matter.
Hi Elin, glad you're enjoying the blog.
DeleteYes I'm 100% sure that these were the original closets. The upstairs originally had 4 bedrooms all the same sizes, with a closet in each. My friend who lives 2 blocks away has the same layout in her upstairs, and she has the original closets still in place. They are about 16" deep, and the doors on them are shorter than the regular house doors. You can see the outline of the closets also in the master bedroom floor. I also do have two of the original closet doors (badly butchered).
Paint on the floors matches what was there originally. It's faster, easier, and hostorically accurate. One other nice thing about the painted floors is that I can keep the worn effect of the floor boards (where you can see the grain patterns). One reason I didn't sand them is that they are only 3/4" boards on joists 20" apart. They are already pretty thin for a floor, so sanding them down would have made them weaker and more fragile. Another reason not to sand is that all the paint would still have been in between all the floor boards, which would not have looked good. If they had been hardwood (like on the main floor) then I would have considered sanding them. I would have also considered sanding them if they were the 1 1/4" thick old style tongue and groove (which you will often see in Victorian homes.
Feel free to ask more questions. I like the feedback.